
How to install and use Active Directory Users and Computers (ADUC)
Aug 26, 2025
Active Directory Users and Computers still handles daily directory work, and the install instructions most administrators learned no longer apply. Remote Server Administration Tools now ships as a Windows capability on current builds, so the old command-line syntax fails. One PowerShell command installs the console on supported Windows editions. Installing the console does not deploy Active Directory.
Active Directory Users and Computers (ADUC) is the Microsoft Management Console (MMC) snap-in behind most daily directory work: resetting passwords, creating and deleting users and groups, and delegating control of directory objects.
The instructions for getting it onto a workstation went stale when Microsoft changed how it delivers Remote Server Administration Tools (RSAT), so a workstation set up by last year's guide often ends up without the console at all.
Administrators use the console for more than those three tasks. Its full range covers:
- Reset passwords and unlock accounts.
- Create, modify, and delete users, groups, and computer objects.
- Add and remove security group members.
- Create and delete organizational units (OUs).
- Delegate control of directory objects.
- Set security and auditing options on individual objects.
The Operations Masters dialog in ADUC also transfers three of the five Flexible Single Master Operations (FSMO) roles between domain controllers, namely the Relative ID (RID) Master, the primary domain controller (PDC) Emulator, and the Infrastructure Master.
Schema Master and Domain Naming Master transfers happen elsewhere, through the Active Directory Schema snap-in and Active Directory Domains and Trusts. The console file is dsa.msc, and it ships inside the RSAT Active Directory Domain Services and Lightweight Directory Services tools.
Searching for a separate ADUC installer turns up nothing from Microsoft. Domain controllers already have the console. On any other machine, add it using the method that matches your Windows version.
What ships with Remote Server Administration Tools
RSAT lets administrators run snap-ins and tools that manage roles, role services, and features on a remote server. It has shipped with the operating system since Windows Server 2008 R2. Starting with Windows 10 version 1809, Microsoft delivers it on Windows clients as a set of Features on Demand instead of a downloadable package.
RSAT installs only on the Pro, Enterprise, Education, and Pro for Workstations editions of Windows. Windows 11 Home and Windows 10 Home don't support it.
The package covers more than one console:
- Active Directory Users and Computers (ADUC): Creates and manages directory objects; most administrators use this console daily.
- Active Directory Administrative Center (ADAC): Manages the AD Recycle Bin and fine-grained password policies, and displays a running history of the PowerShell behind each action.
- Active Directory Module for Windows PowerShell: Supplies the cmdlets for scripted directory administration.
- Active Directory Domains and Trusts: Manages domain and forest functional levels, user principal names (UPNs), and trusts between domains and forests.
- Active Directory Sites and Services: Manages site topology, subnets, and replication.
- Active Directory Service Interfaces (ADSI) Edit: Edits objects and attributes directly, including attributes the other consoles don't expose.
Installing ADUC compared with installing Active Directory
Installing ADUC adds a management console to a workstation or member server. Deploying Active Directory Domain Services creates a forest, a domain, and a domain controller. Administrators land on the wrong guide because both tasks share vocabulary.
A machine with ADUC installed remains a member machine. It holds no copy of the directory database and still needs an existing directory to reach.
To stand up a new domain, see this guide to deploying and setting up a domain controller. For how the directory itself is organized, see this primer on Active Directory basics.
How to check the Windows edition and version first
Check both before you start, since the edition and version determine which install method works. Click Start > Settings > System > About, or right-click the Start menu and select System.
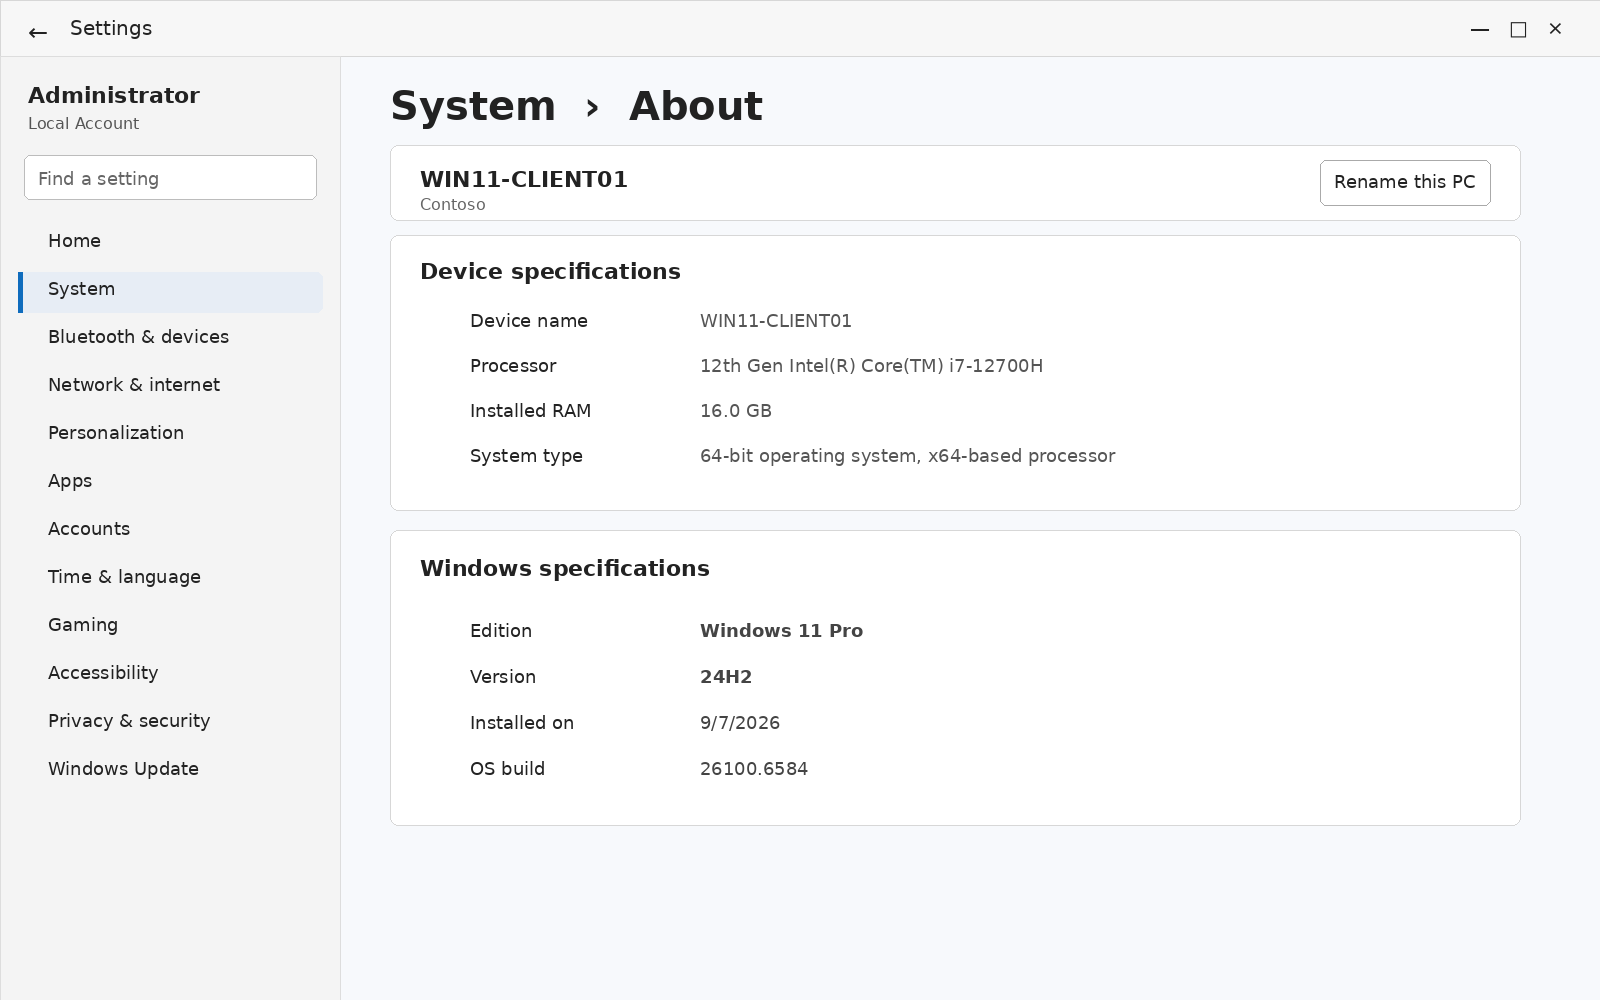
RSAT requires Pro, Enterprise, Education, or Pro for Workstations. A machine reporting Home has no supported path to the console. Builds from Windows 10 version 1809 onward use the Features on Demand method, and earlier builds need the retired standalone package.
Netwrix Directory Manager automates joiner-mover-leaver workflows across hybrid Active Directory and Entra ID without code. Request a demo
How to install ADUC on Windows 11
Windows 11 delivers ADUC as a Feature on Demand. There's no download to hunt for and no package to extract. Confirm the edition is Pro, Enterprise, Education, or Pro for Workstations, sign in with local administrator rights, then use one of the methods below.
Install ADUC from Settings
Go through the Optional features pane; this is the shortest route on a machine you're setting up by hand.
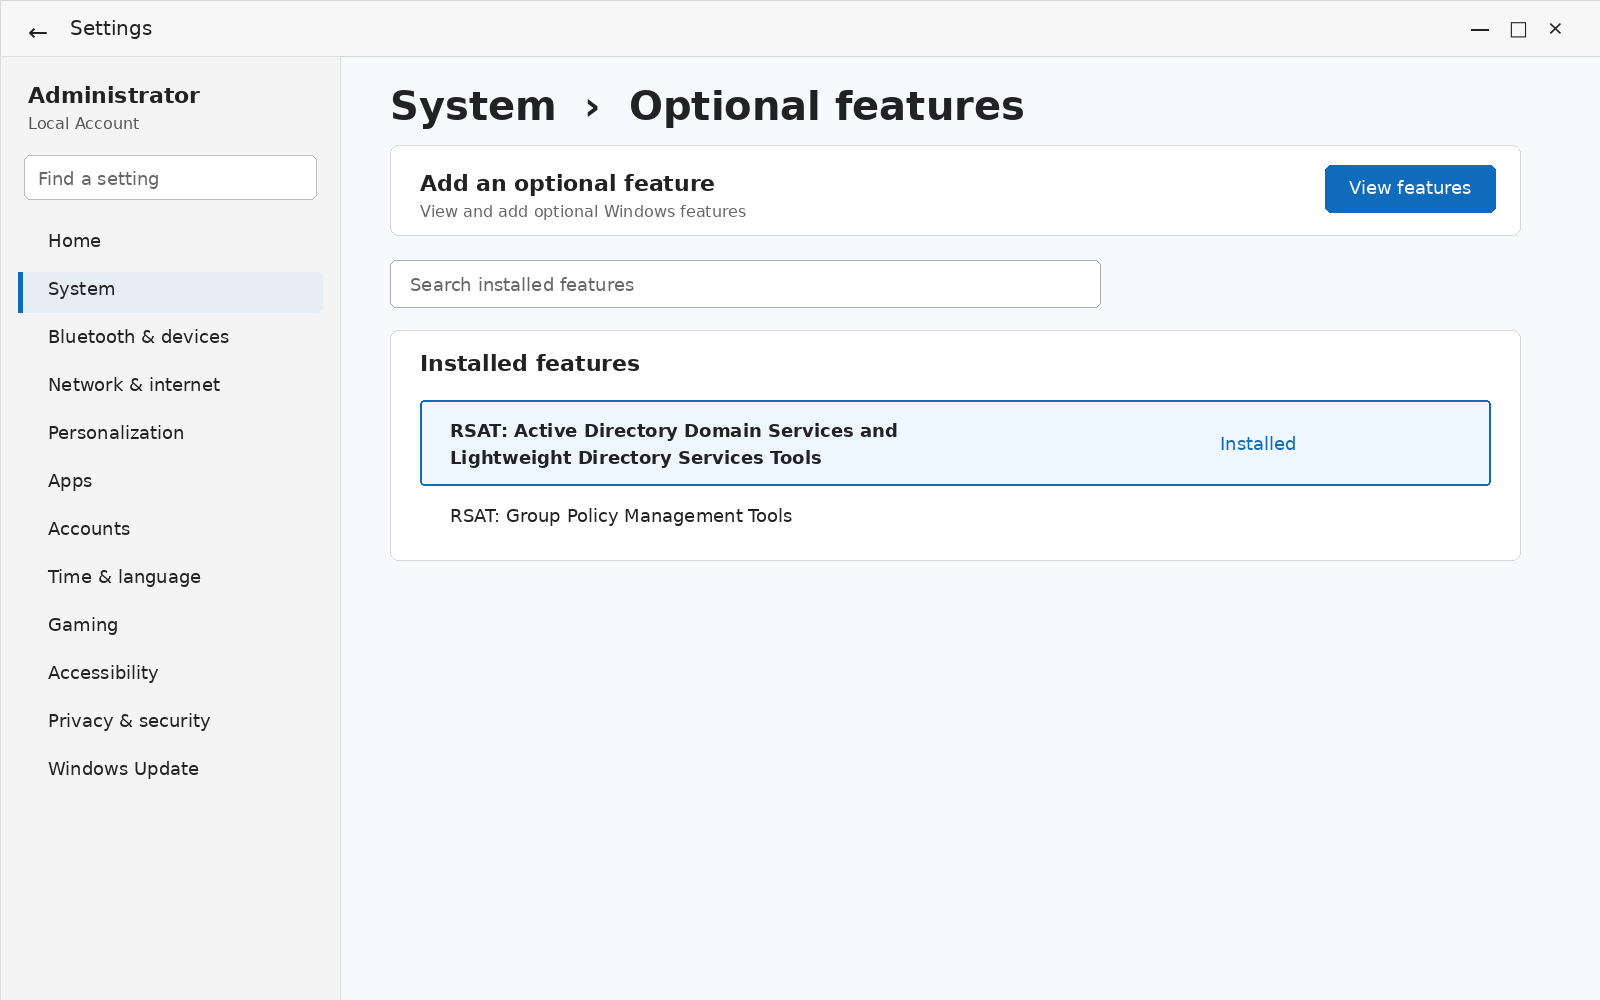
- Open Settings > System > Optional features.
- Next to Add an optional feature, click View features.
- Type RSAT in the search box.
- Select RSAT: Active Directory Domain Services and Lightweight Directory Services Tools.
- Click Next, then click Add.
Running optionalfeatures.exe from the Run dialog opens the older Windows Features panel, a quicker route if you already know your way around it.
Install ADUC with PowerShell
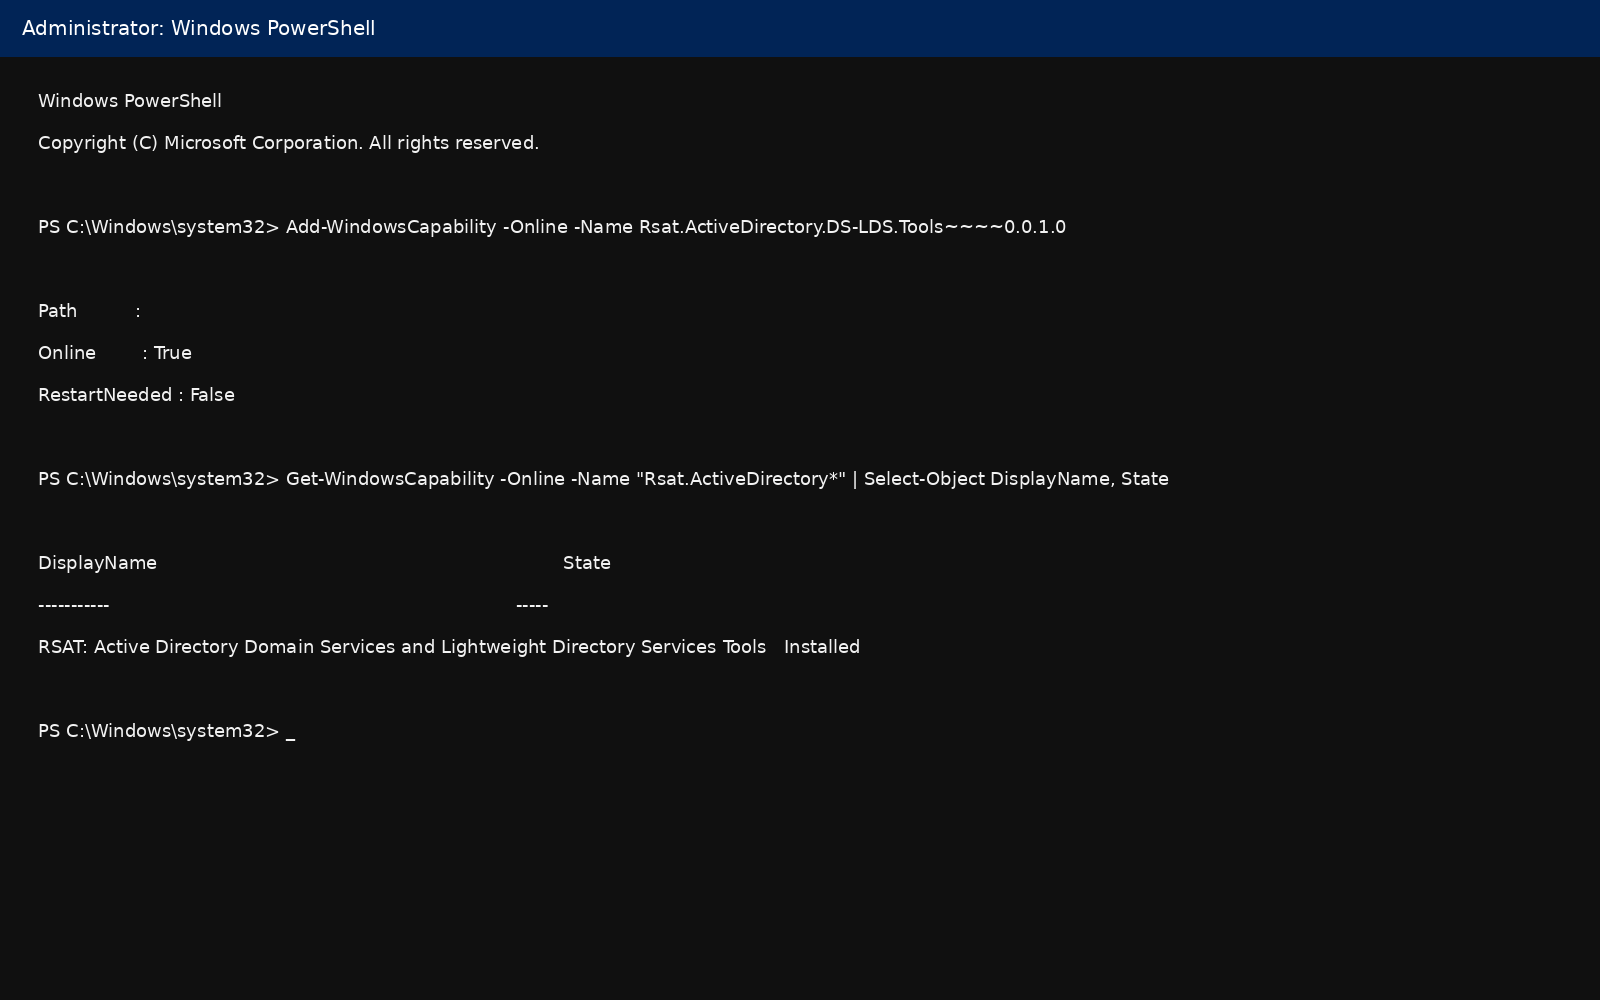
The capability command works on every supported build and suits scripted or repeated installs. Open PowerShell as an administrator and run:
Add-WindowsCapability -Online -Name Rsat.ActiveDirectory.DS-LDS.Tools~~~~0.0.1.0
The capability name uses four consecutive tilde characters, which are easy to mangle when copying. Check them first if the command reports an unrecognized capability.
Confirm the result with:
Get-WindowsCapability -Online -Name "Rsat.ActiveDirectory*" | Select-Object DisplayName, State
Installed means the tools are present. NotPresent means Windows recognizes the capability and hasn't installed it yet. The install usually reports RestartNeeded: False, so a reboot isn't typically required.
Deployment Image Servicing and Management (DISM) installs that capability from an elevated command prompt, which suits scripted builds and imaging:
      DISM /Online /Add-Capability
/CapabilityName:Rsat.ActiveDirectory.DS-LDS.Tools~~~~0.0.1.0
The older dism /online /enable-feature /featurename: RSATClient-Roles-AD-DS-SnapIn syntax belongs to the standalone RSAT package that Microsoft retired after Windows 10 version 1803. It fails on Windows 11 and on current Windows 10 builds.
Arm64 devices are the exception
ARM hardware takes a different route, and the commands above are not the starting point there. Microsoft added Arm64 RSAT support to Windows 11 versions 24H2 and 25H2 in the February 2026 non-security preview update and moved it into the stable servicing channel with the March 2026 cumulative update.
On Arm64, both versions deliver the AD DS and AD LDS tools as optional components rather than Features on Demand, so the entry lives under Control Panel > Programs > Programs and Features > Turn Windows features on or off. Version 26H1 integrates them as Features on Demand and lists them in Settings, matching x64 behavior. On an ARM device still running 24H2 or 25H2, that split is why the entry is missing from Settings on a machine that otherwise meets the prerequisites.
How to install ADUC on Windows 10
Windows 10 version 1809 and later: use the Features on Demand method described above. Windows 10 reached end of support on October 14, 2025, so treat this section as guidance for estates still running it.
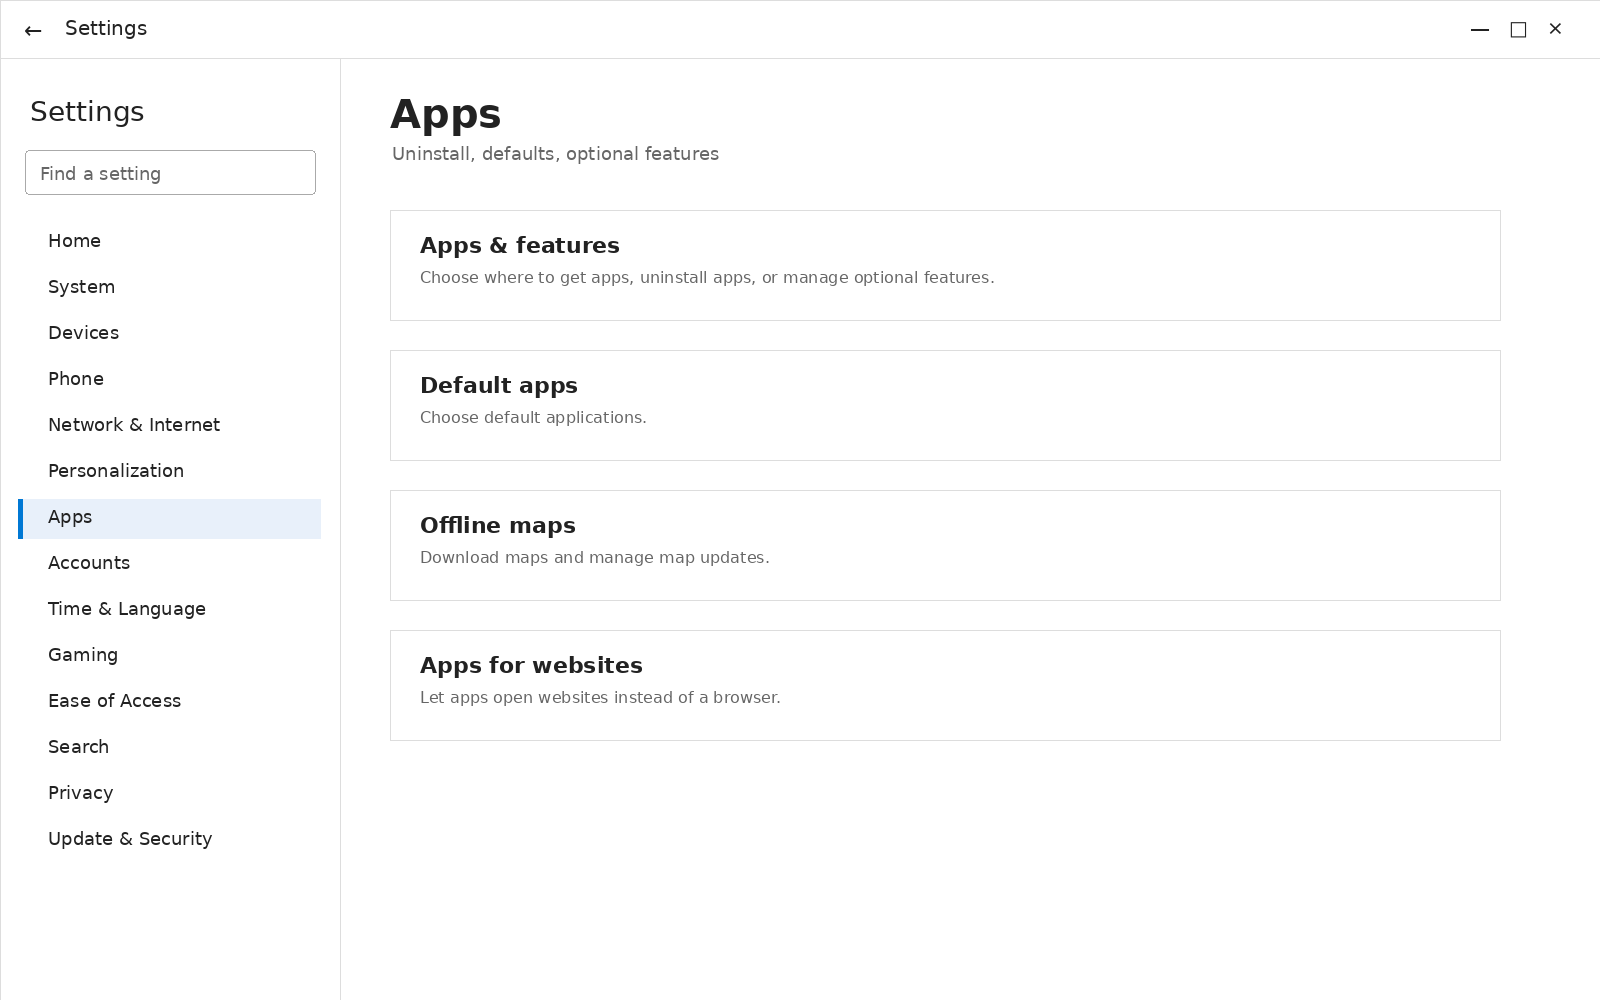
On Windows 10, Settings sits under Apps rather than System.
- Open Settings > Apps.
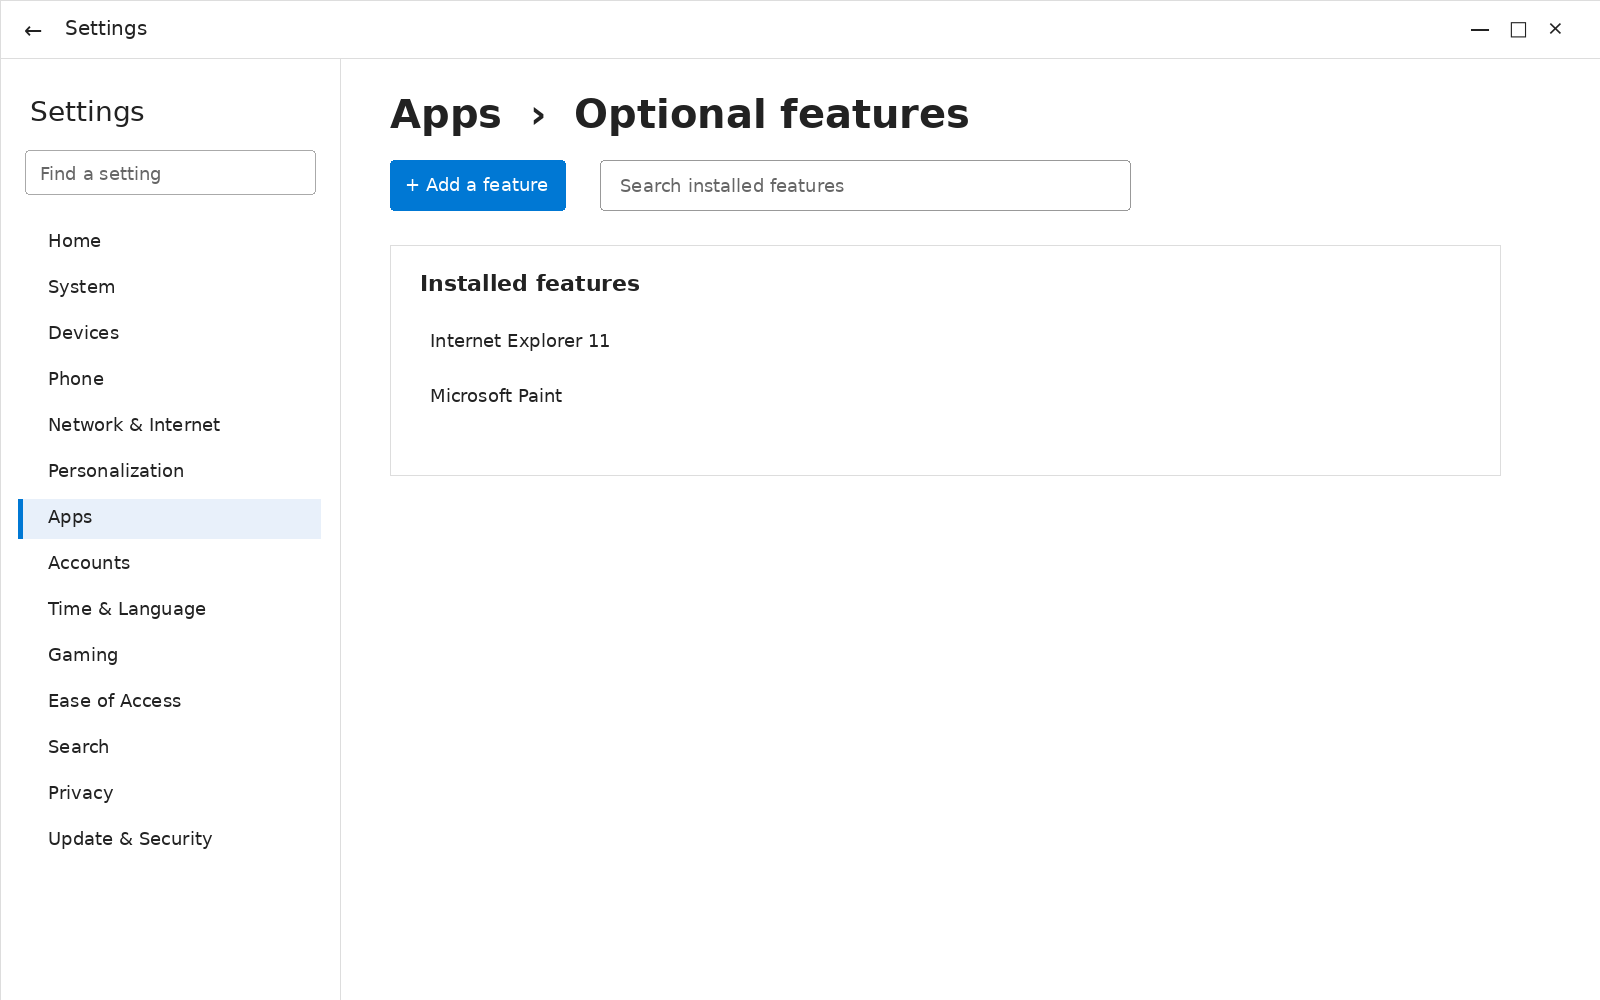
2. Select Optional features, then click Add a feature.
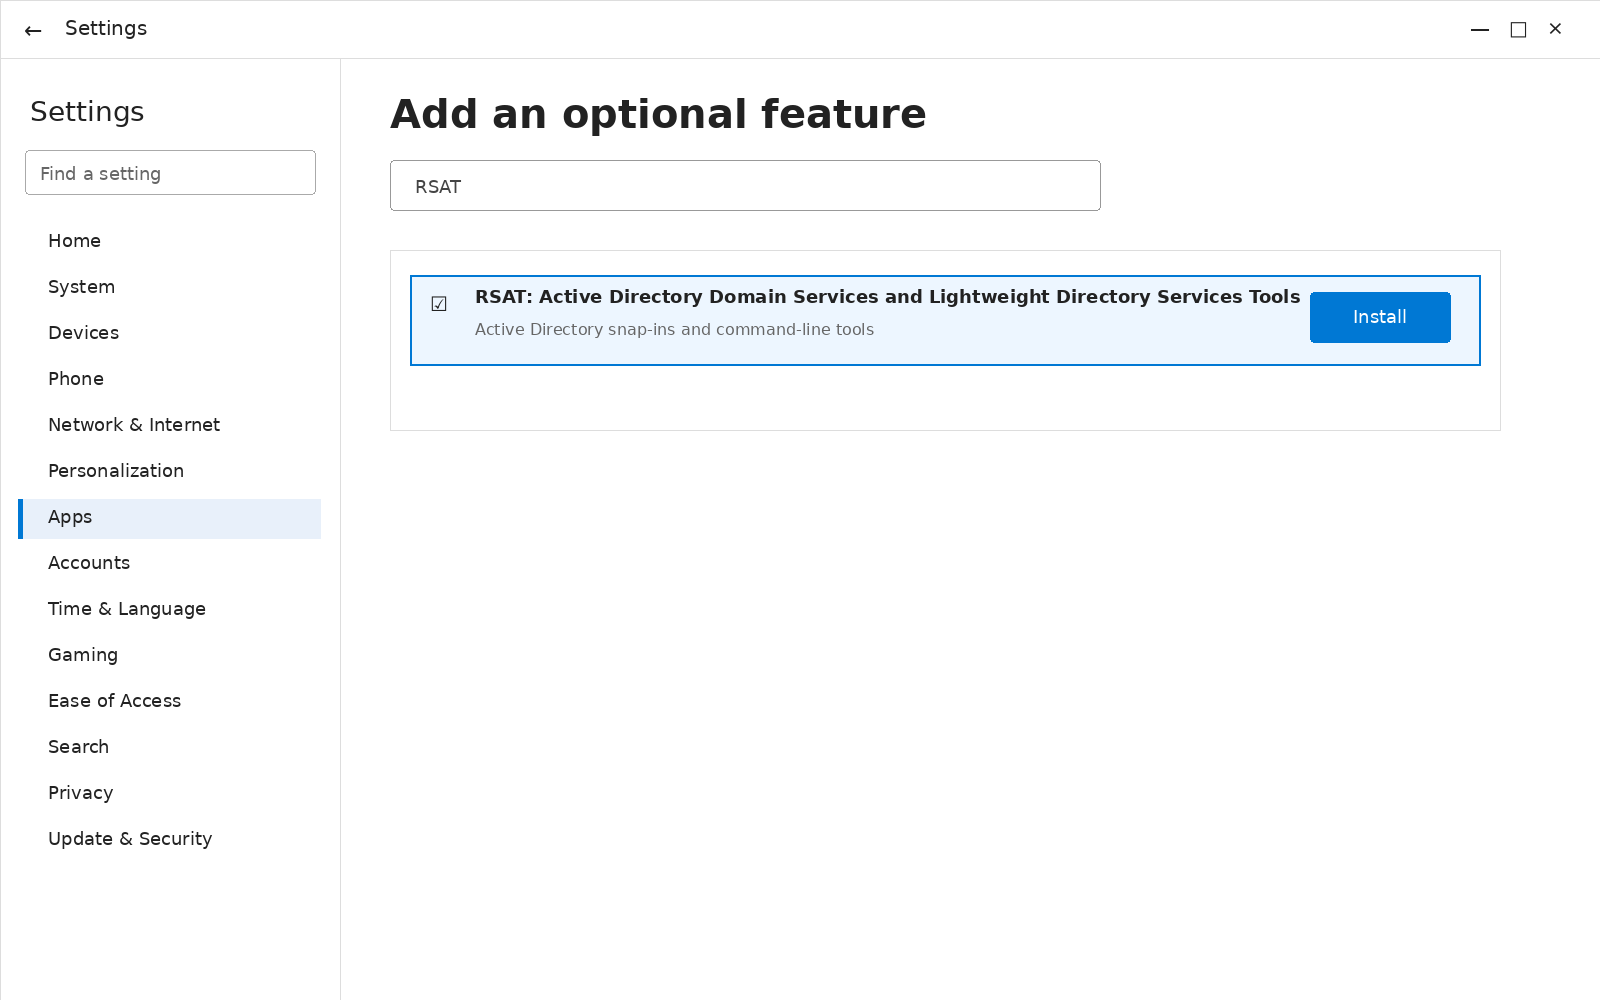
3. Search for RSAT, select RSAT: Active Directory Domain Services and Lightweight Directory Services Tools, and click Install.
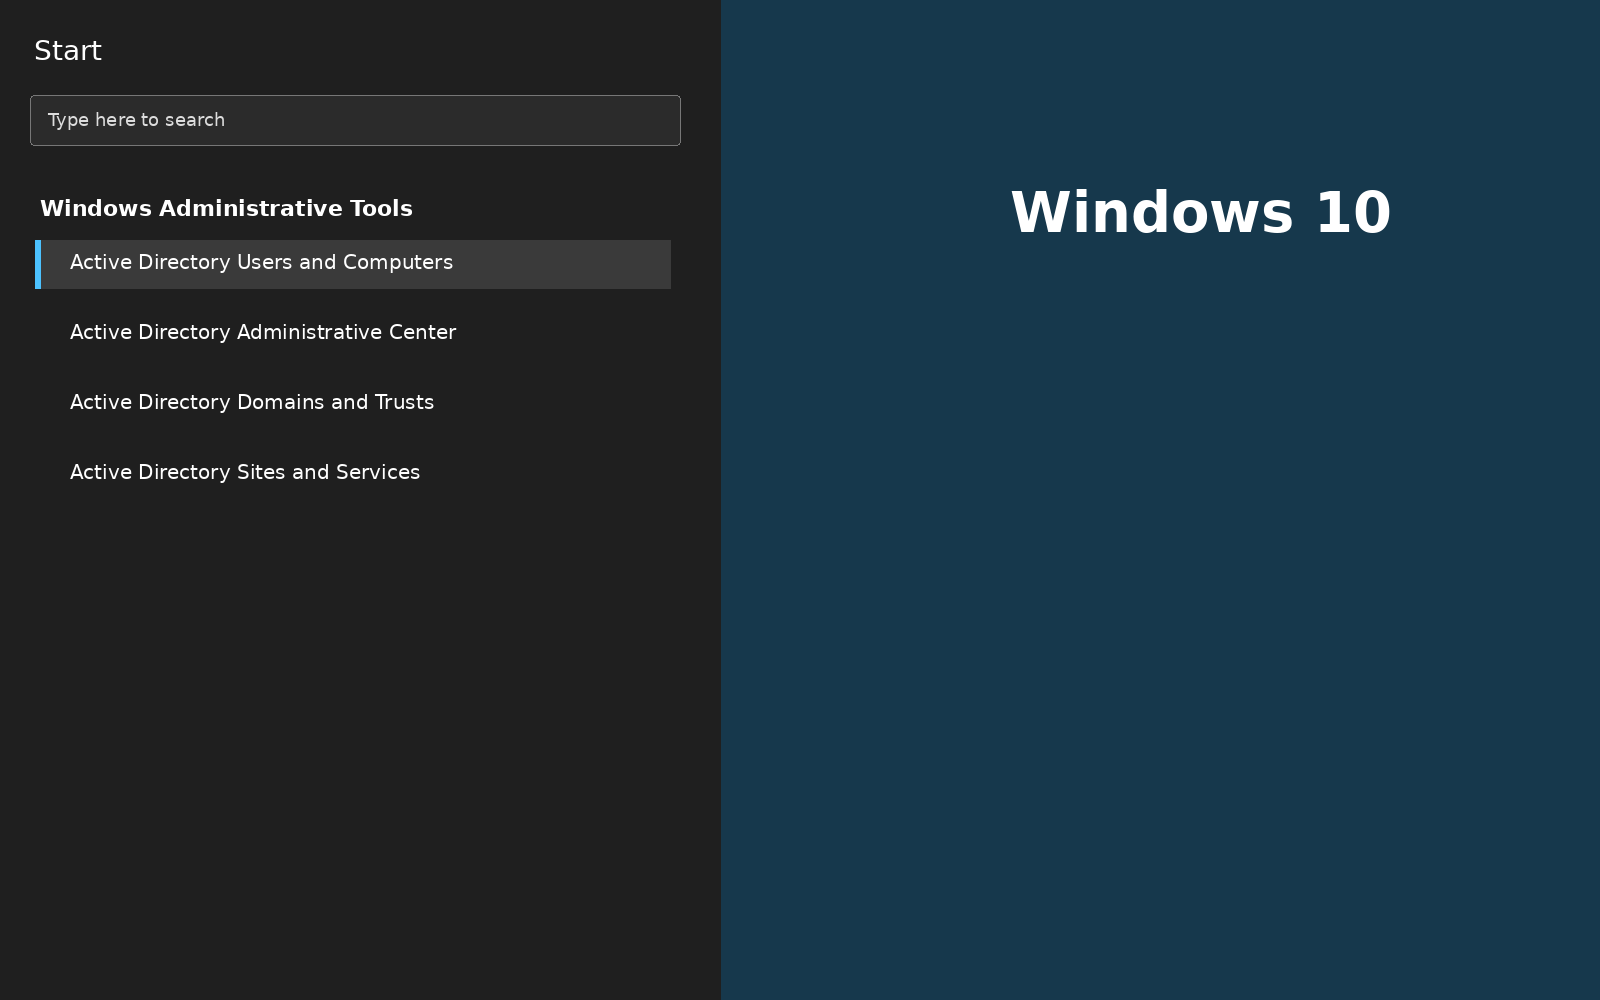
4. Open the Start menu and find the console under Windows Administrative Tools, the folder Windows 10 uses instead of Windows Tools.
Both the Add-WindowsCapability and DISM commands above work the same way on any build from 1809 onward.
Netwrix Directory Manager automates joiner-mover-leaver workflows across hybrid Active Directory and Entra ID without code. Request a demo
How to install ADUC on a Windows member server
Server Manager handles this on Windows Server, and the wizard below applies to Windows Server 2012 R2 through Windows Server 2022 and Windows Server 2025.
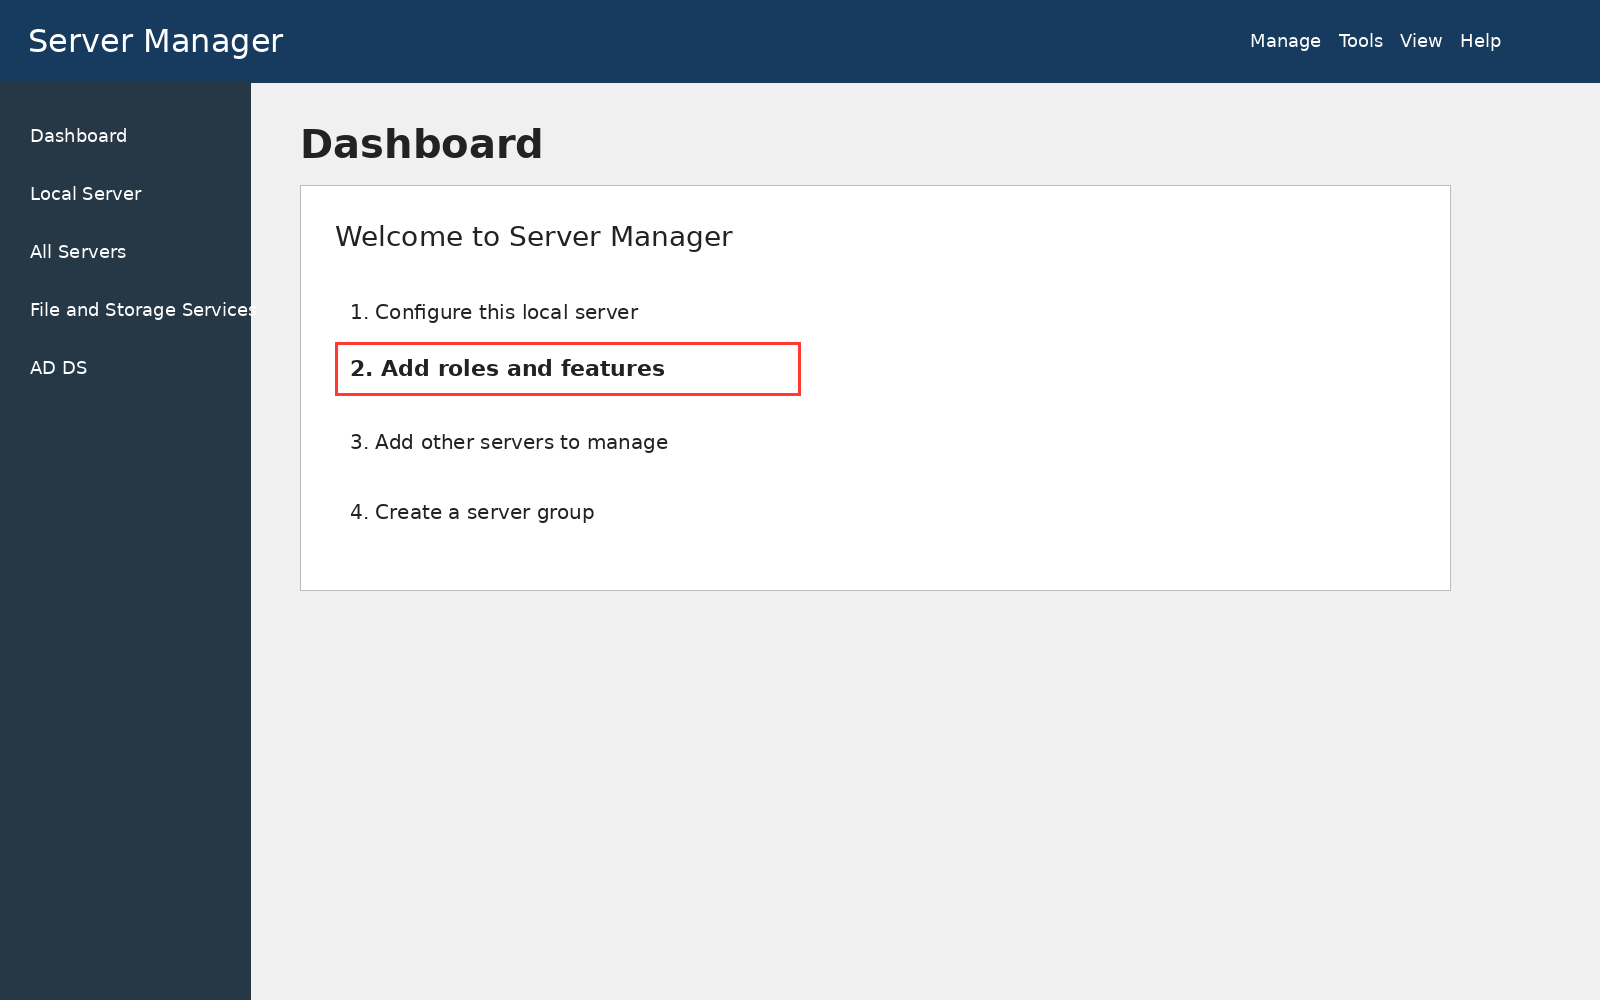
- Launch Server Manager from its taskbar icon, or click Start and type Server Manager in the search box.
2. Click Add roles and features to open the wizard.
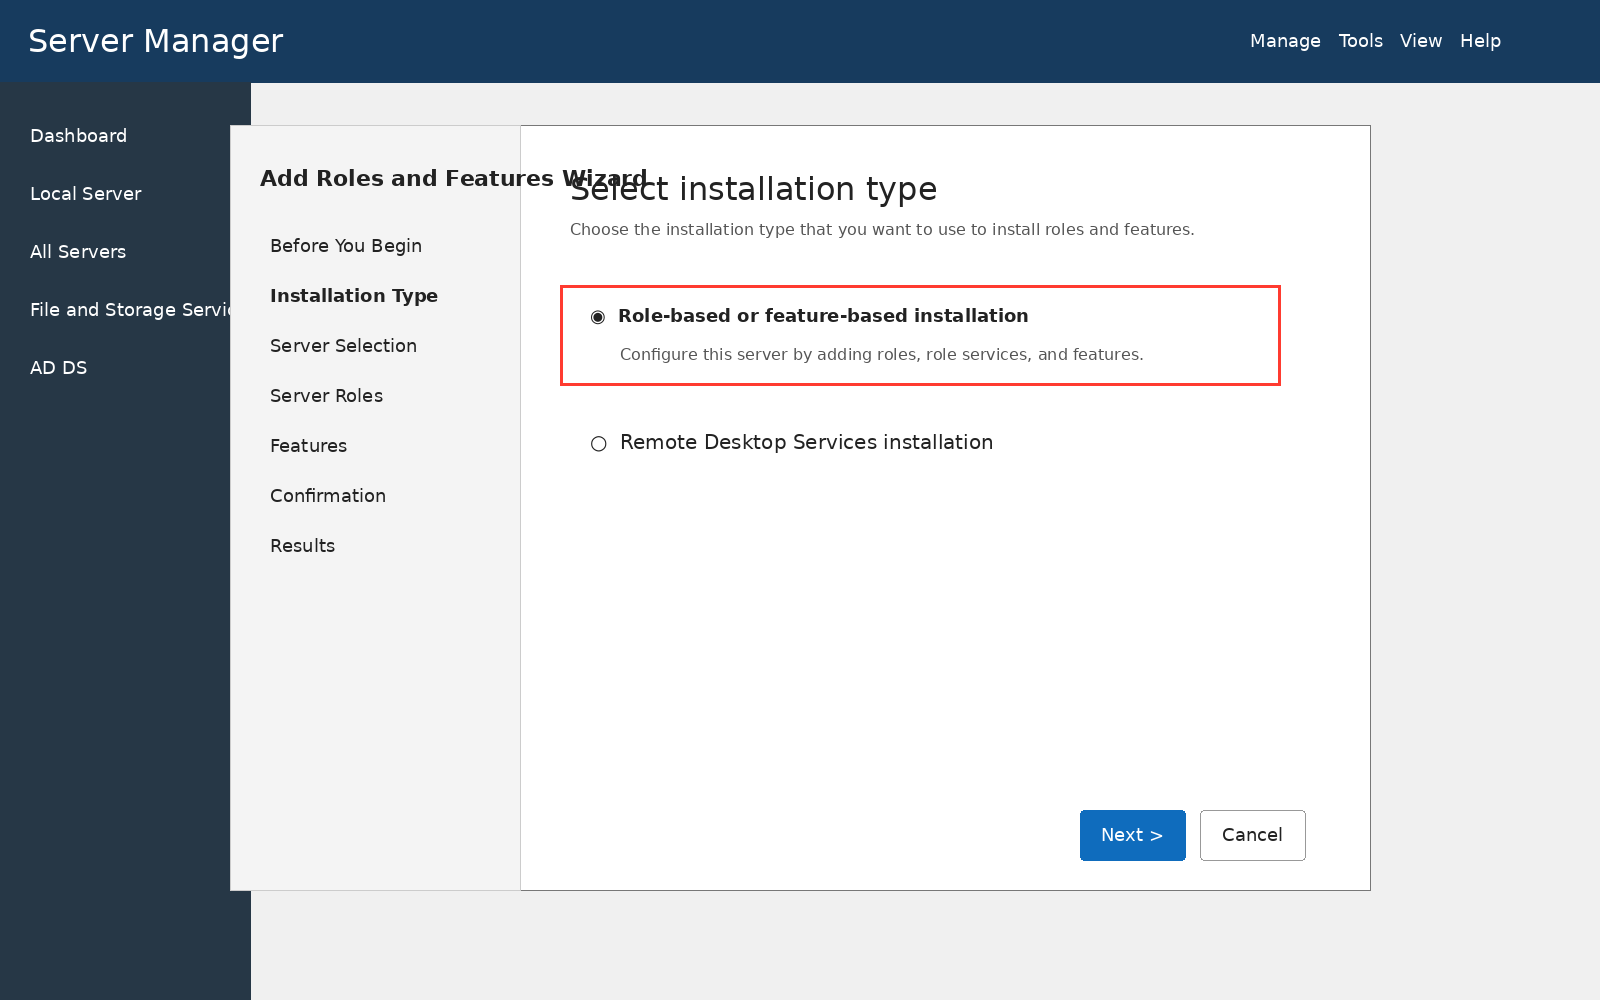
3. Click Next past the prerequisites page, then select Role-based or feature-based installation.

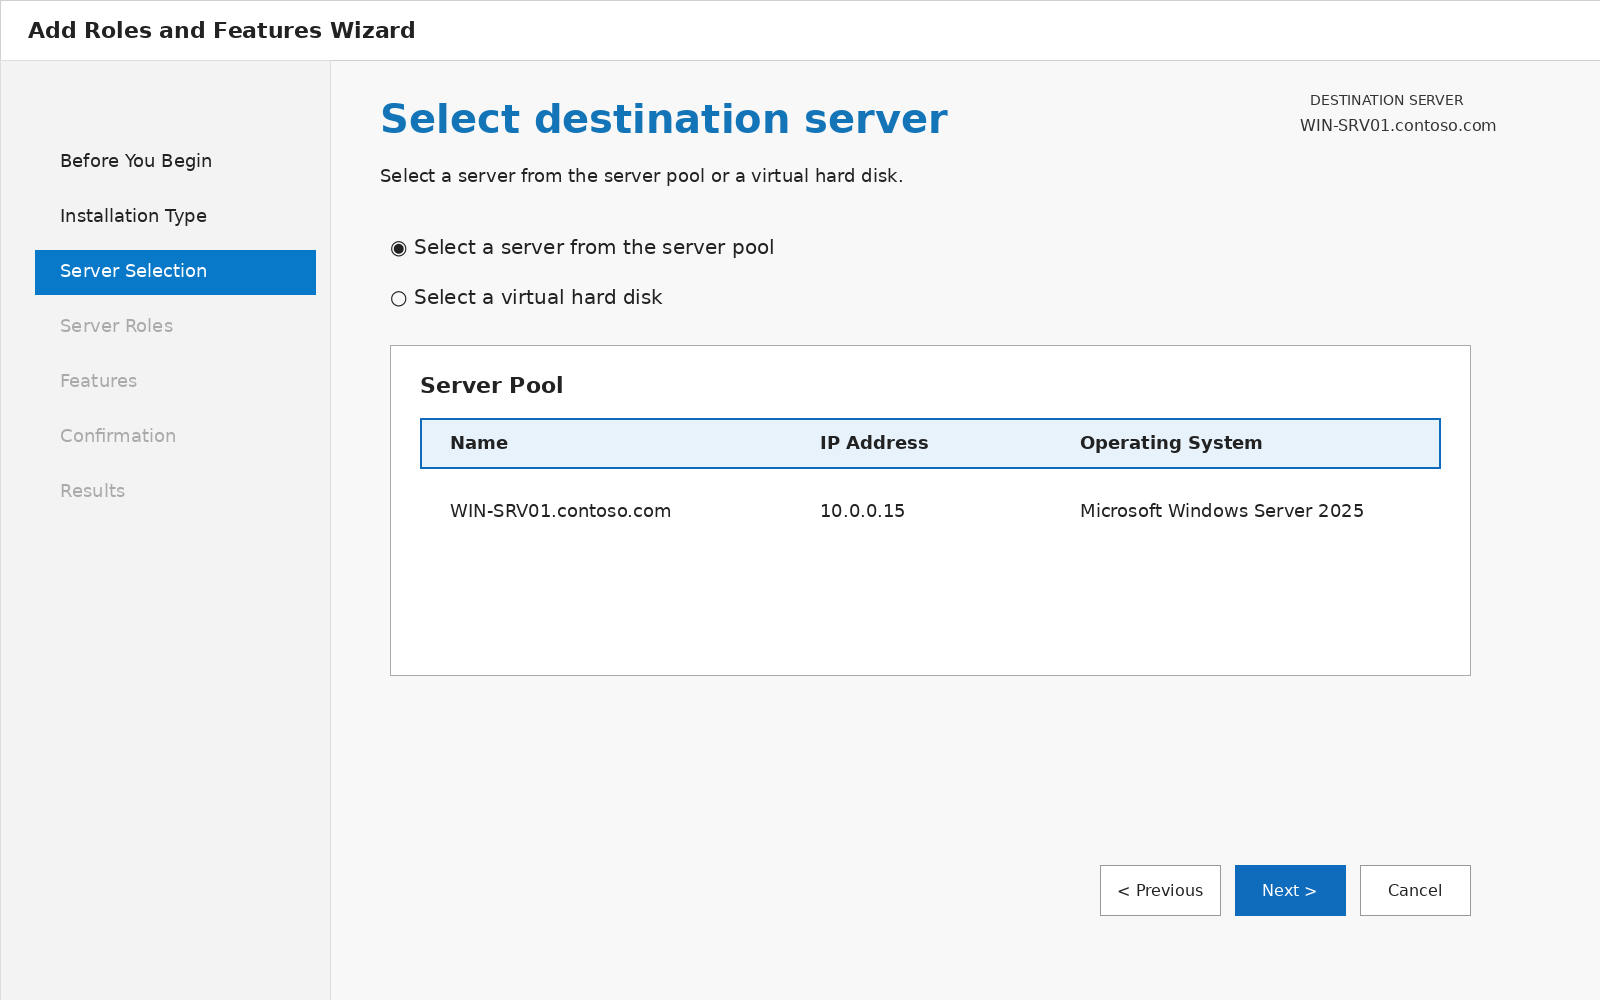
4. Choose either a server from the server pool or a virtual hard disk, then click Next.
5. Click Next on the Server Roles page.
6. Select Remote Server Administration Tools, AD DS and AD LDS Tools; this automatically selects the other Active Directory management consoles. Click Next.
7. Review the summary, select the Restart the destination server automatically if required checkbox, and click Install.
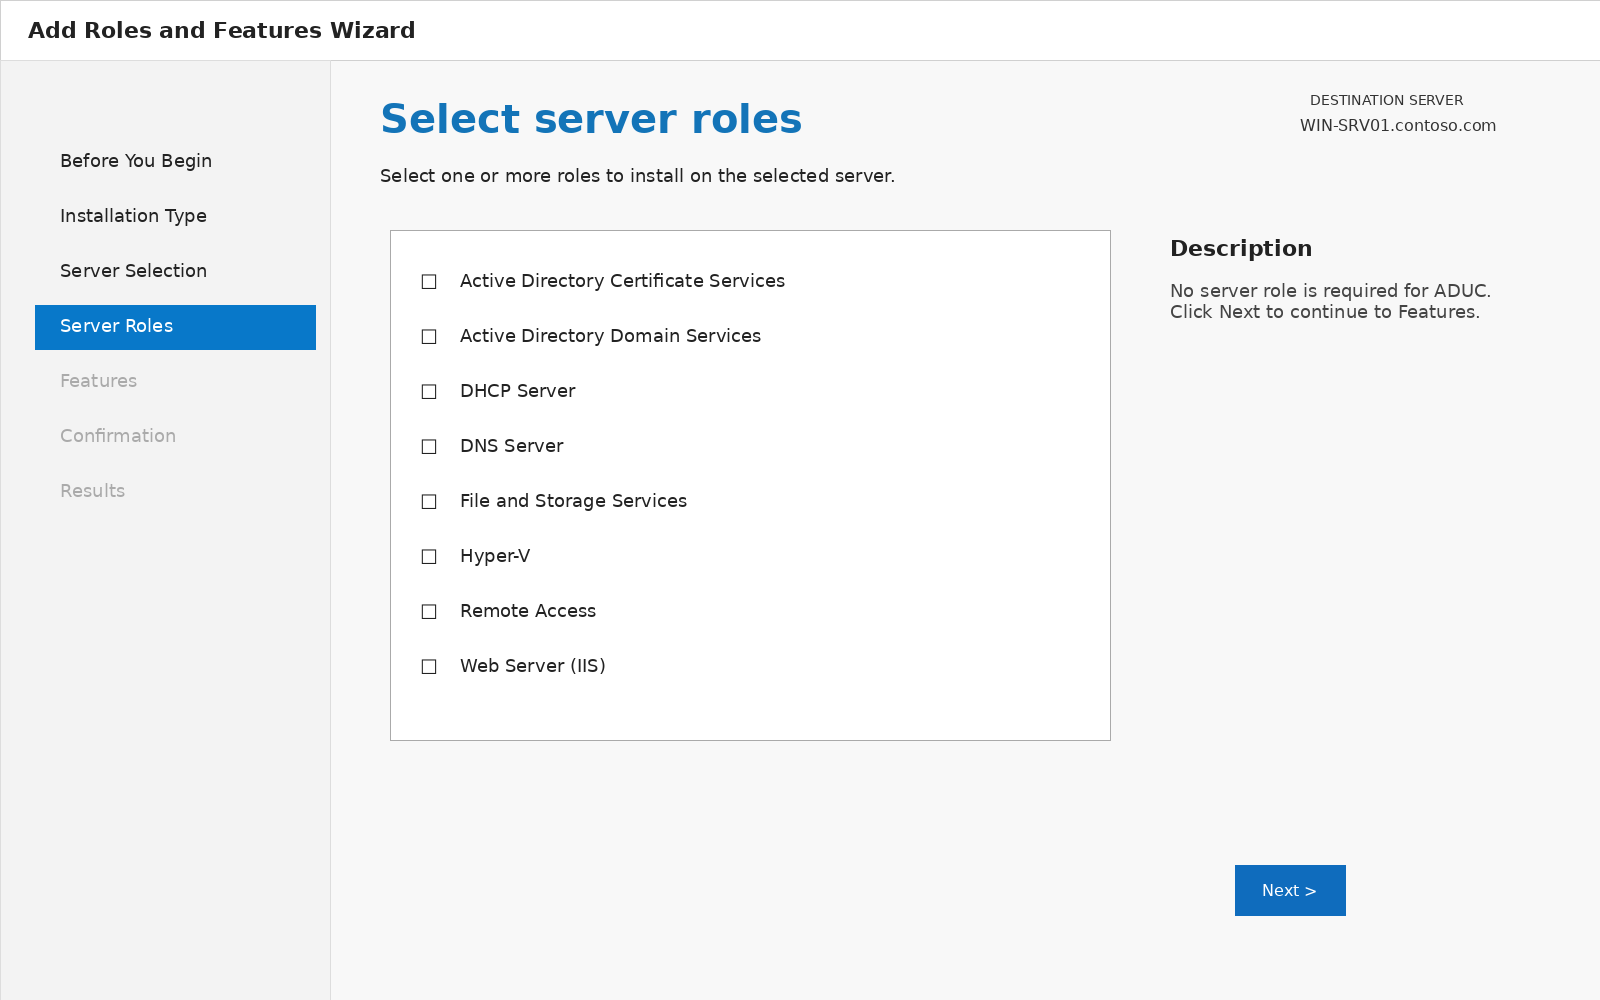
8. Watch the progress page, or close it while the installation continues in the background.
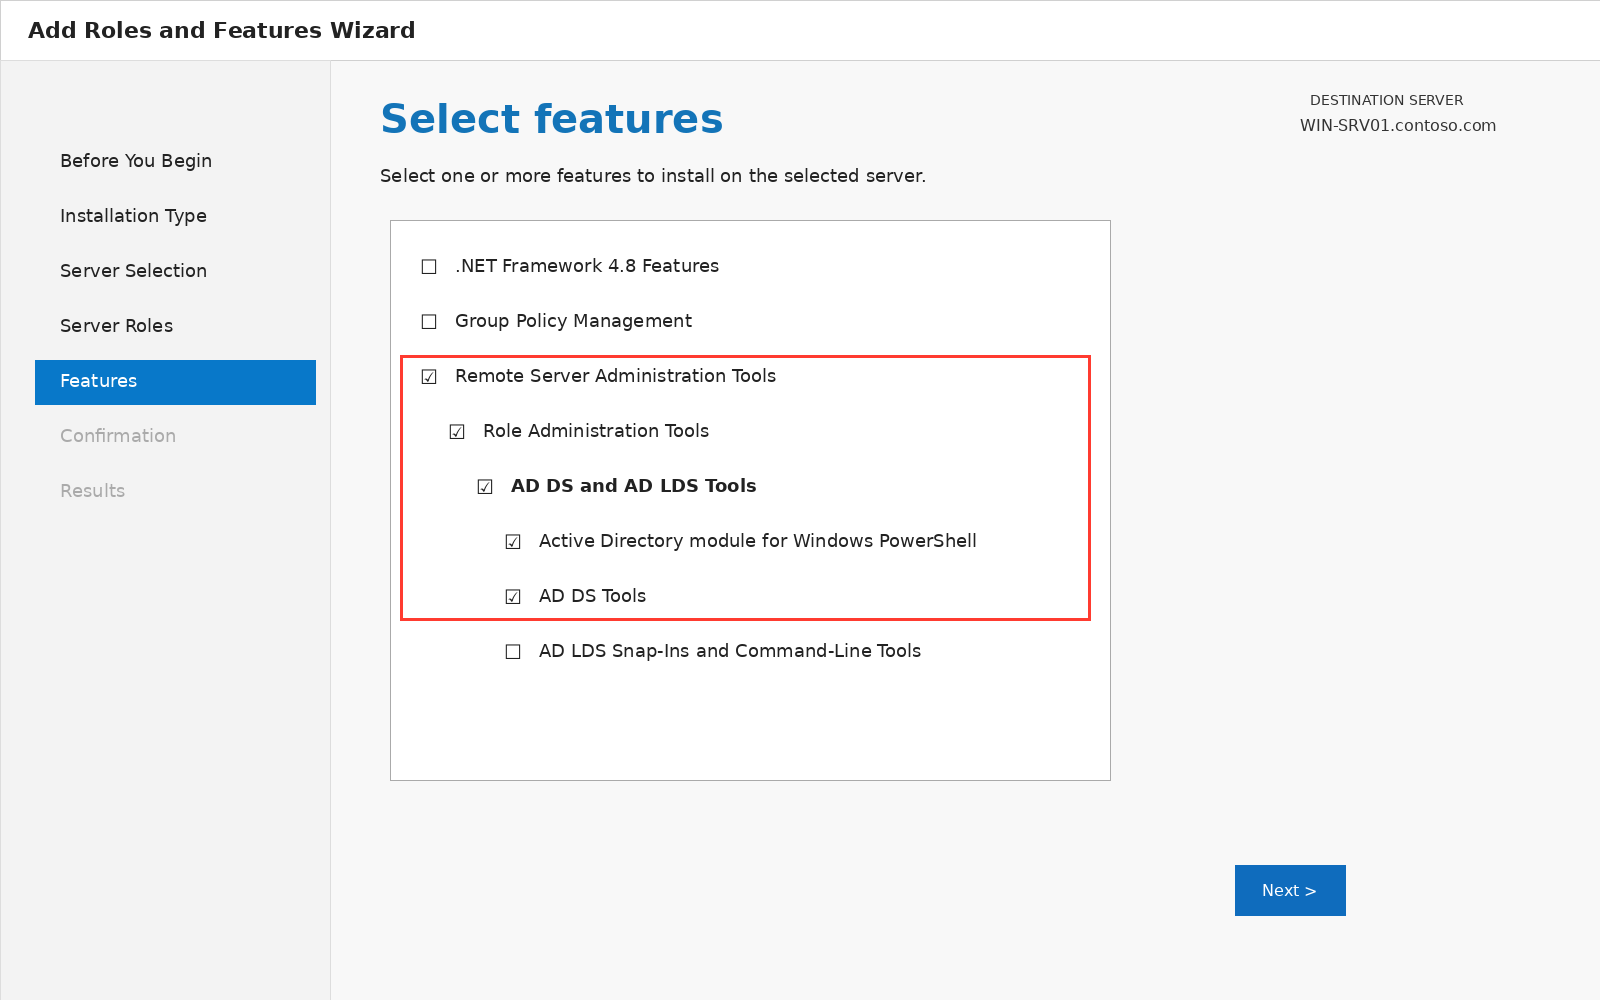
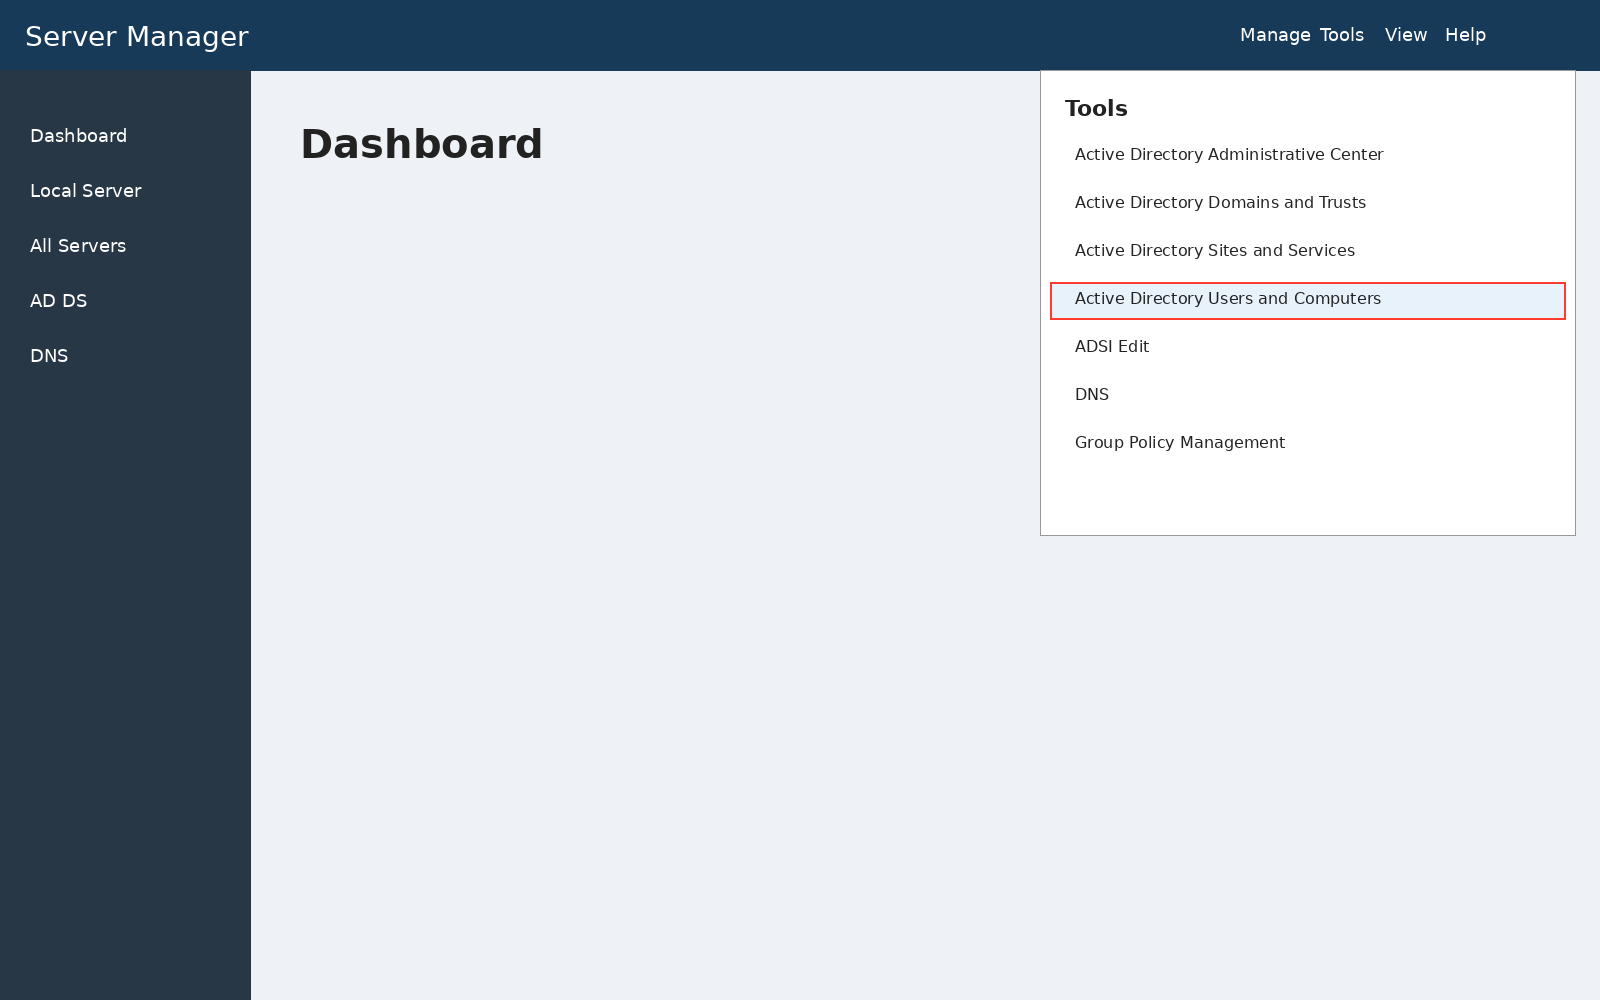
9. Open Server Manager and click the Tools menu to see the installed consoles.
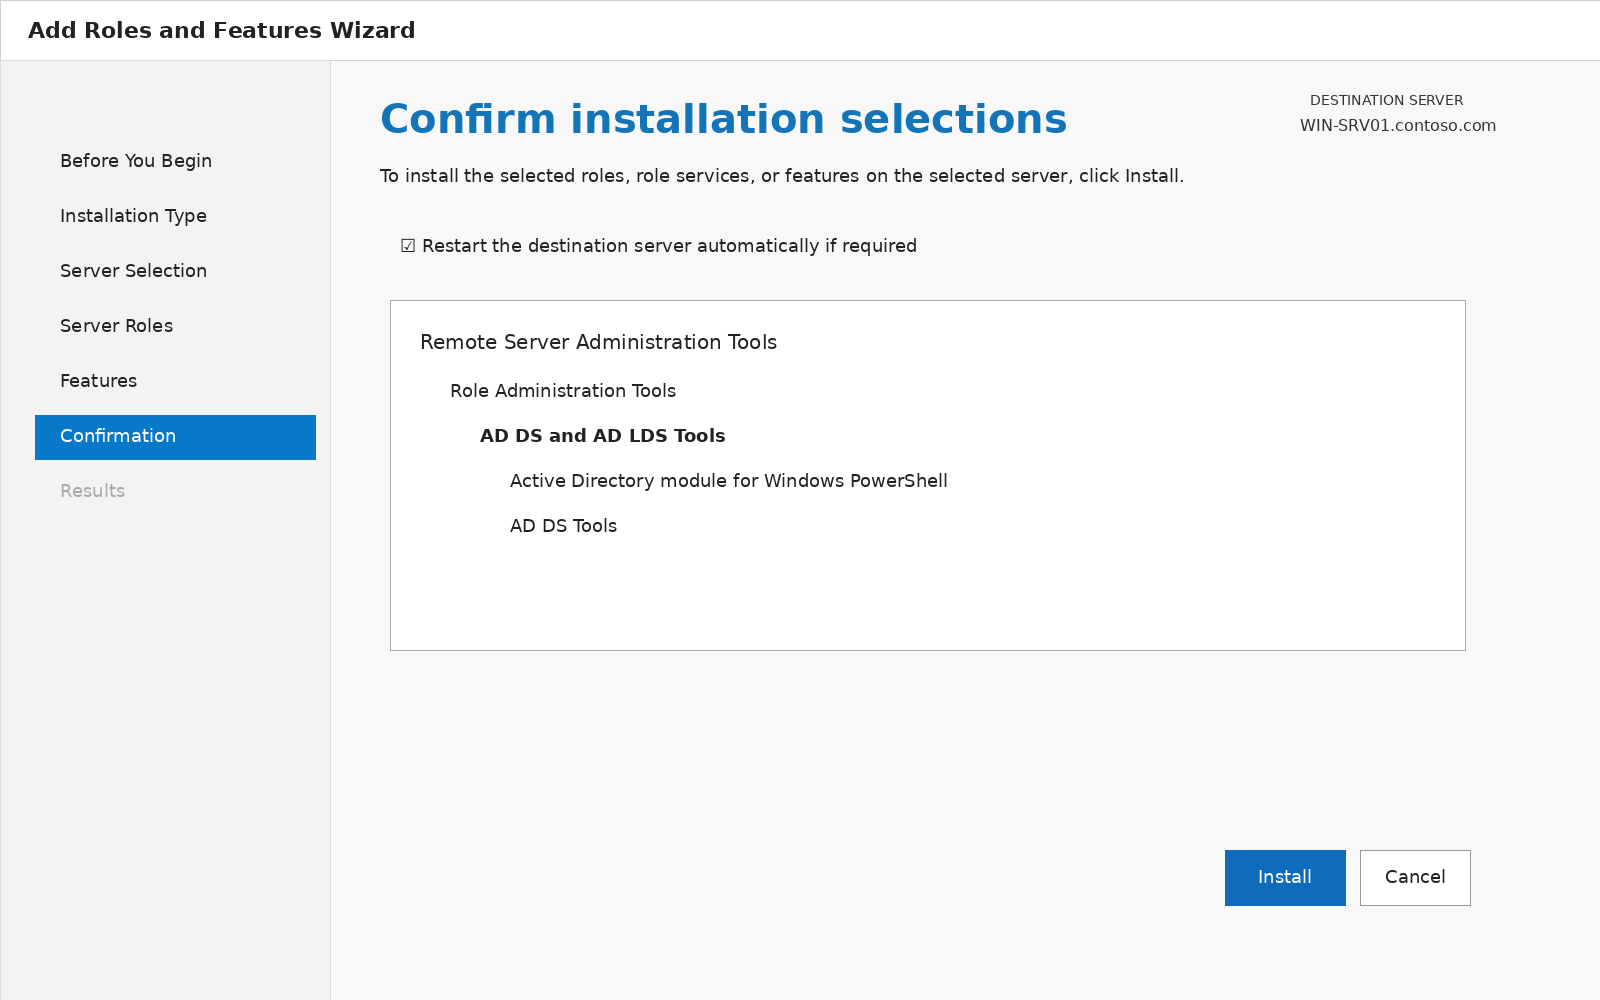
PowerShell installs those tools in one line from an elevated session:
Install-WindowsFeature -Name RSAT-AD-Tools -IncludeAllSubFeature
To install only the Active Directory module for PowerShell without the consoles, use Install-WindowsFeature RSAT-AD-PowerShell instead. Domain controllers already have ADUC, so neither step applies there.
How to install ADUC on older versions of Windows
On Windows 8, Windows 10 version 1803, and earlier, RSAT is a separate download rather than a built-in capability. This is one of only two situations that require a real download; the other is offline installation from the Features on Demand ISO.
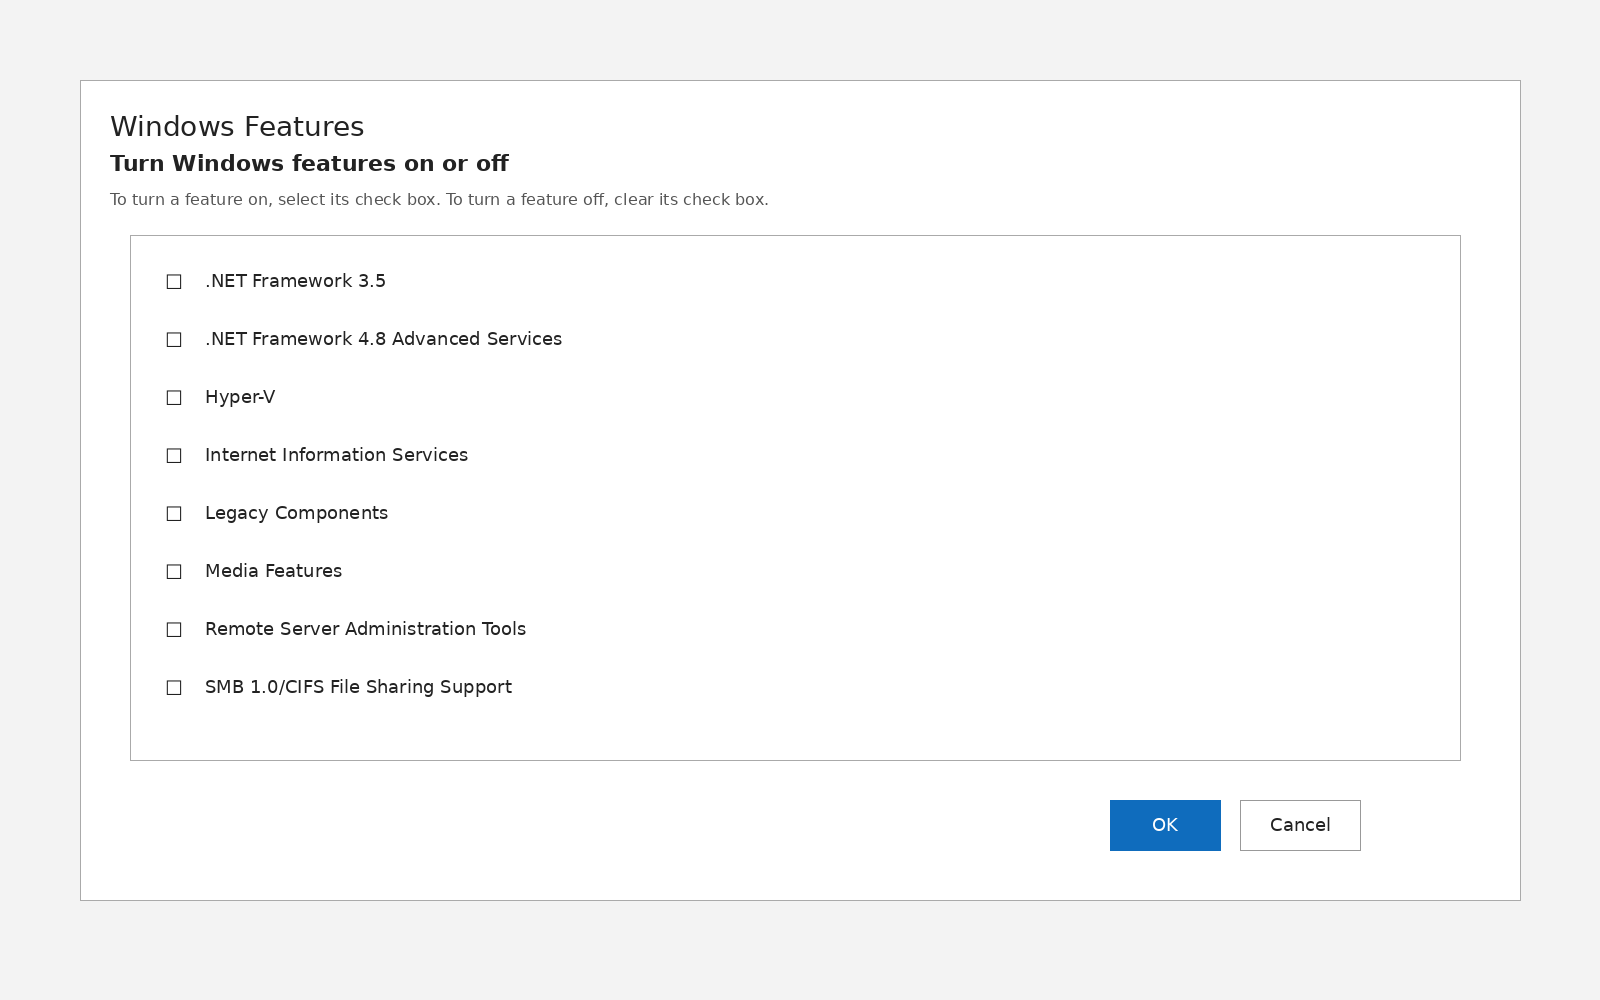
- Install the RSAT package for that Windows version, then click Start > Control Panel > Programs > Turn Windows features on or off.
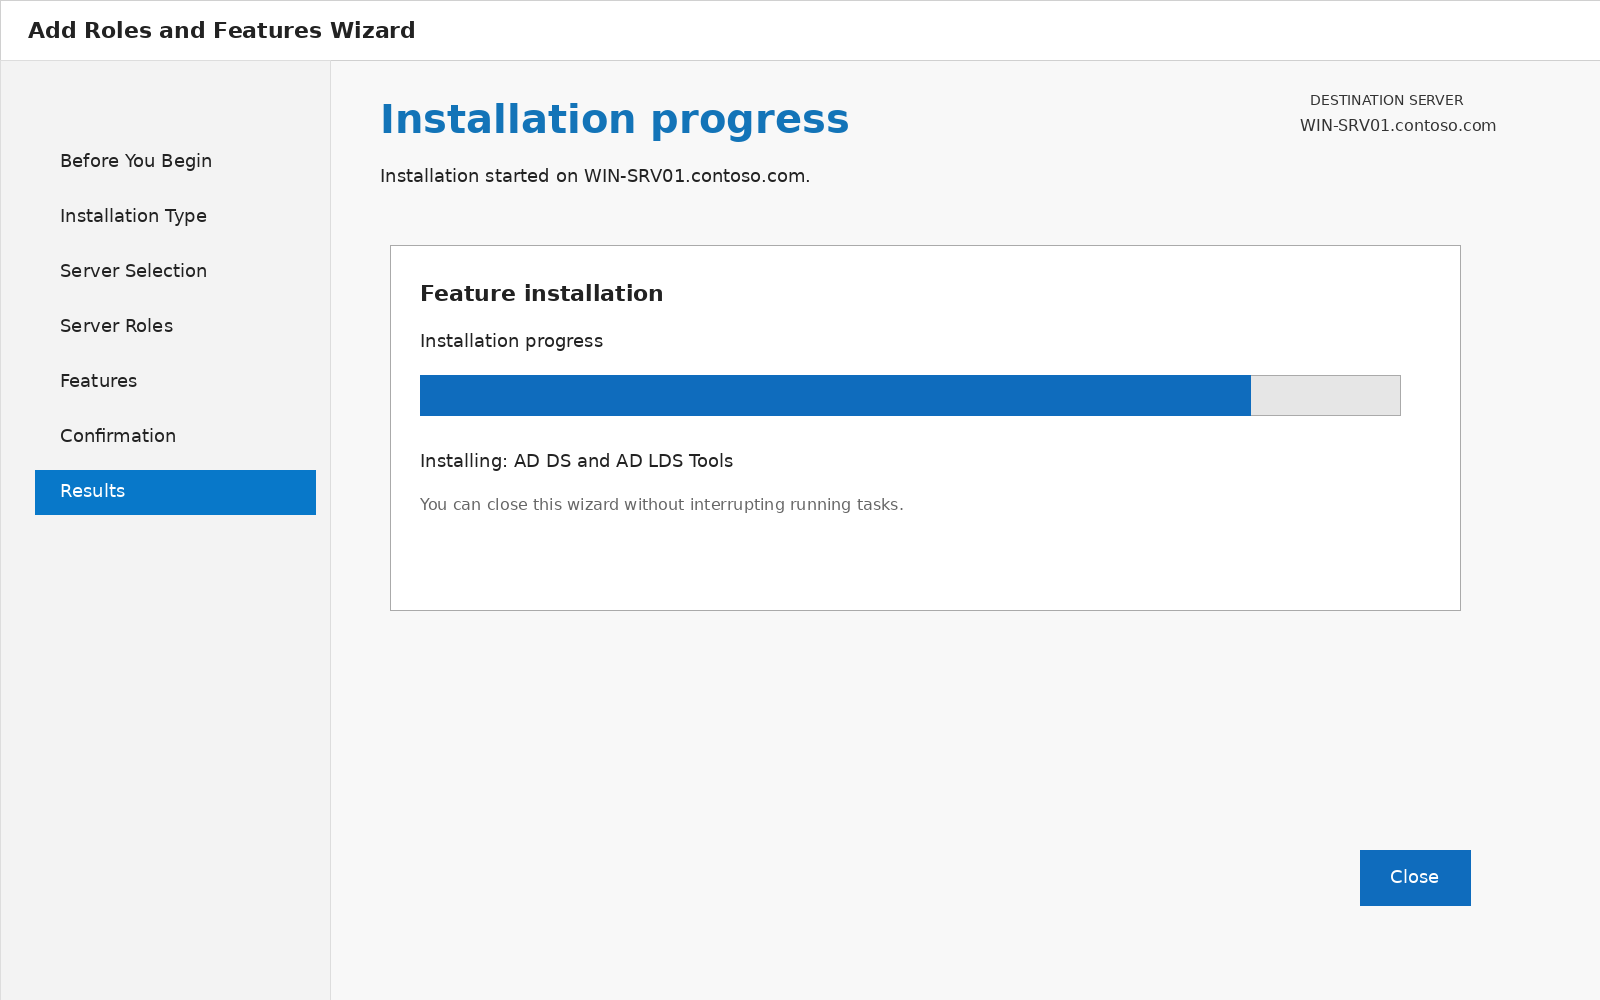
2. Expand Role Administration Tools > AD DS and AD LDS Tools, check AD DS Tools, and restart.
Windows 7 uses that dialog after the package installs.
How to open ADUC once it's installed
Three routes open the console, and the Run dialog is the fastest from any keyboard.
- Run dialog: Press Win+R, type dsa.msc, and press Enter. This is also the fastest way to confirm the install succeeded.
- Start menu: Windows 11 lists ADUC under Windows Tools, which replaced the old Windows Administrative Tools folder. Windows 10 still uses the older folder name.
- Server Manager: On Windows Server, open Server Manager and select Active Directory Users and Computers from the Tools menu.
If the console opens but shows no directory, or the install never completed, the section below covers both.
Netwrix Auditor records before-and-after values for access and change events across hybrid Microsoft environments. Download a free trial
Troubleshooting ADUC installation and connection problems
Installation and connection failures have different causes, so the sections below follow that order. The first three cover an install that won't complete or a console that never appears, and the last two cover a console that opens but doesn't reach a directory. Work through the symptoms that match what you're seeing.
RSAT installation fails with error 0x800f0954
This error means Windows couldn't reach the Features on Demand payload, usually because policy points the machine at an internal update service. Confirm you have the right RSAT version for the operating system first, then change the policy:
- Right-click the Start button, choose Run, type gpedit.msc, and click OK.
- In the Local Group Policy Editor, navigate to Computer Configuration > Administrative Templates > System.
- Right-click Specify settings for optional component installation and component repair policy, set it to Enabled, and check the box to pull repair content and optional features directly from Windows Update instead of an internal update service.
- Click Apply, then click OK.
- Right-click the Start button, choose Run, type gpupdate /force, and click OK.
On managed devices and isolated networks where that policy change isn't permitted, install from a local source instead. Download the Languages and Optional Features ISO that matches the exact Windows version on the target machine, mount it, and run:
Add-WindowsCapability -Online -Name Rsat.ActiveDirectory.DS-LDS.Tools~~~~0.0.1.0 -LimitAccess -Source D:\LanguagesAndOptionalFeatures\
The -LimitAccess switch stops Windows from reaching out to Windows Update. The source must match the installed build, architecture, and language. A mismatched ISO is the most common failure here once you rule out policy and network access.
RSAT installation fails with error 0x80070003
This error usually traces to installing from an uncommon location. Copy the installation files to the target machine's local drive and run the install again. A corrupt installation file or an operating system mismatch produces the same result, so verify both if the local copy fails too.
ADUC is missing after RSAT installs successfully
Check the actual capability state before assuming the install failed, using the Get-WindowsCapability query from the PowerShell section above. If the state reads Installed, the tools are present, and the console is just not where it's usually listed. Confirm the file at C:\Windows\System32\dsa.msc, or run dsa.msc from the Run dialog. ADUC and the Active Directory Administrative Center are separate entries on some builds, so one can be present without the other.
ADUC opens but can't connect to the domain
Reaching a directory depends on conditions the install never touches. Check them in this order:
- Domain membership. The machine is domain-joined, or on VPN if you're remote.
- Domain Name System (DNS). The machine's DNS points to a domain controller instead of a public resolver. This is the most common cause.
- Domain controller reachability. At least one controller is online and responding.
- Firewall. Lightweight Directory Access Protocol (LDAP) and Kerberos traffic to the controller isn't blocked.
- Permissions. Your account holds read rights on the OU you're browsing.
ADUC connects to the Active Directory domain of the signed-in session by default. To target another domain, right-click the Active Directory Users and Computers root and choose Change Domain.
Using ADUC from a computer that isn't domain-joined
A non-domain machine can run the console as long as you supply domain credentials at launch:
runas /netonly /user:domain\username "mmc dsa.msc"
The /netonly switch applies those credentials to network access while leaving the local session alone. The machine still needs to resolve the domain's DNS and reach a domain controller, so point DNS at the controller or connect through VPN first. Windows can't validate the password locally with /netonly, so a typo surfaces as a connection failure instead of a prompt.
How to navigate the ADUC console
The layout stays the same across Windows versions, though one View menu setting changes how much of the directory appears.
Console components
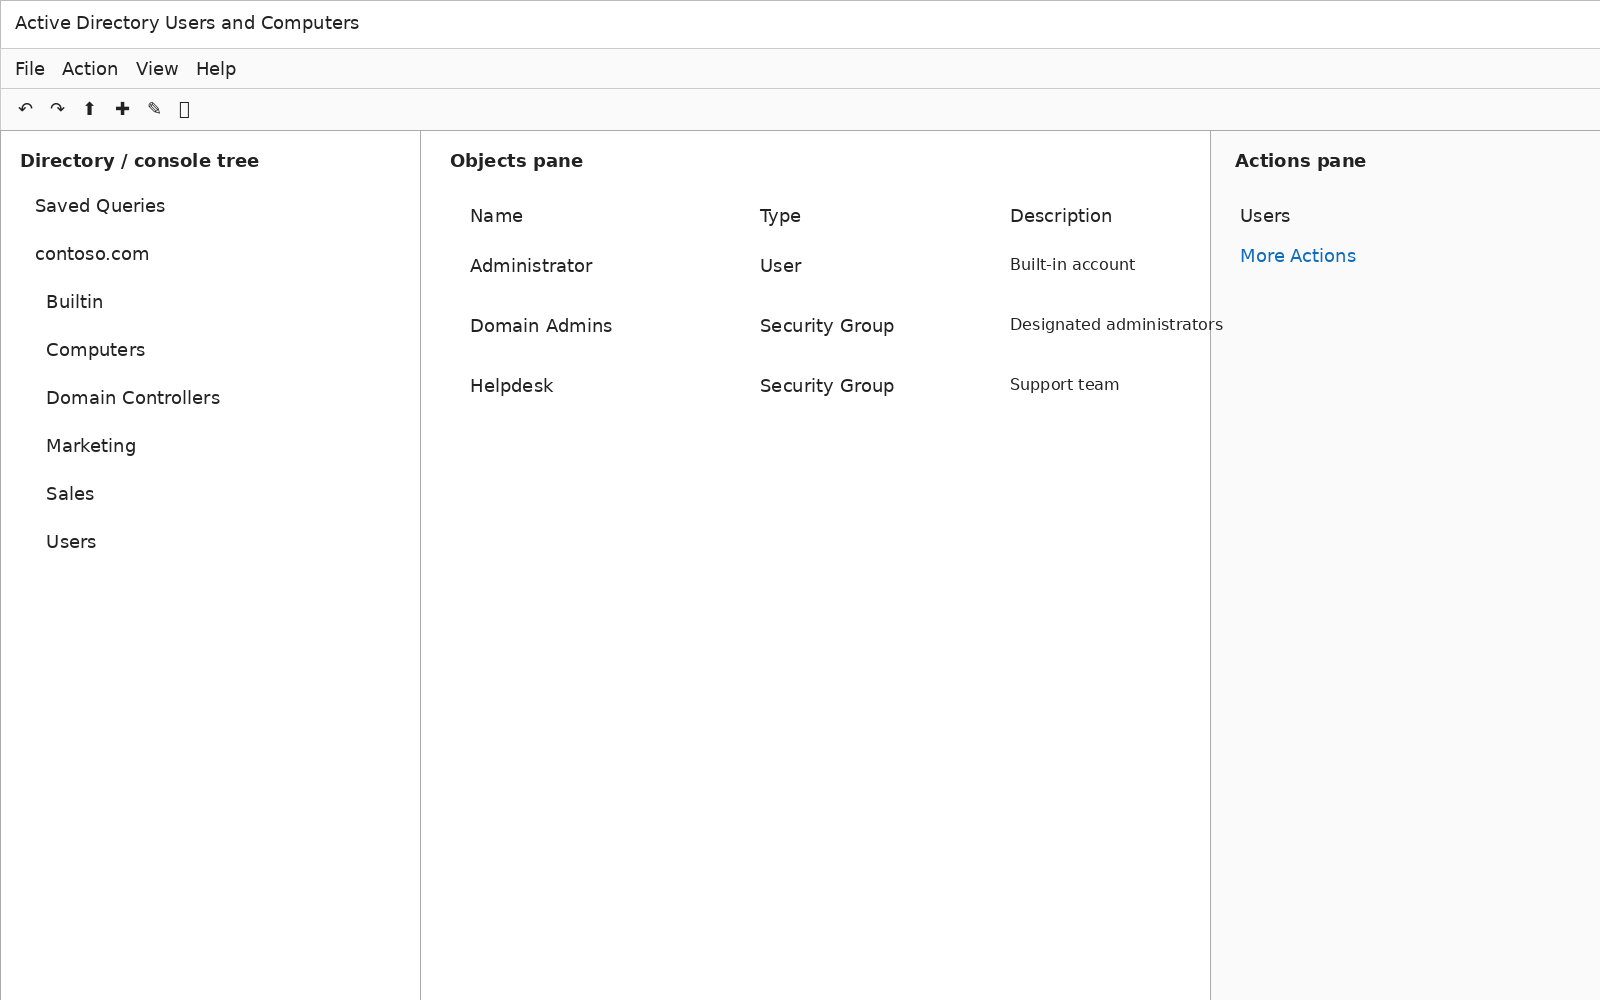
The interface splits into these areas:
- Menu bar: Holds the File, Action, View, and Help menus.
- Toolbar: Holds buttons for quick actions, such as creating a user or group and showing or hiding the other panes.
- Directory (console tree) pane: Shows the connected domain hierarchy, including its containers and OUs.
- Objects pane: Shows objects and their attributes, with columns configurable from the View menu.
- Actions pane: Shows details for the selected object and offers a More Actions option.
Show system containers and the attribute editor
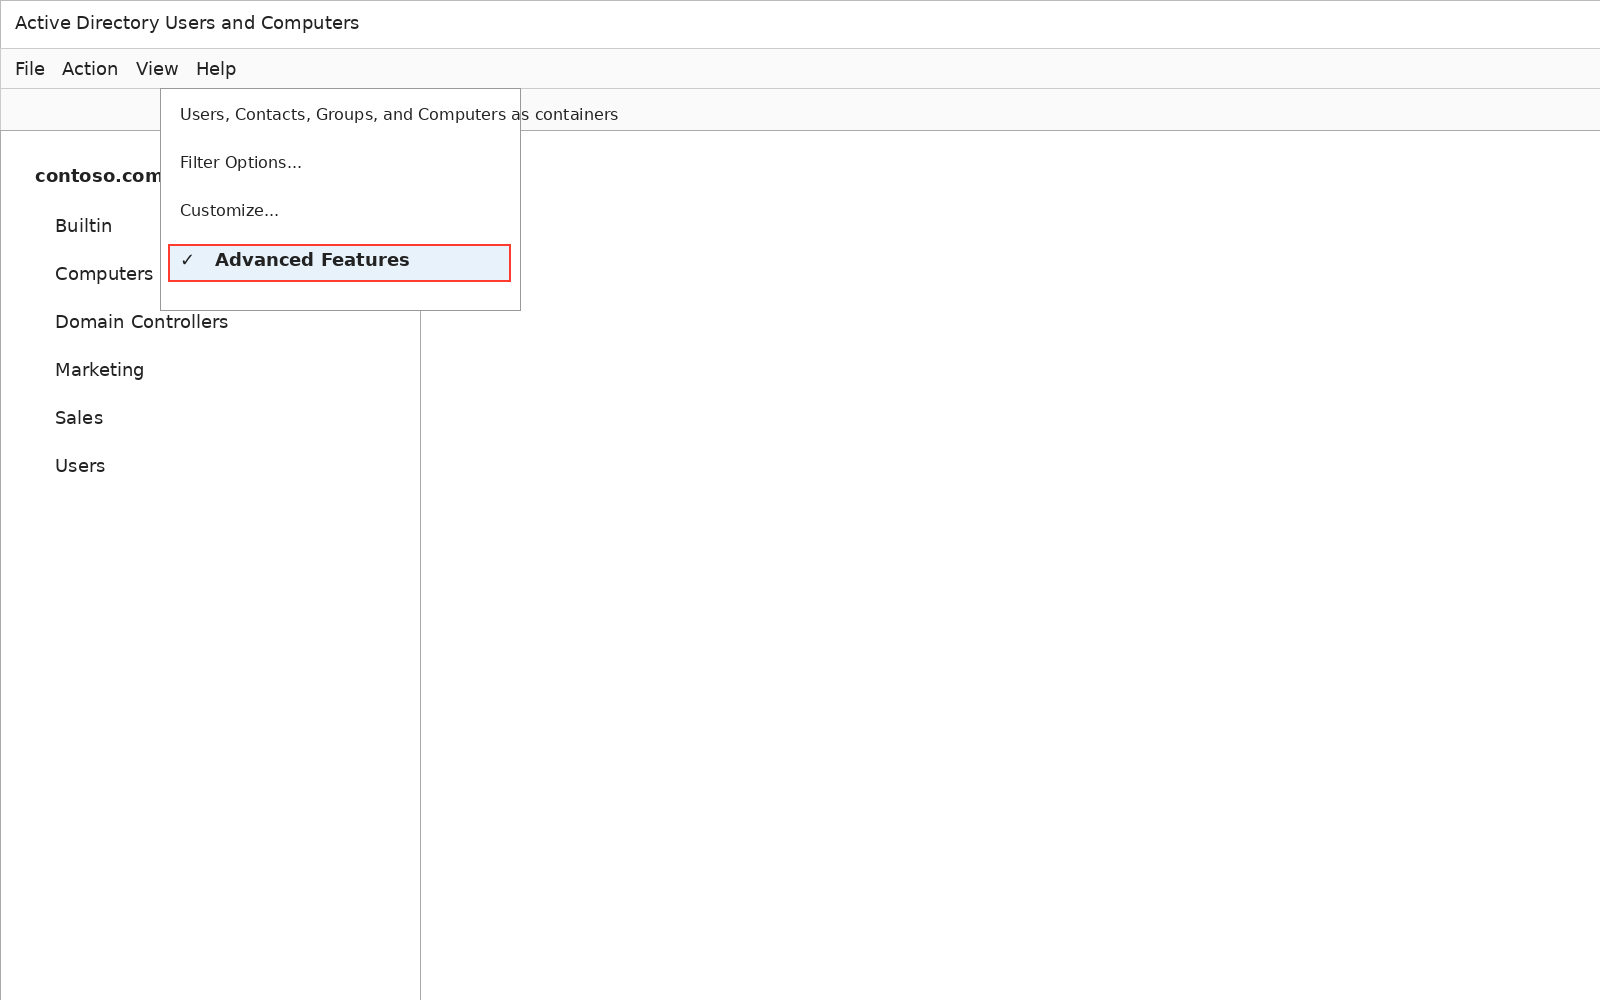
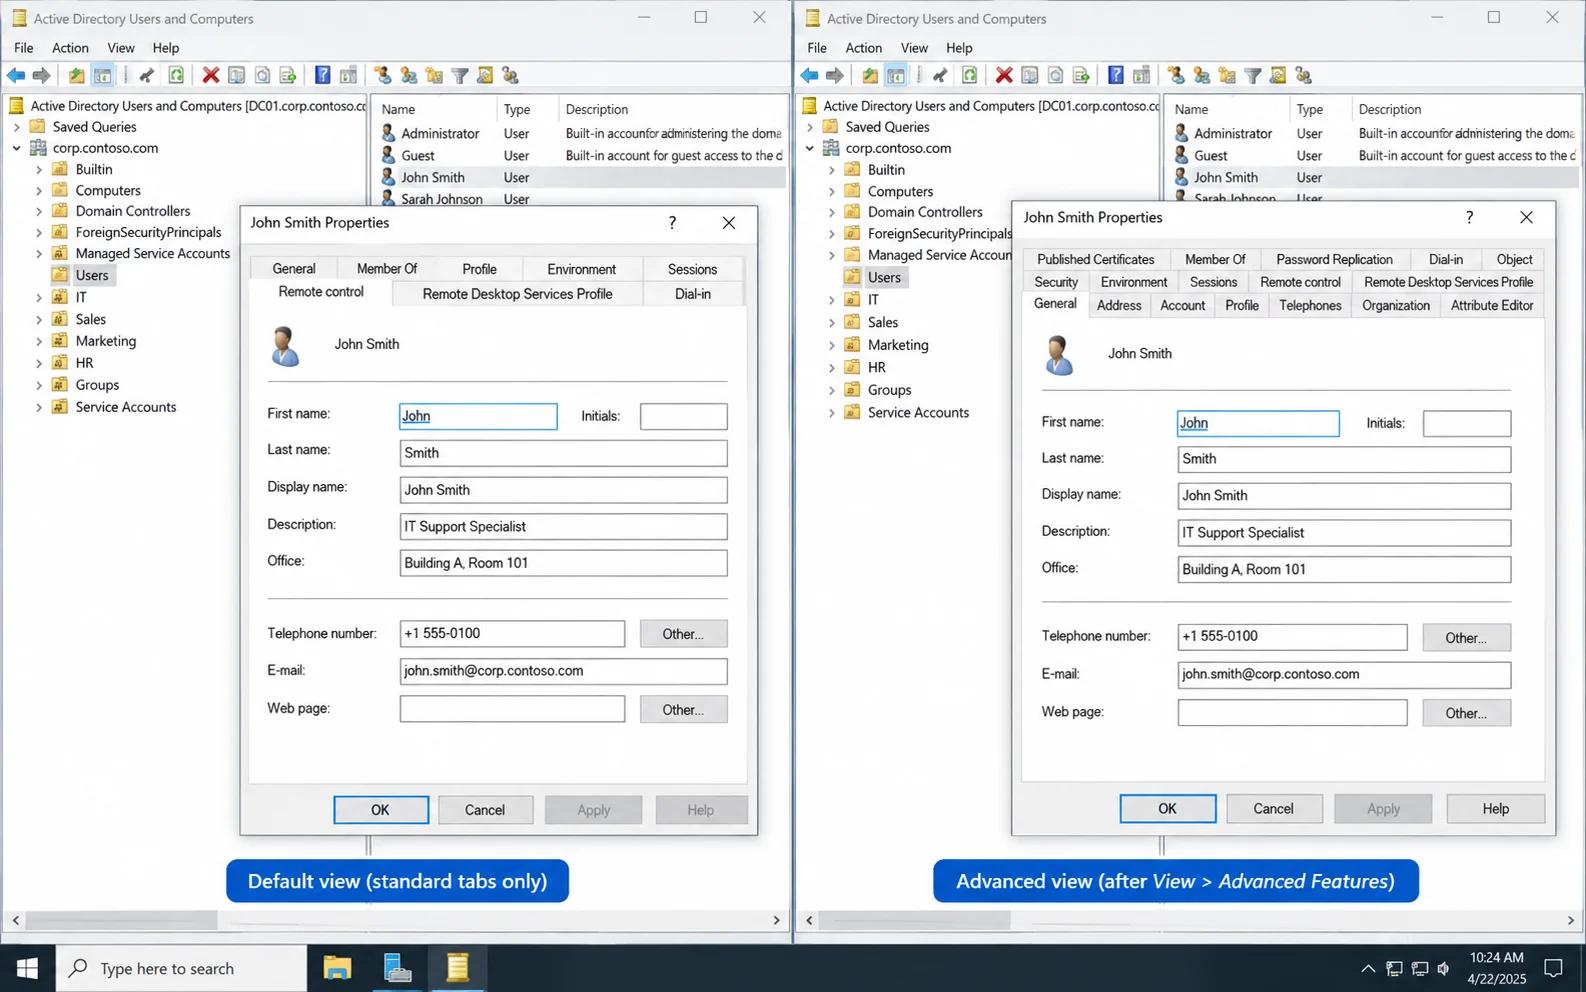
By default, ADUC hides several containers and object property tabs. Open the View menu and click Advanced Features to reveal them.
The Attribute Editor tab and the directory's system containers appear once you enable this setting. The comparison below shows the property tabs available in the default view on the left and the expanded view on the right.
How to use Active Directory Users and Computers
The tasks below assume the console is connected to a domain and the signed-in account has the rights needed for each action. Where it doesn't, the menu option stays visible, and the operation fails when you commit the change.
Create an organizational unit
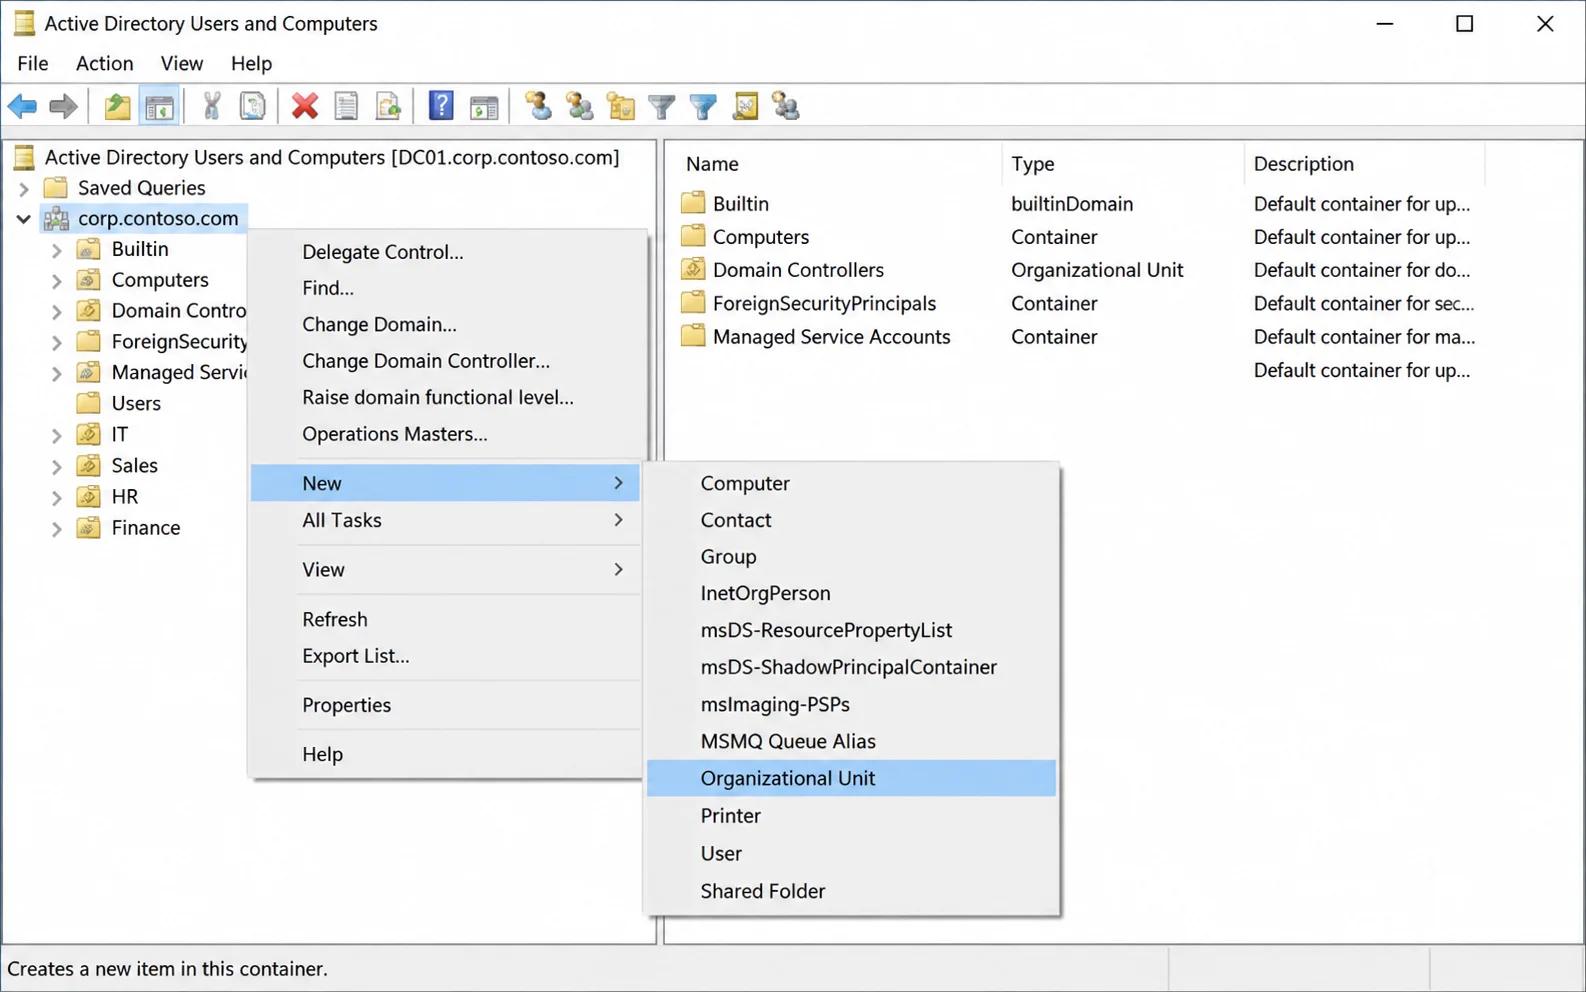
- Right-click the domain or the OU that will contain the new OU, then click New > Organizational Unit.
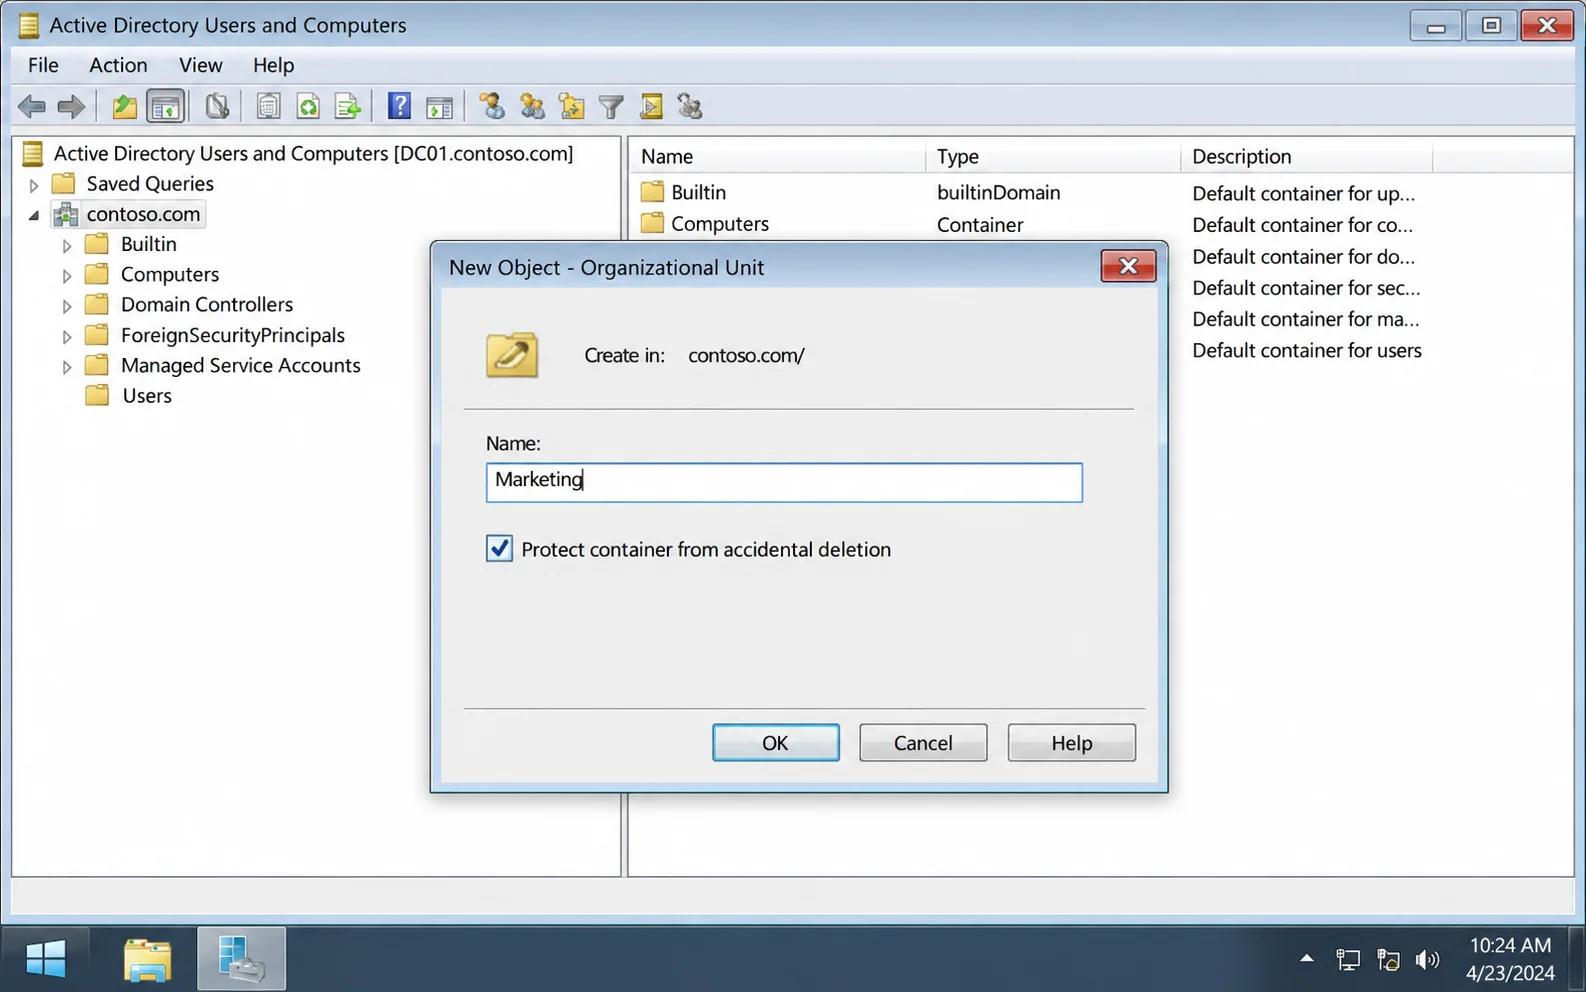
2. Type a name in the Name field, specify whether to protect the OU from accidental deletion, and click OK.
For bulk OU work, see this walkthrough of managing OUs with PowerShell.
Add a user account
- Select the domain where the user belongs and expand its contents.
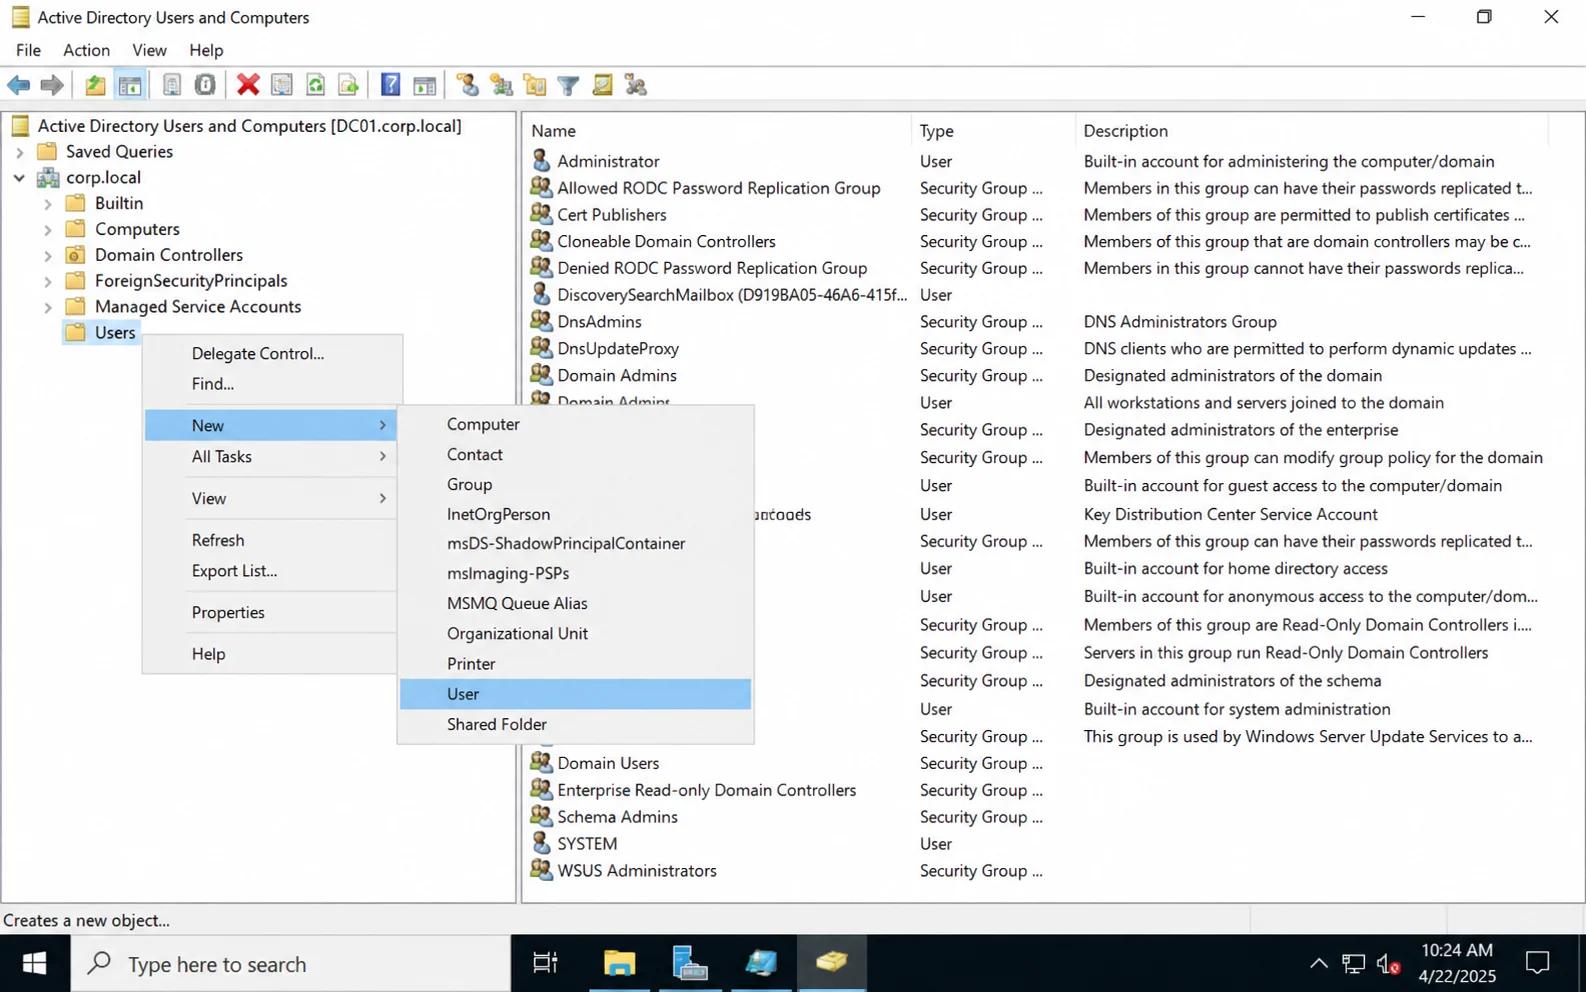
- Right-click the target container, usually Users, select New, and click User.
3. Type the user's first name, last name, and logon name, then click Next.
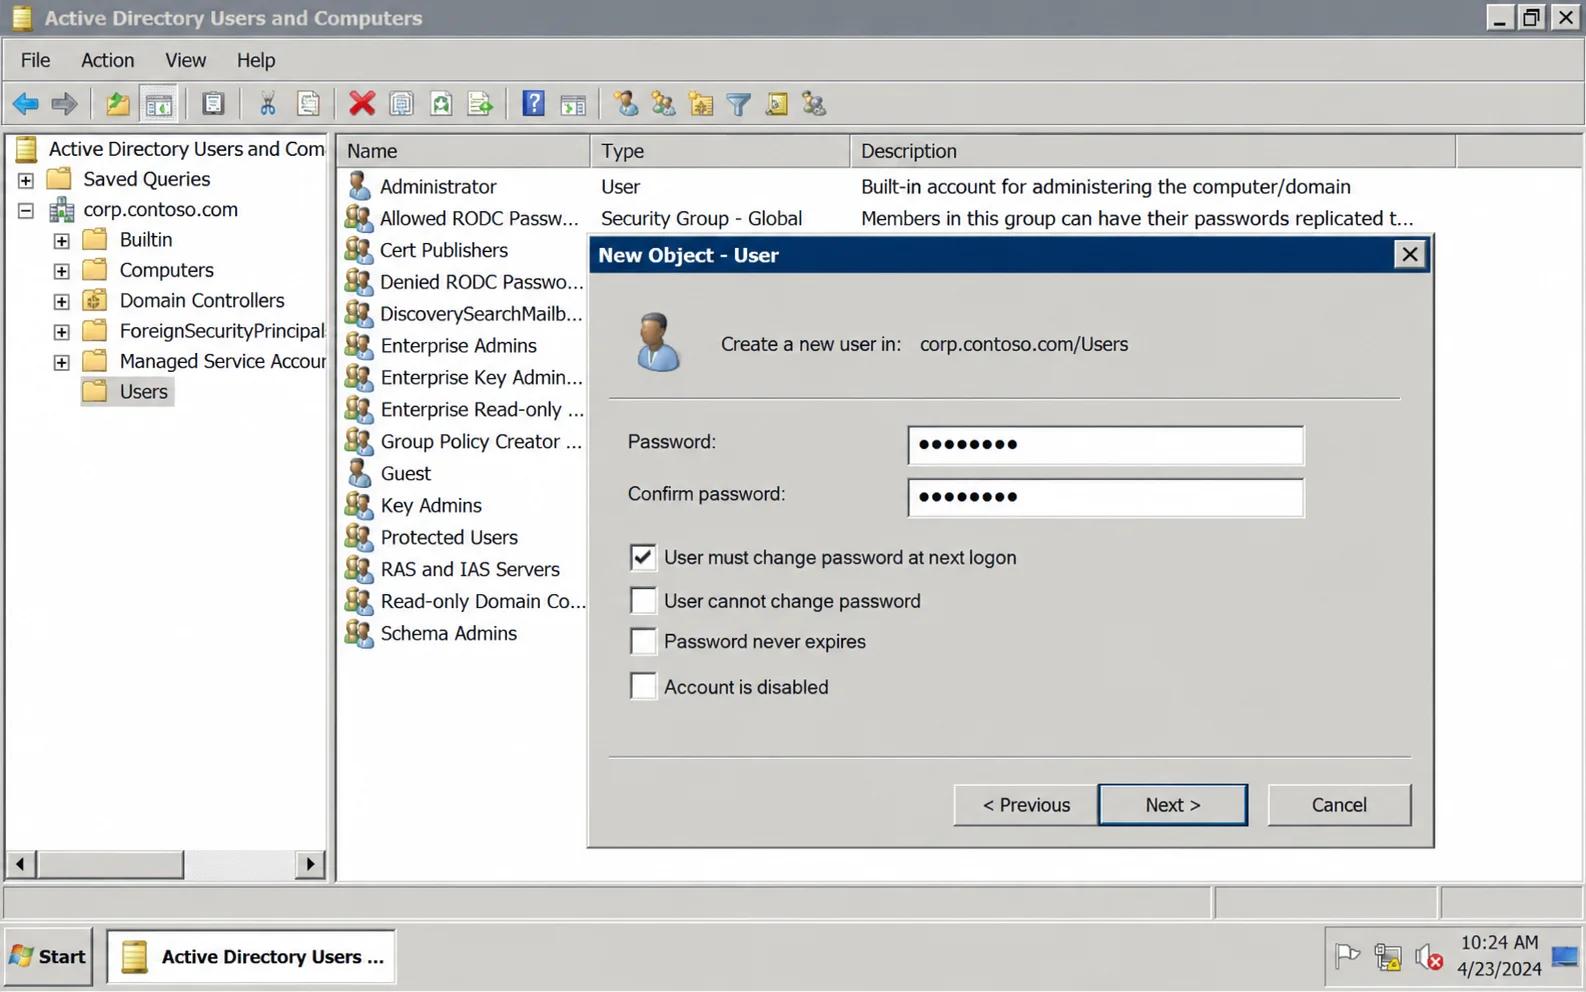
4. Type and confirm a password, then set one of the four password options in the dialog. Those options force a change at the next logon, block the user from changing it, exempt it from expiry, or leave the account disabled. Click Next.
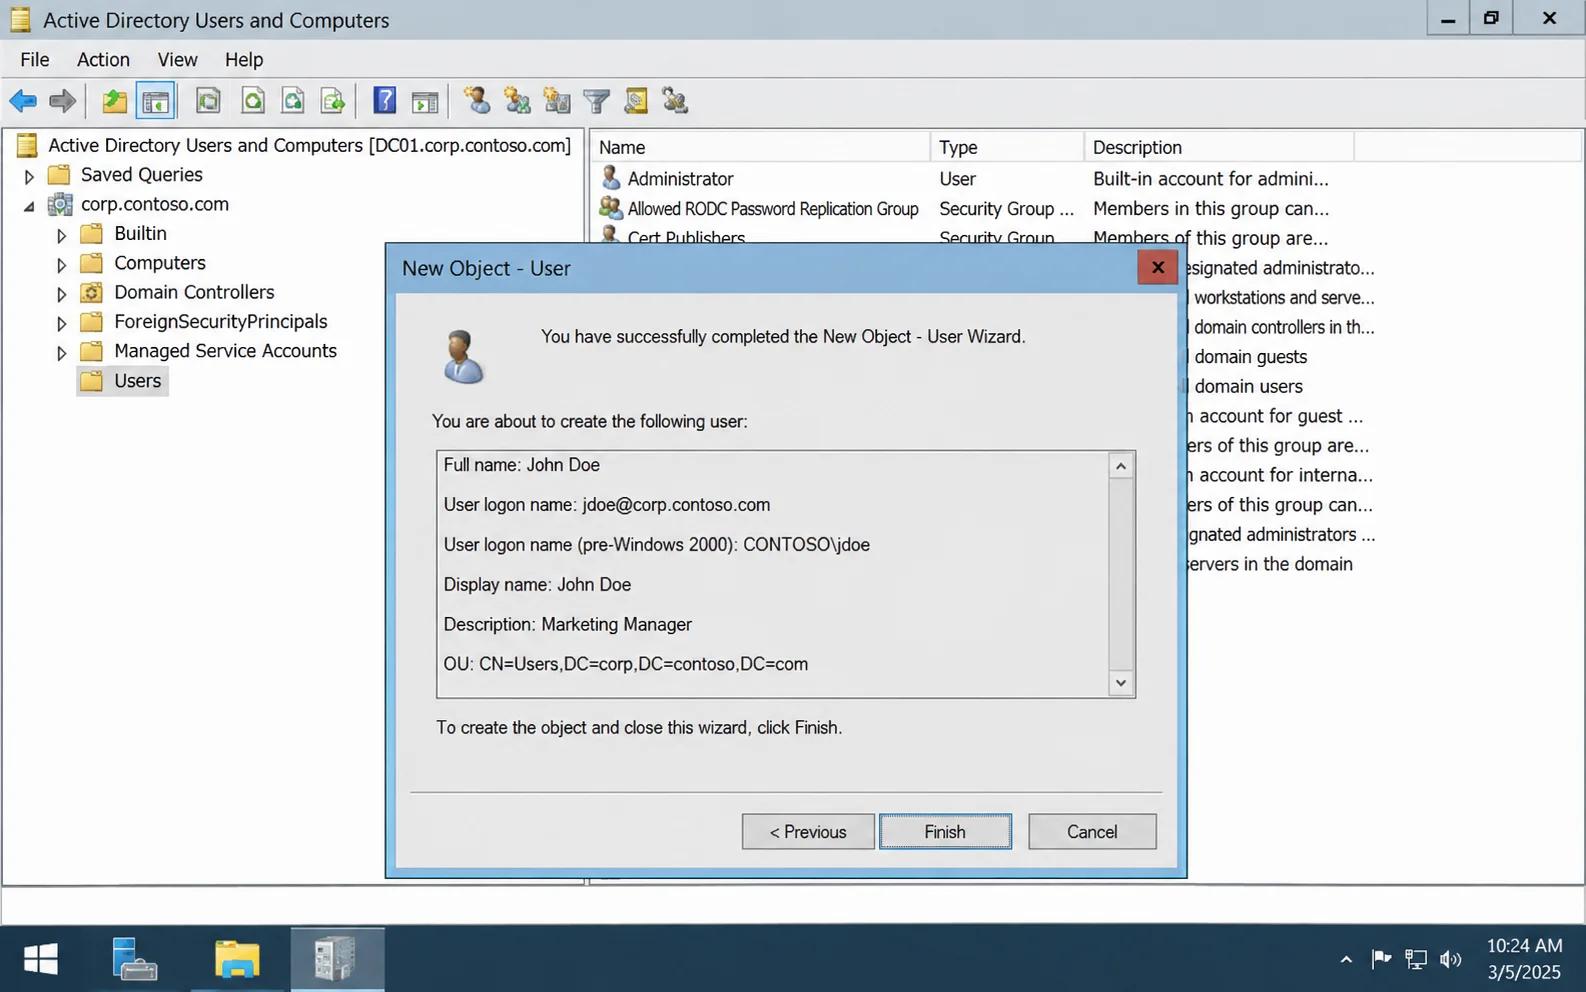
5. Check the summary and click Finish.
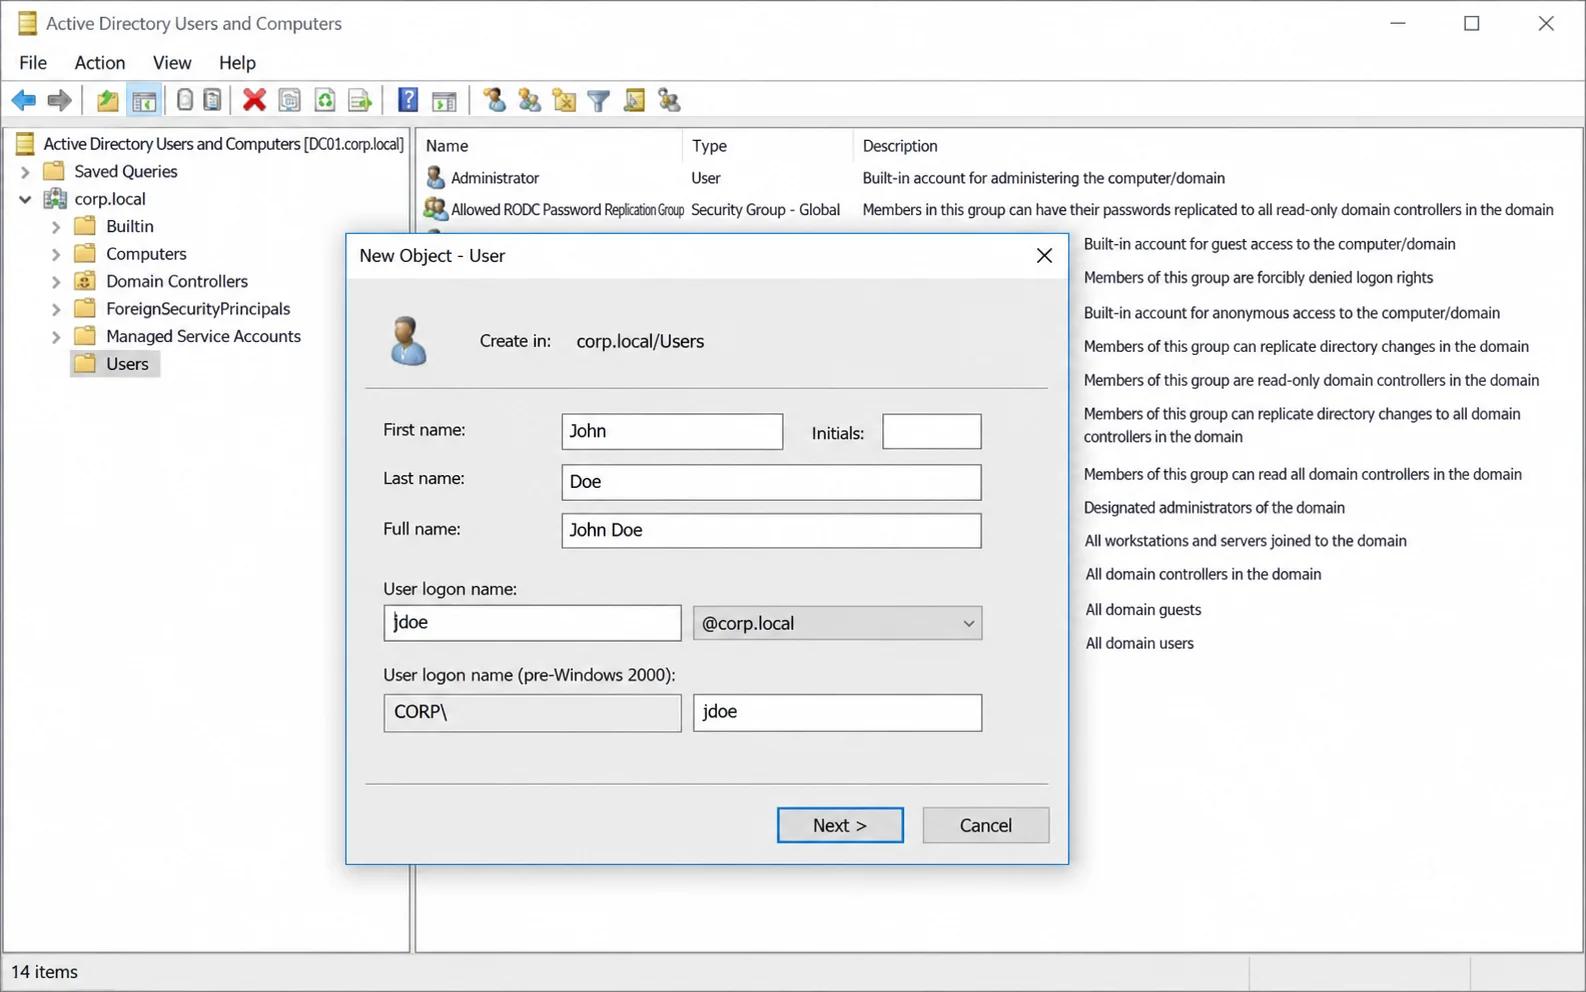
For more than a handful of accounts, see this guide to bulk user creation in Active Directory.
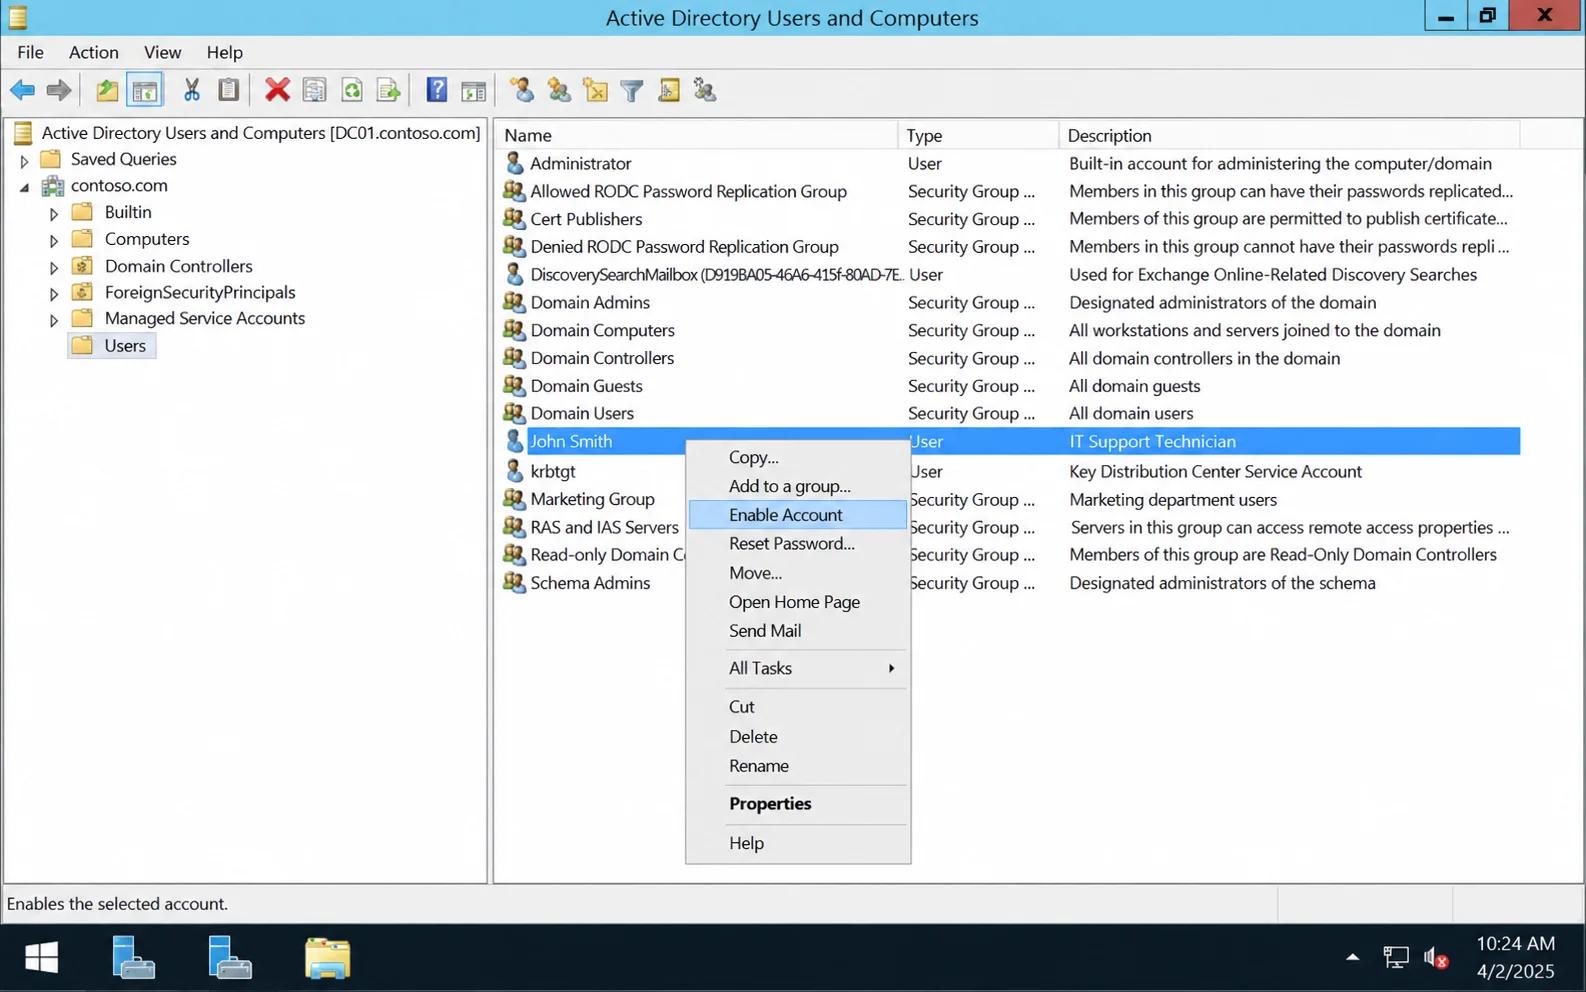
Enable and disable user accounts
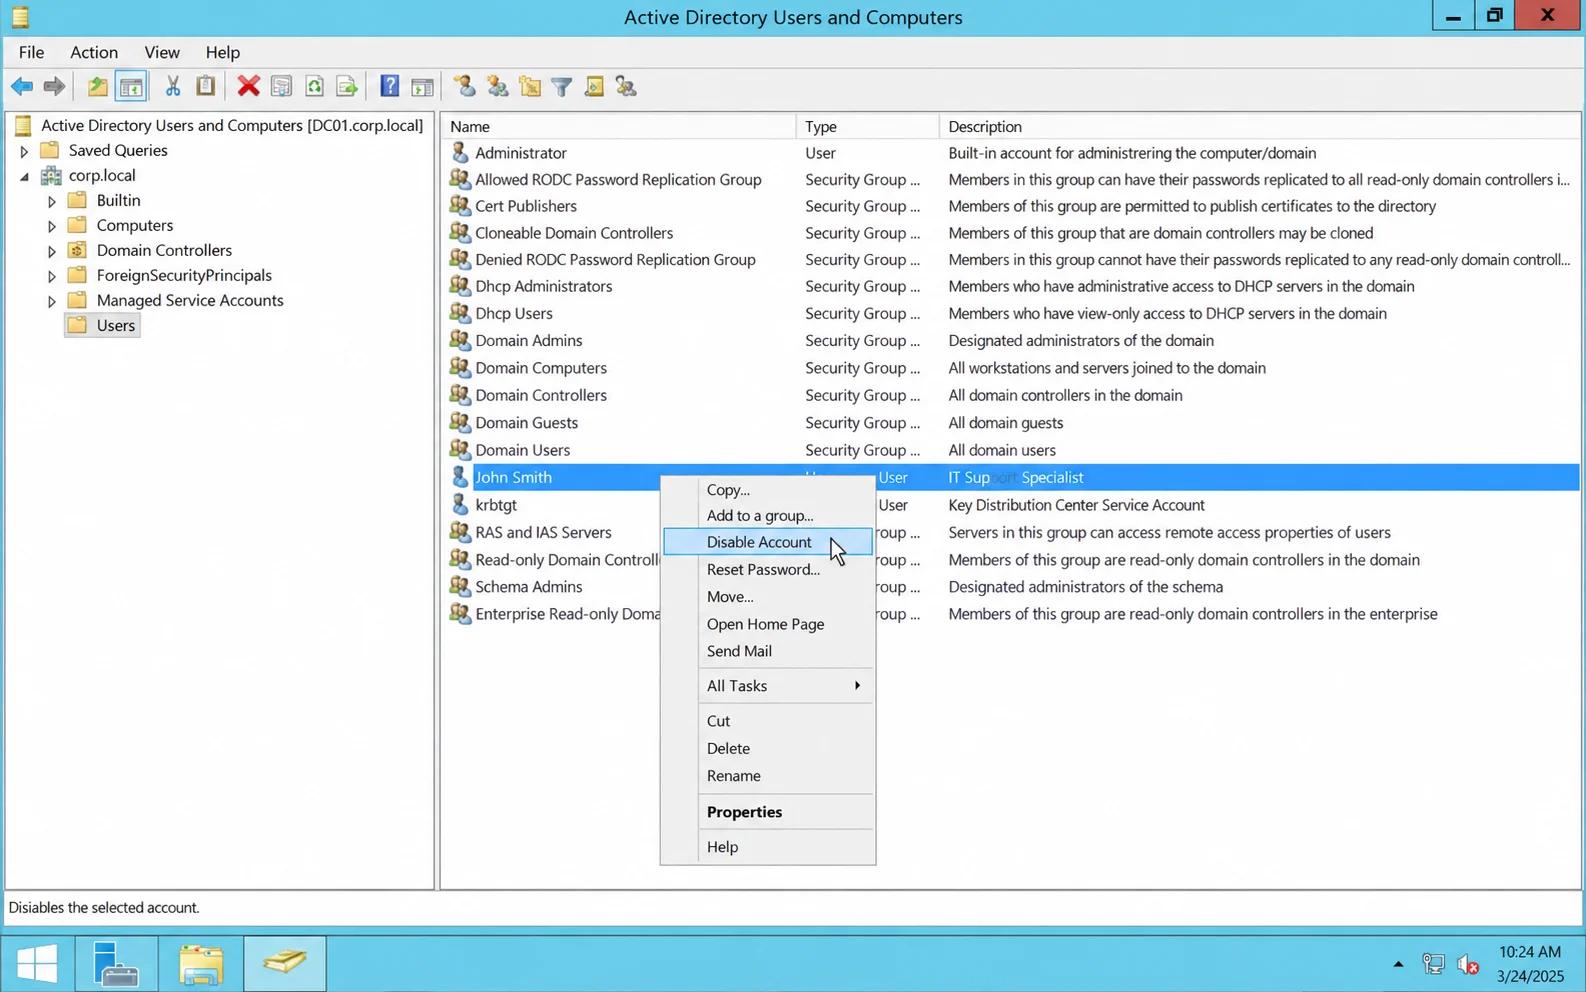
The context menu handles both directions, so right-click a disabled user and click Enable Account to restore access.
Right-click an active user and click Disable Account to revoke it.
For routine cleanup, see this walkthrough of disabling inactive user accounts with PowerShell.
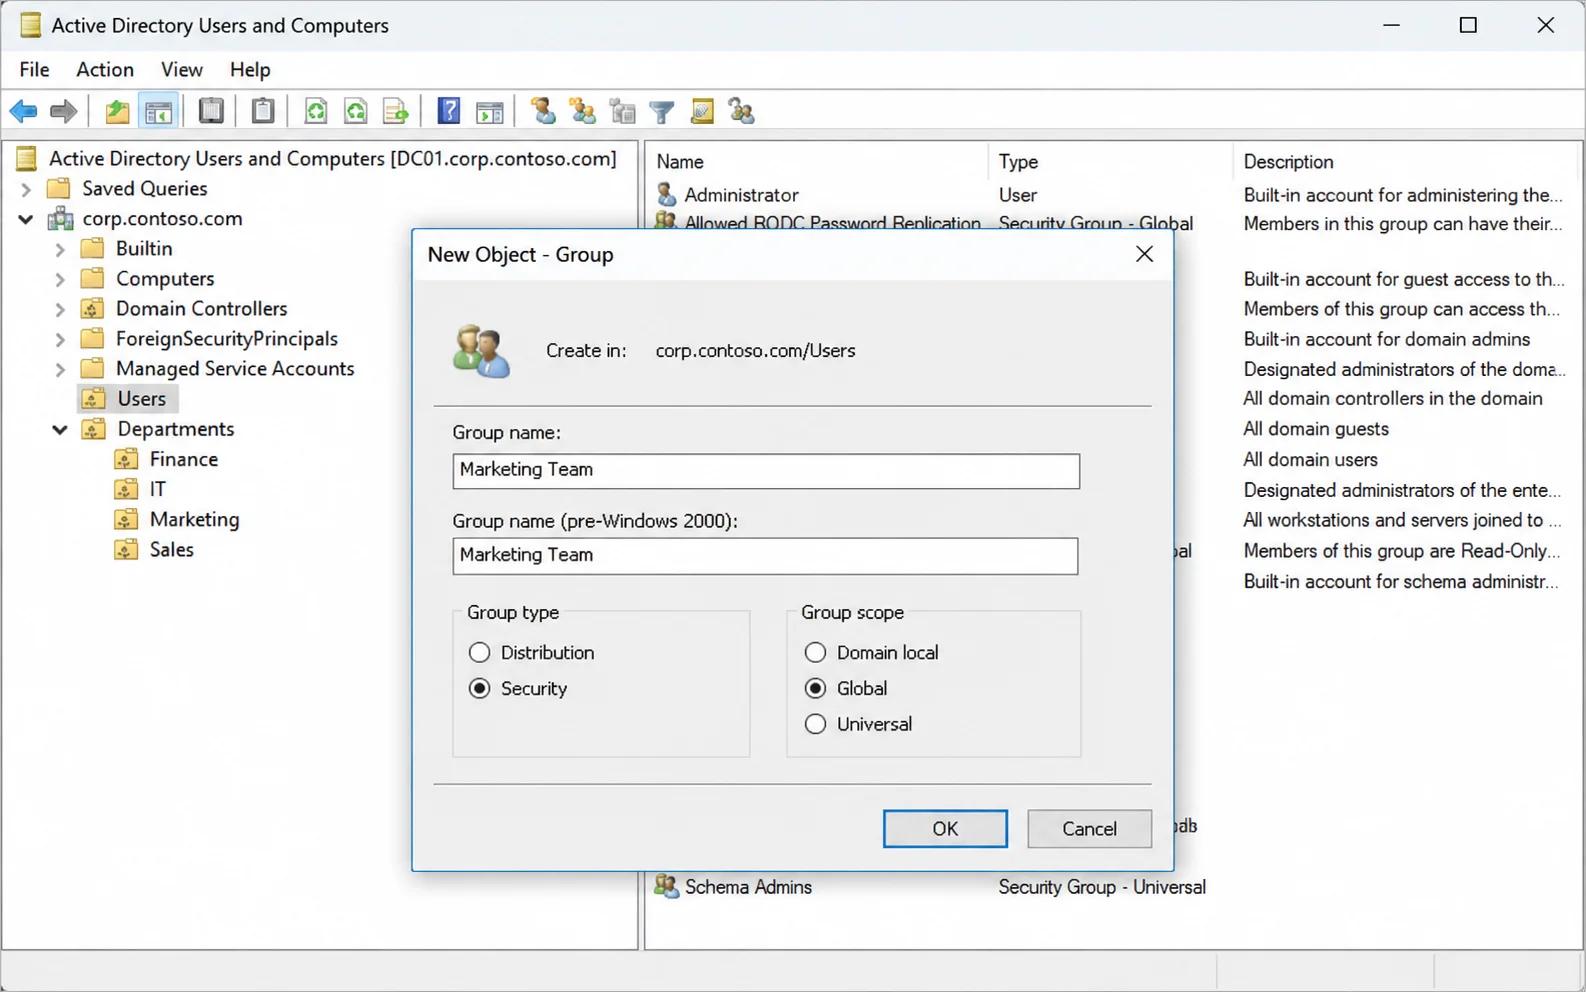
Create a group object
Group type and scope are both set at creation, and changing scope later can fail depending on the memberships already in place.
- Right-click the domain or the OU that will contain the new group, then click New > Group.
- Specify a name and a pre-Windows 2000 name, the group type (distribution or security), and the group scope (domain local, global, or universal).
3. Click OK to create the group.
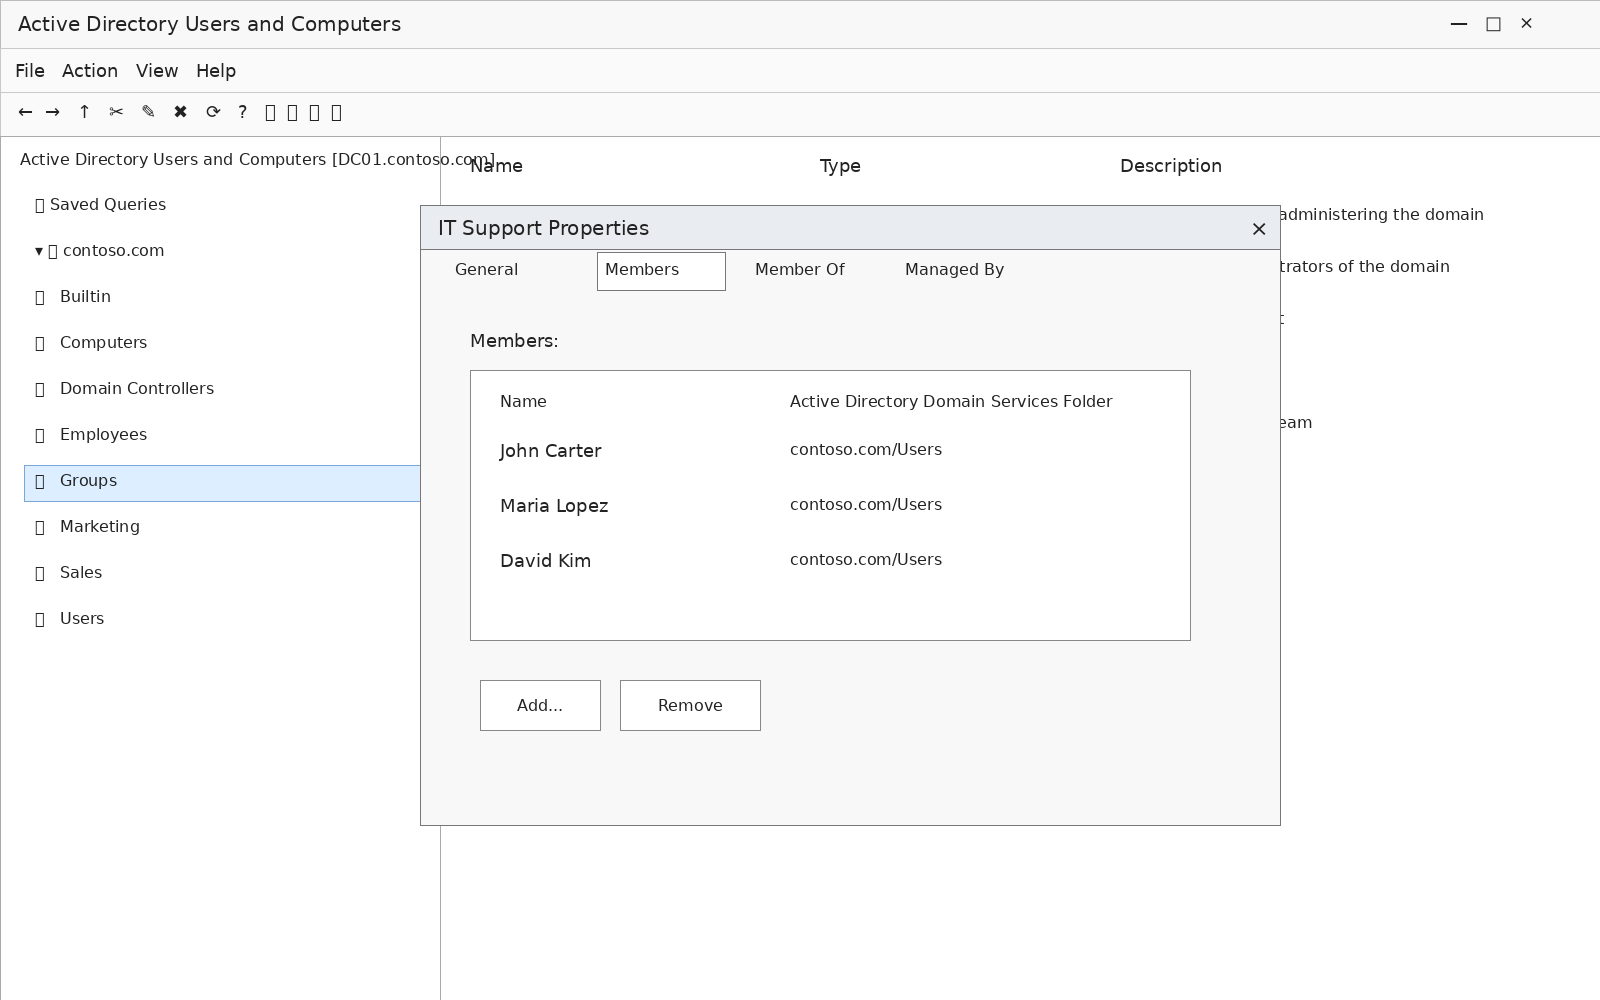
Add and remove users from a group
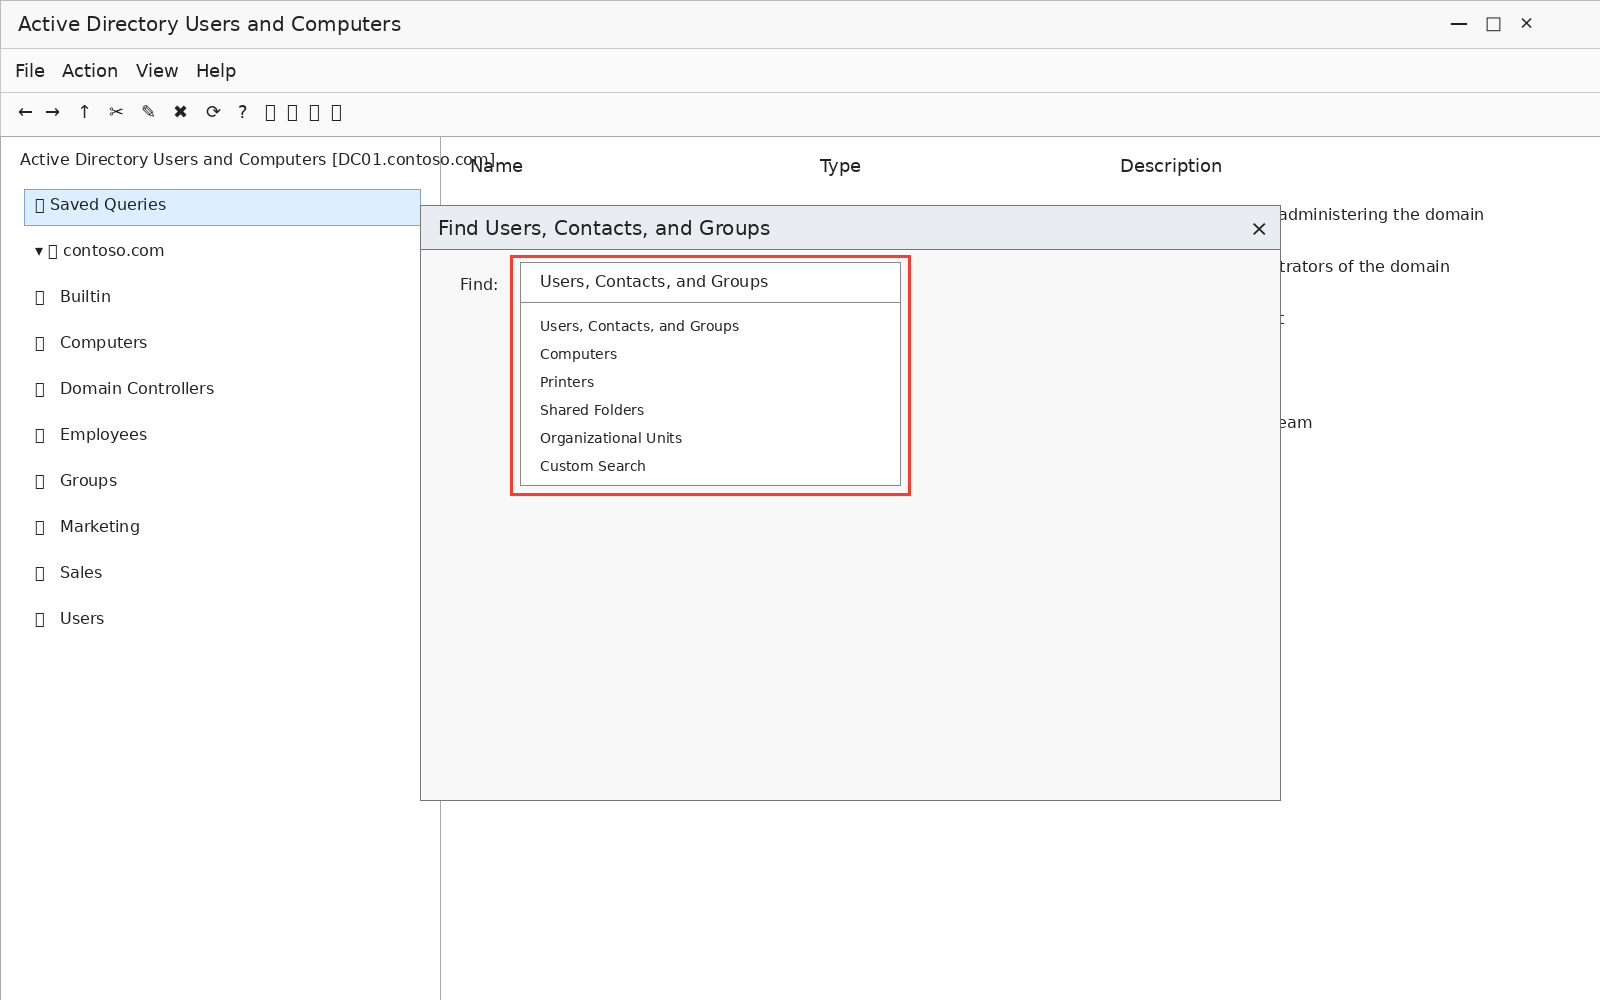
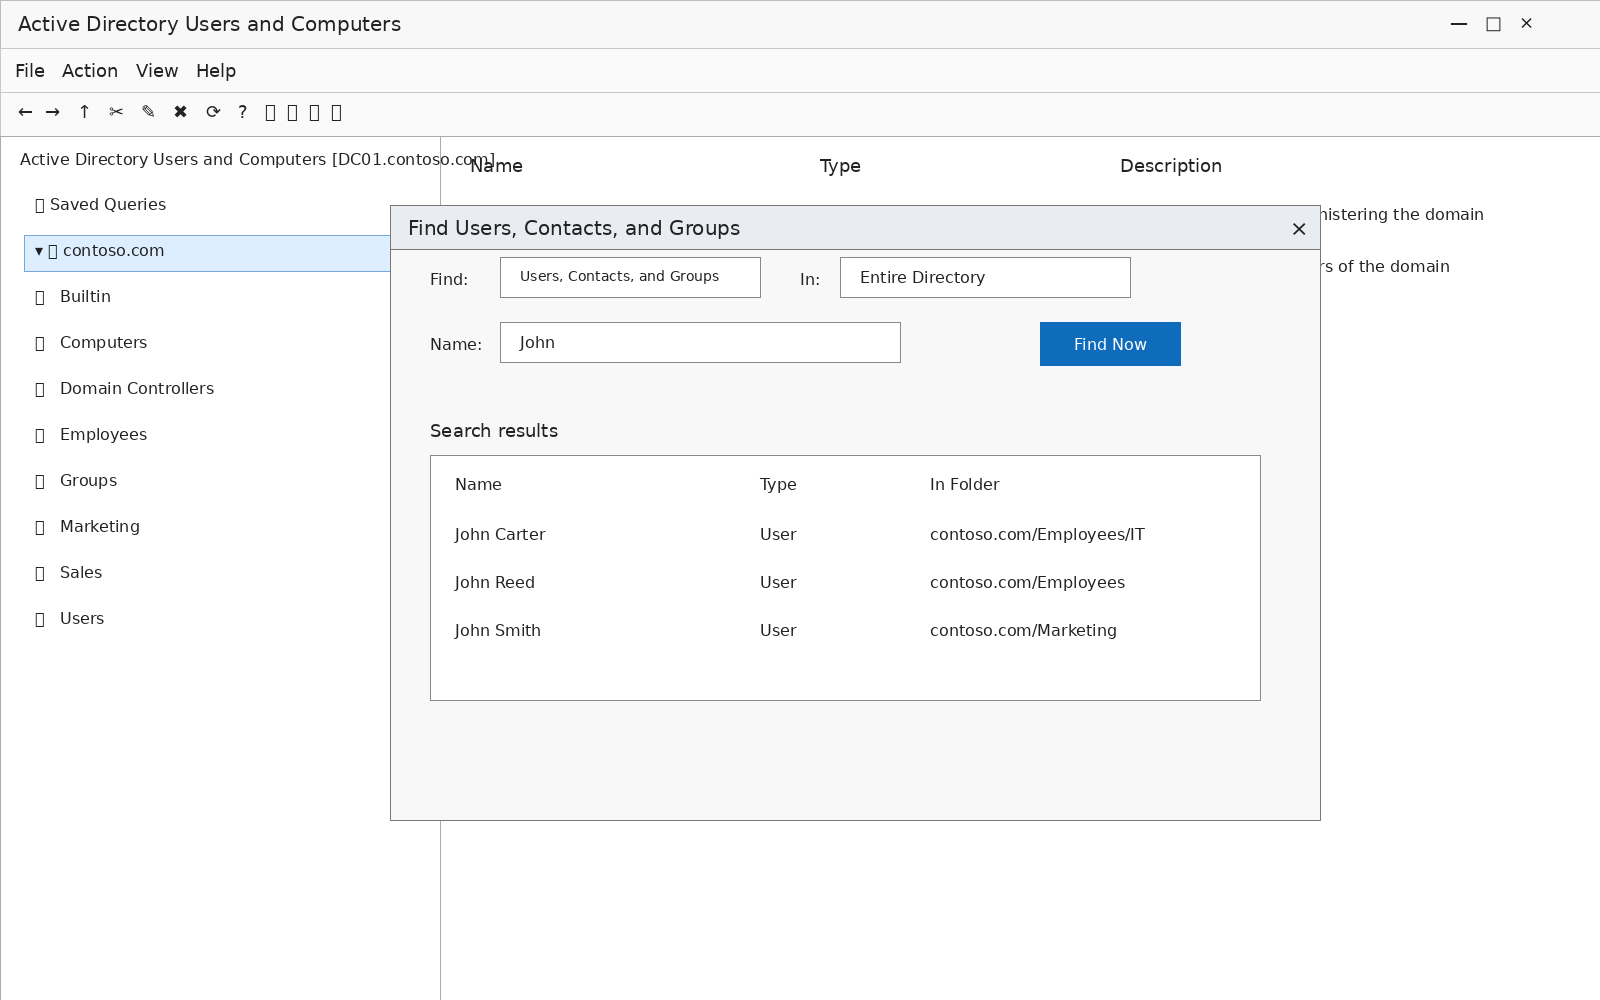
- Right-click the domain holding the group and select Find. Select Users, Contacts, and Groups in the Find dropdown list, enter the group name, and click Find Now.
2. Right-click the group in the results, select Properties, and open the Members tab.
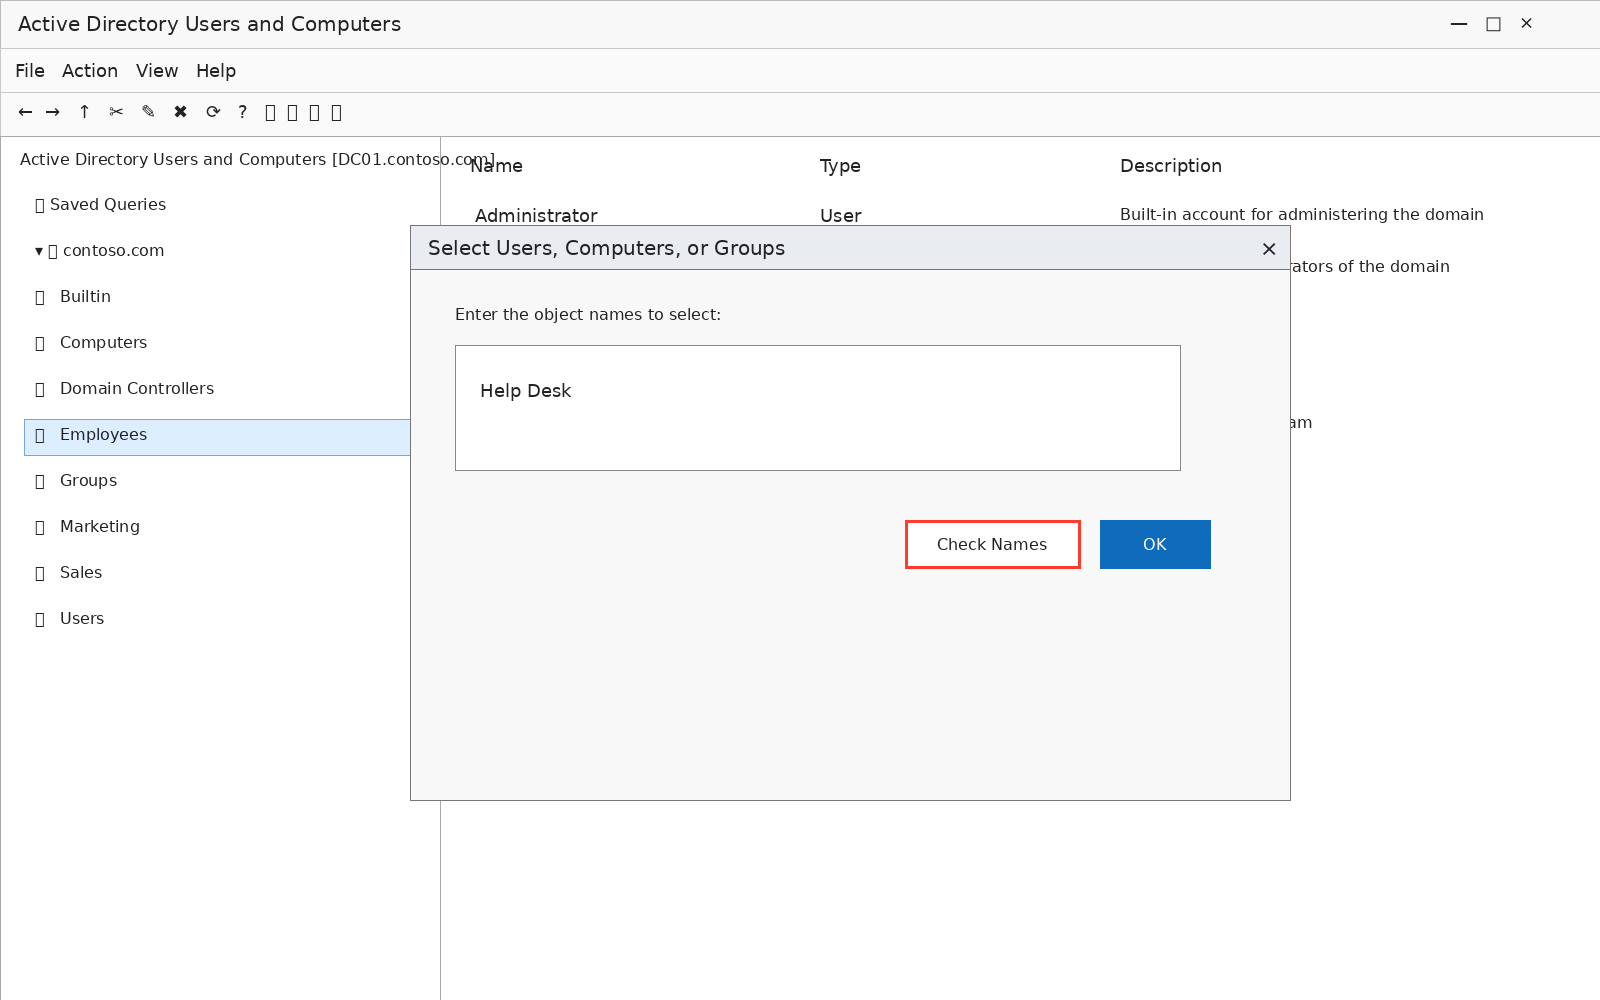
3. To add a member, click Add, type the user's name, and click Check Names, then click OK to confirm the addition. Semicolons separate multiple names typed directly, and an expanded search option in the same dialog looks up users one at a time.
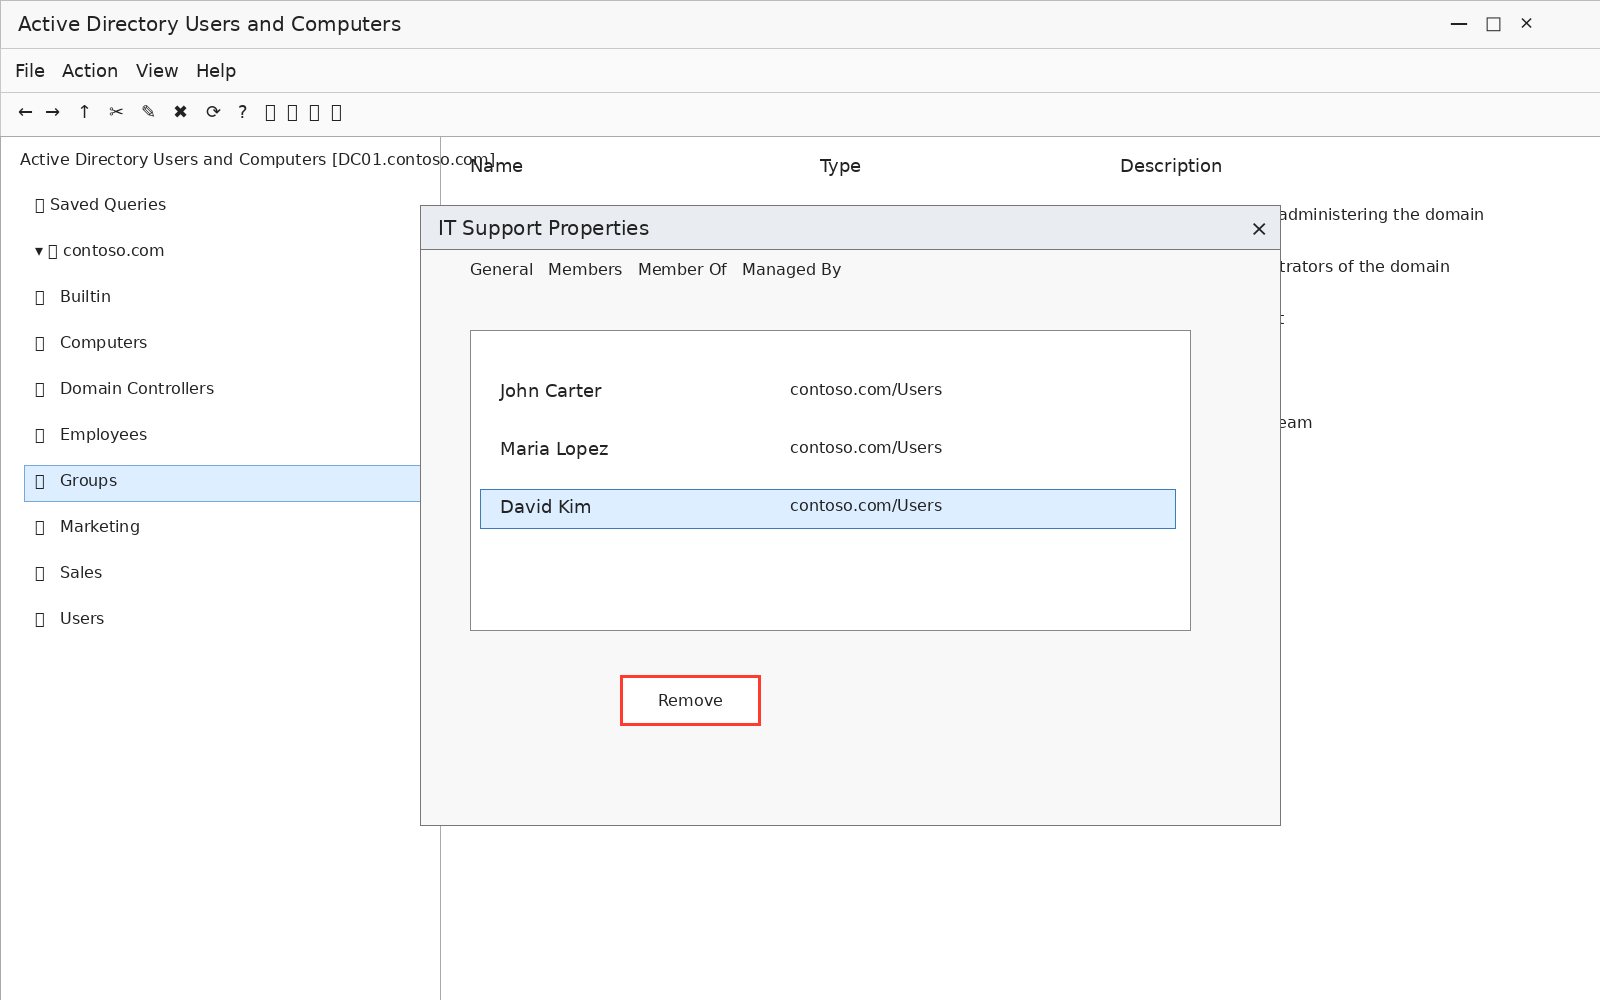
4. To remove a member, highlight the user on the Members tab and click Remove.
Reset a user's password
- Go to the user's domain folder.
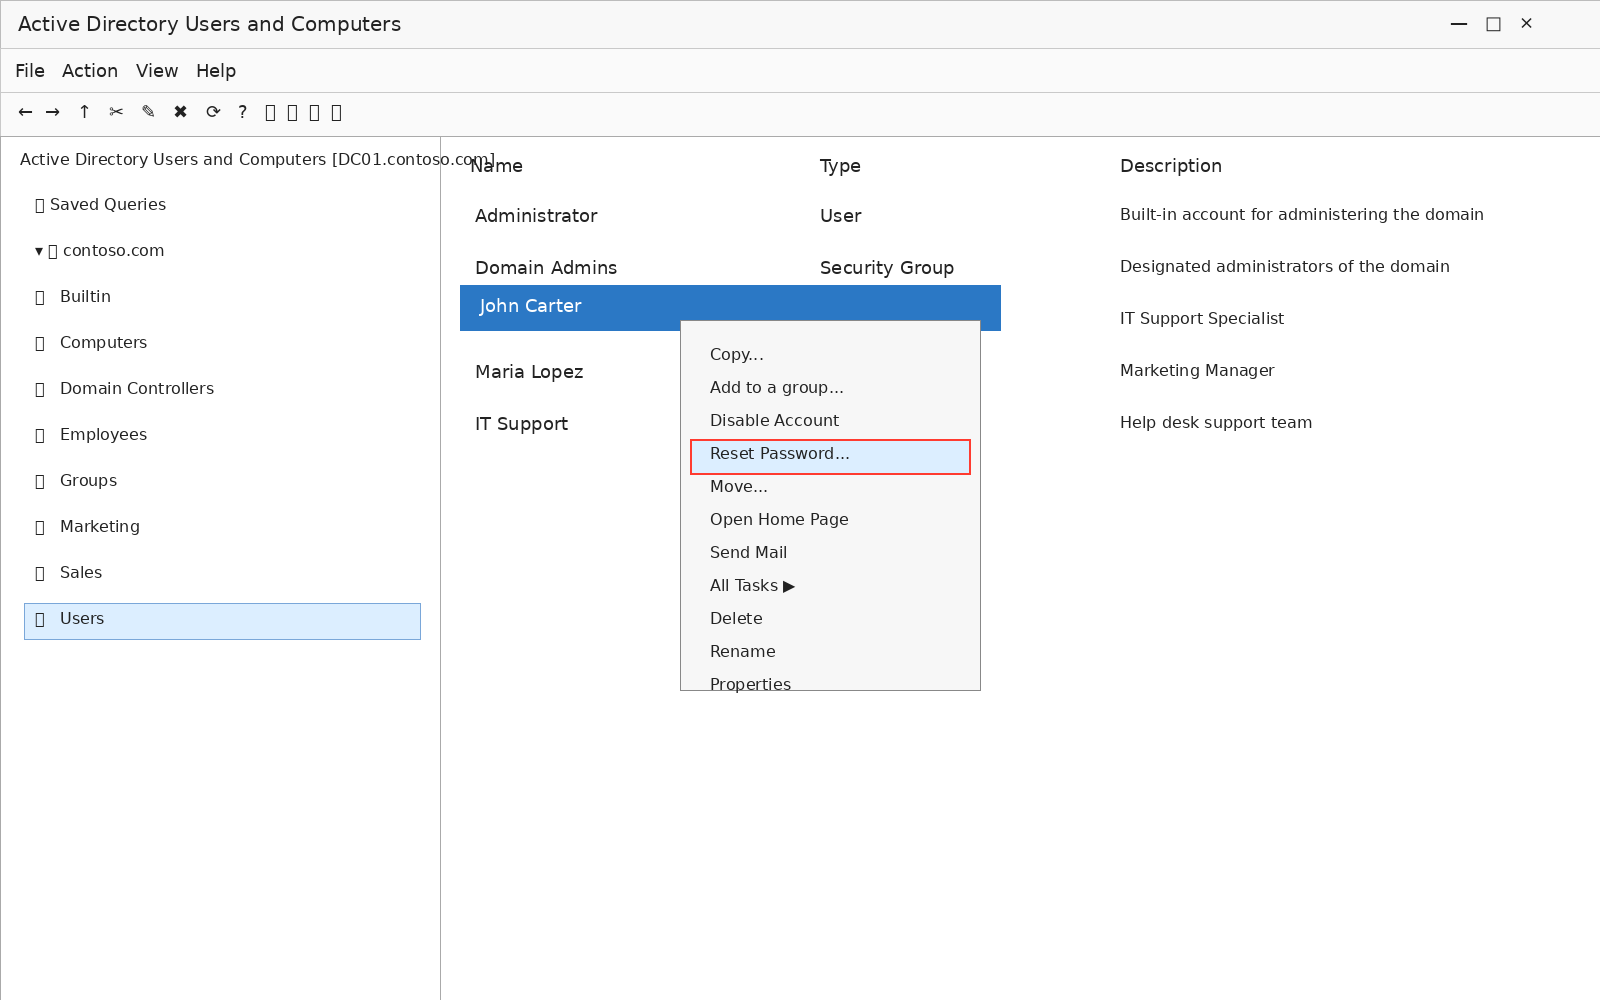
- Right-click the user's name, choose All Tasks, and select Reset Password.
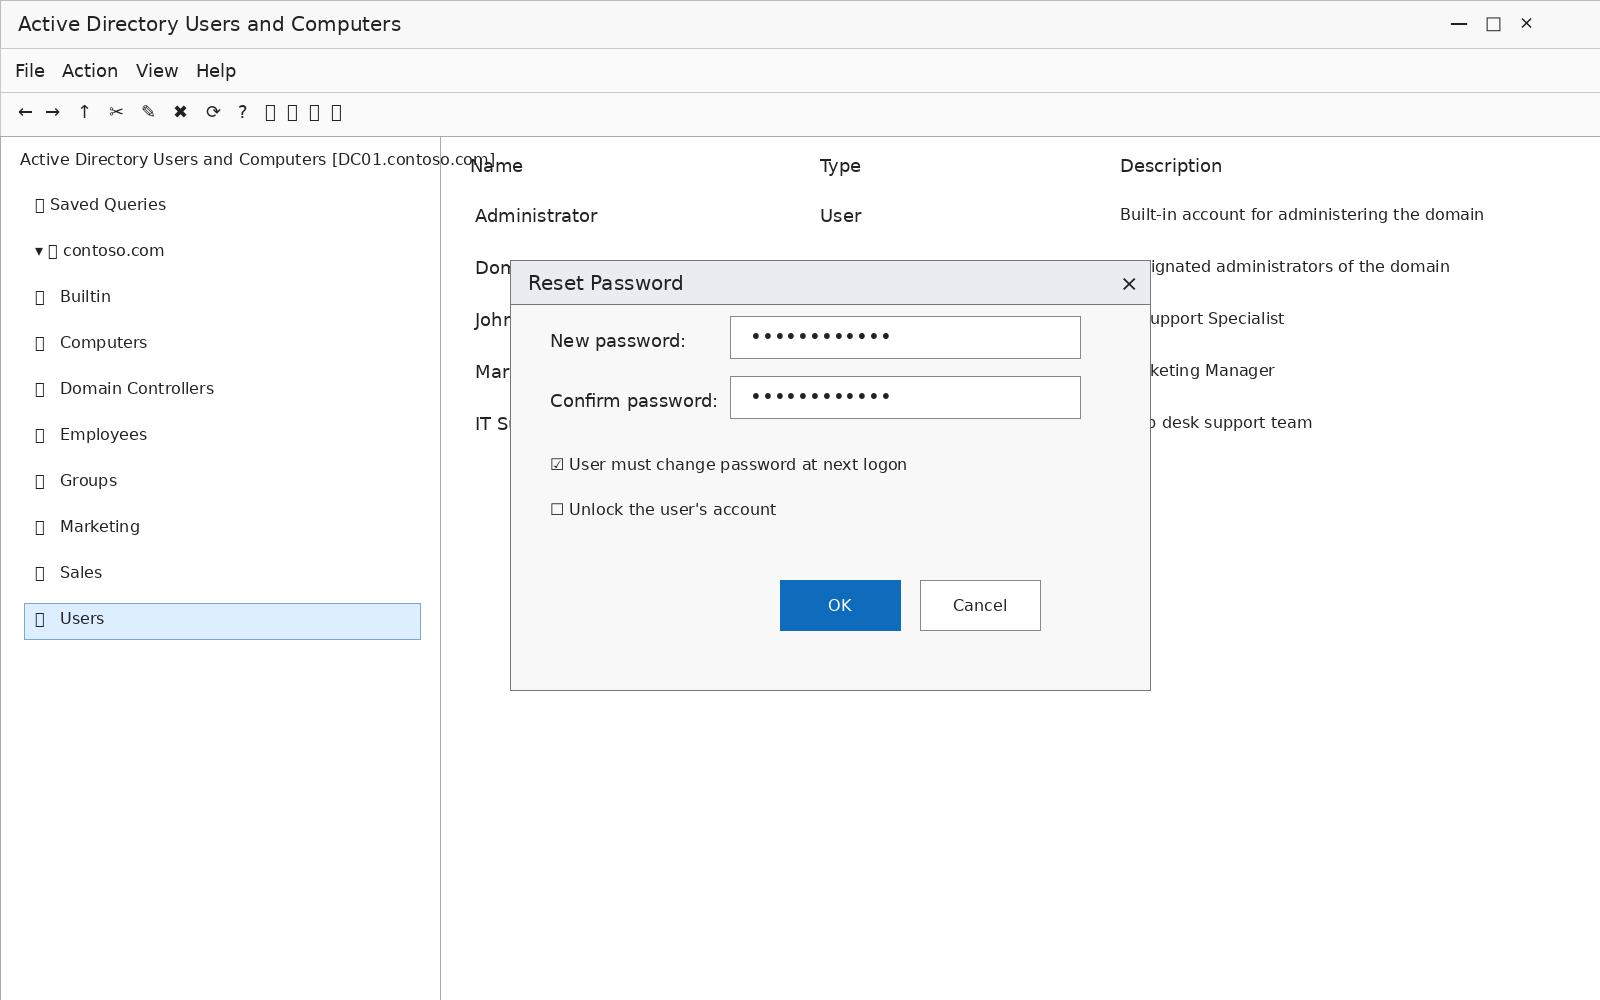
3. Type a new password, type it again in the Confirm password box, and click OK.
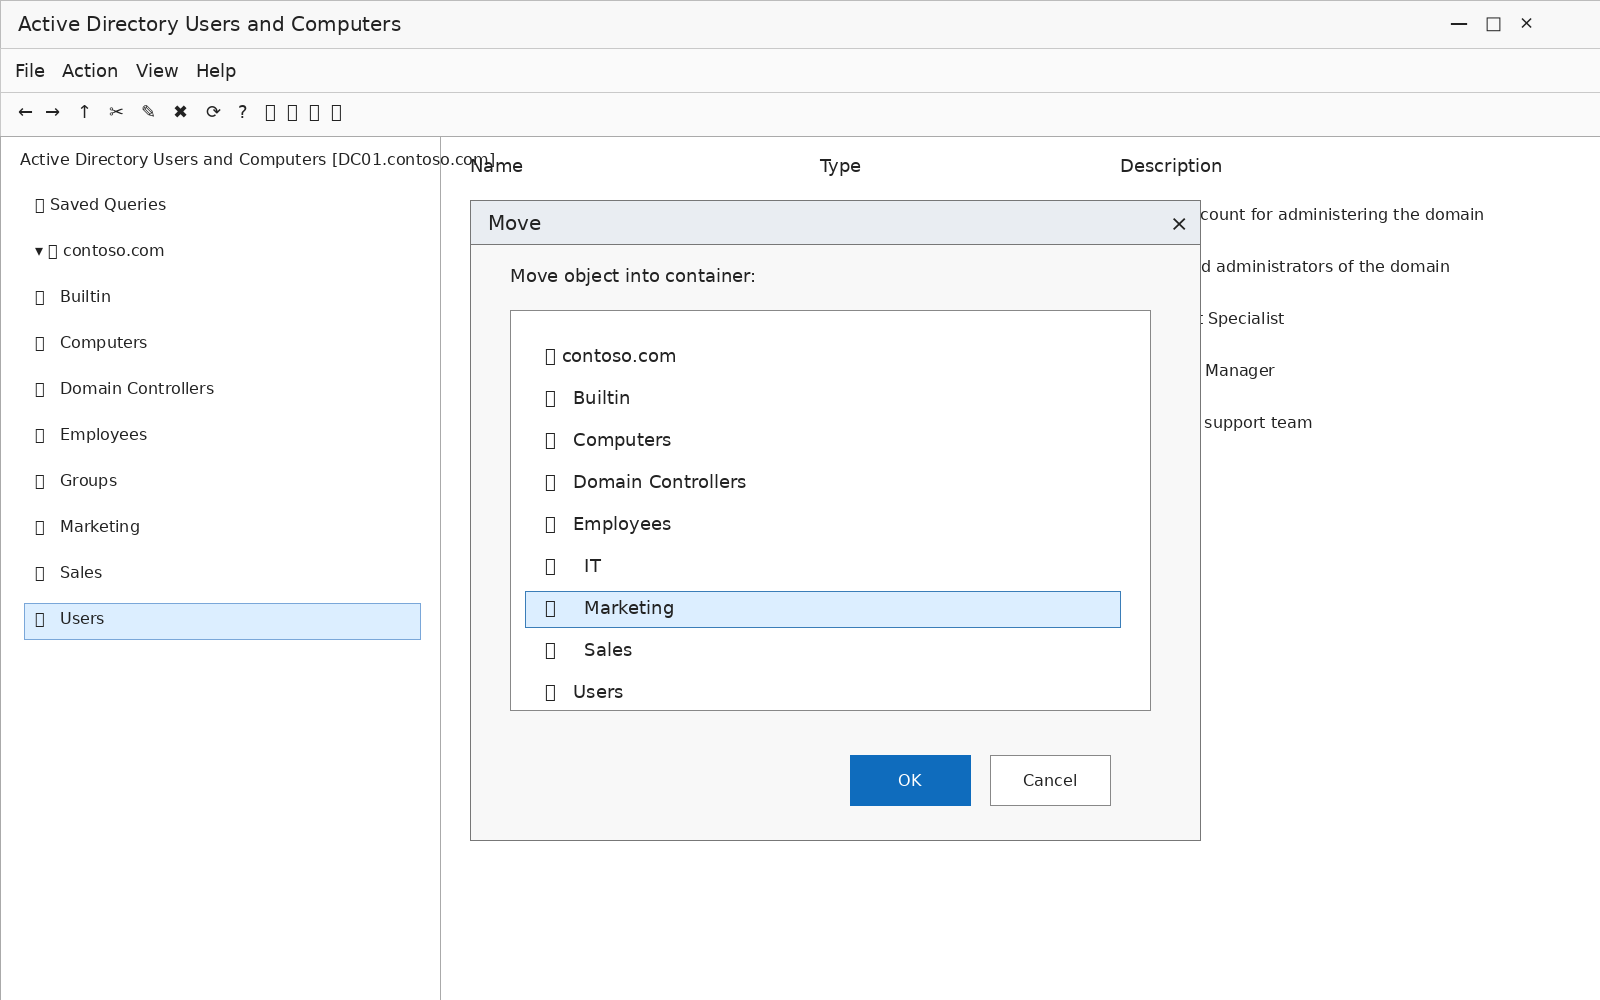
Move a user to another organizational unit
Moving an object changes which OUs' delegated permissions and group policies apply to it, so confirm the destination before committing.
- Right-click the user and select Move.
- Choose the destination container and click OK.
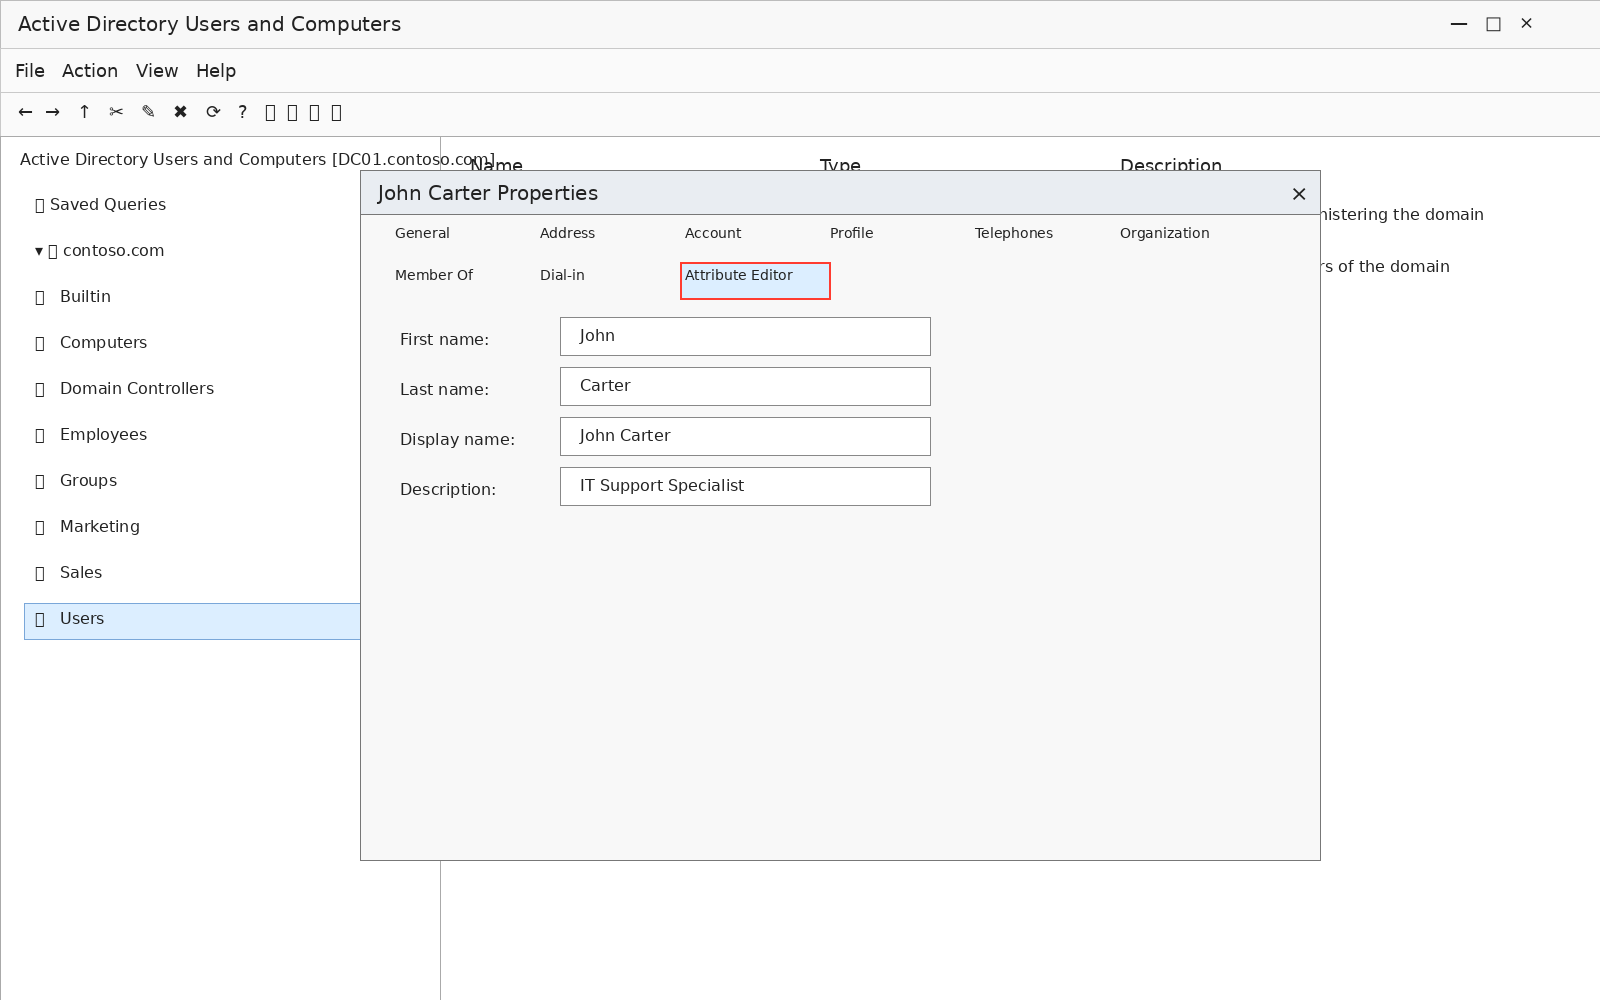
Change a user's attributes
- Right-click the user and select Properties.
- Navigate to the tab holding the attribute you want to change, make the edit, and click OK.
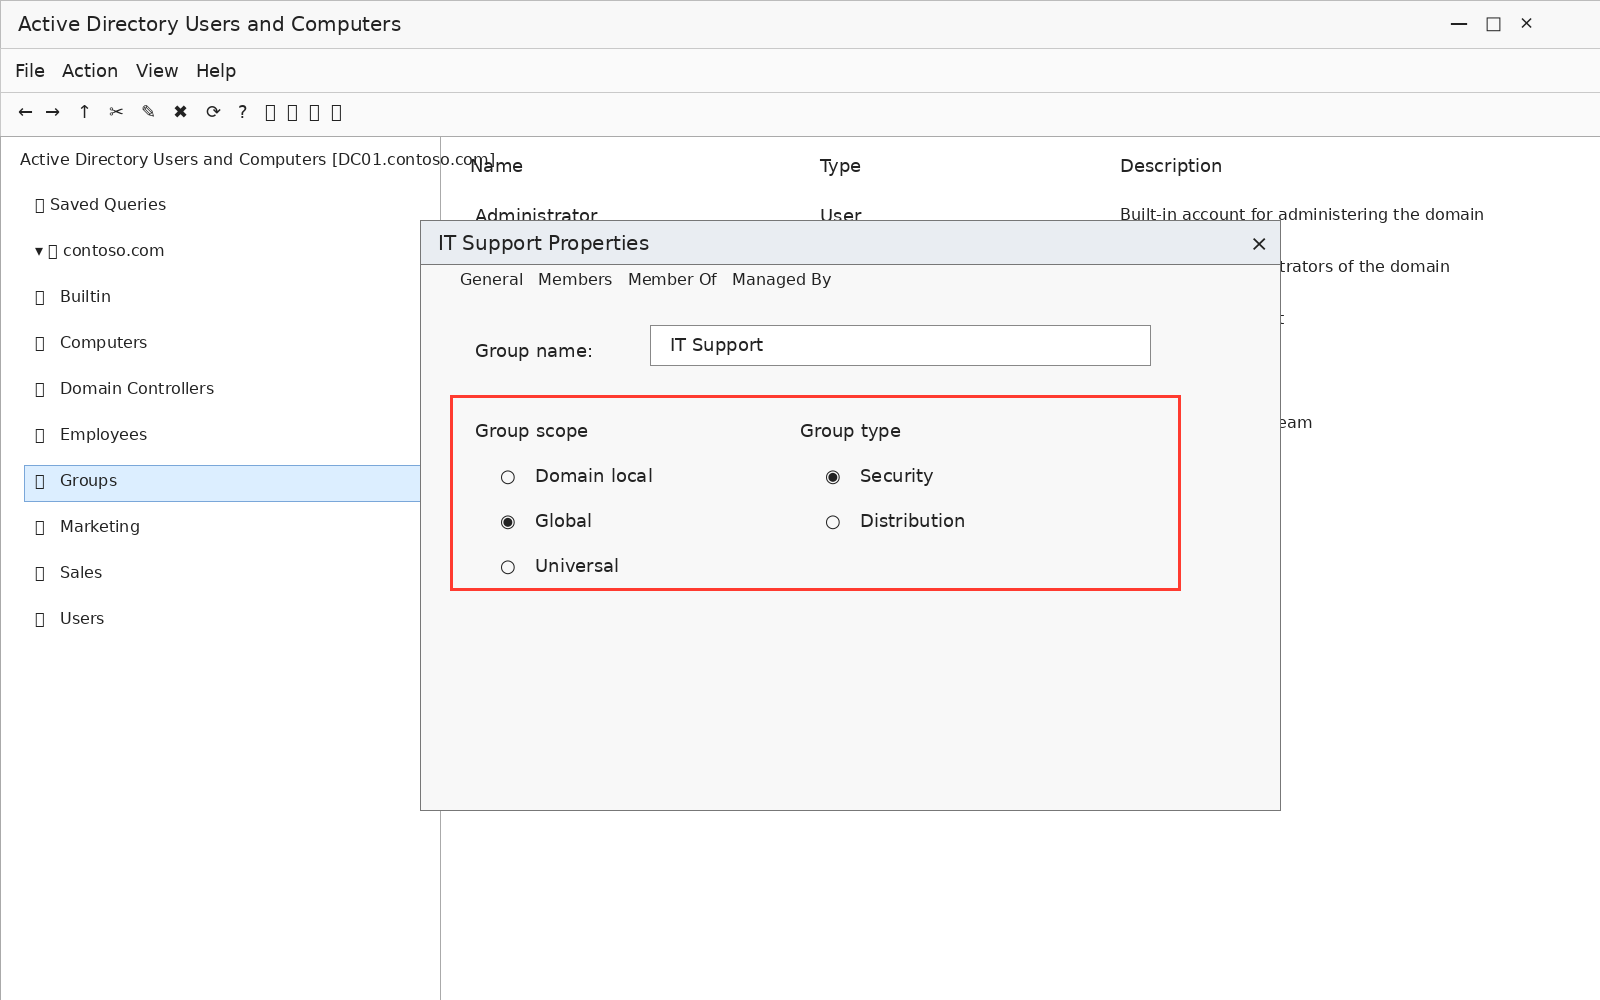
Change a group's type and scope
Both settings live on the General tab, and Windows grays out conversions that current memberships won't allow.
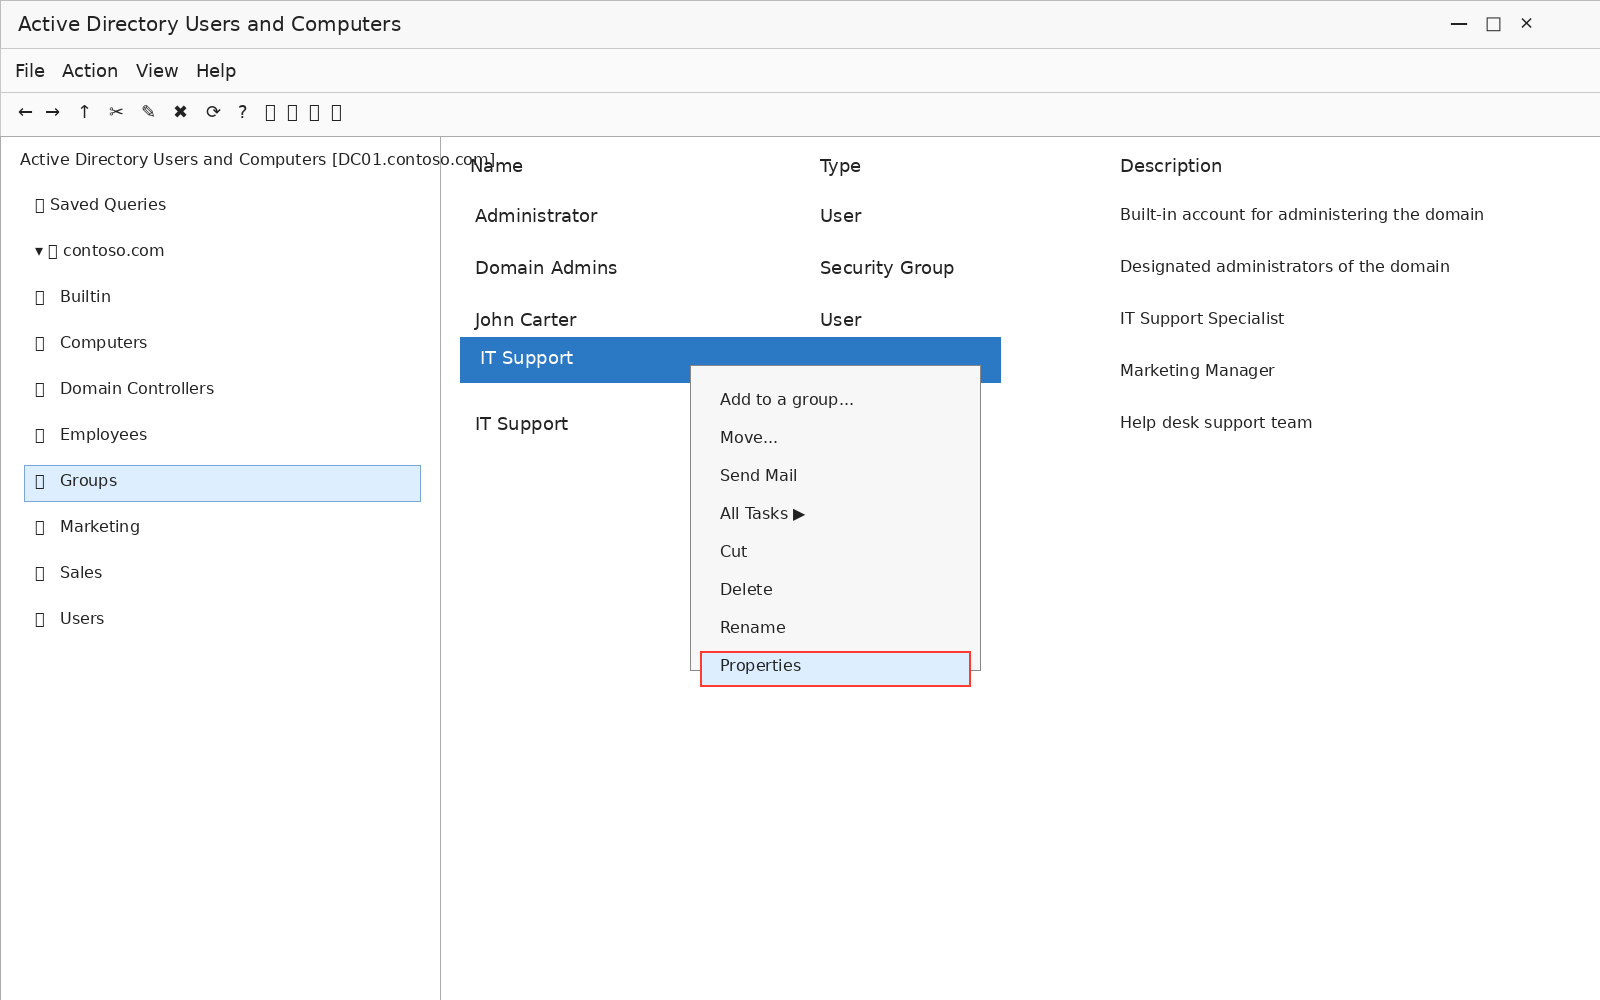
- Right-click the group and select Properties.
2. On the General tab, specify the new group type or scope, then click OK.
Find objects in the directory
The Find dialog searches a single domain or the whole directory for users, contacts, groups, and OUs.
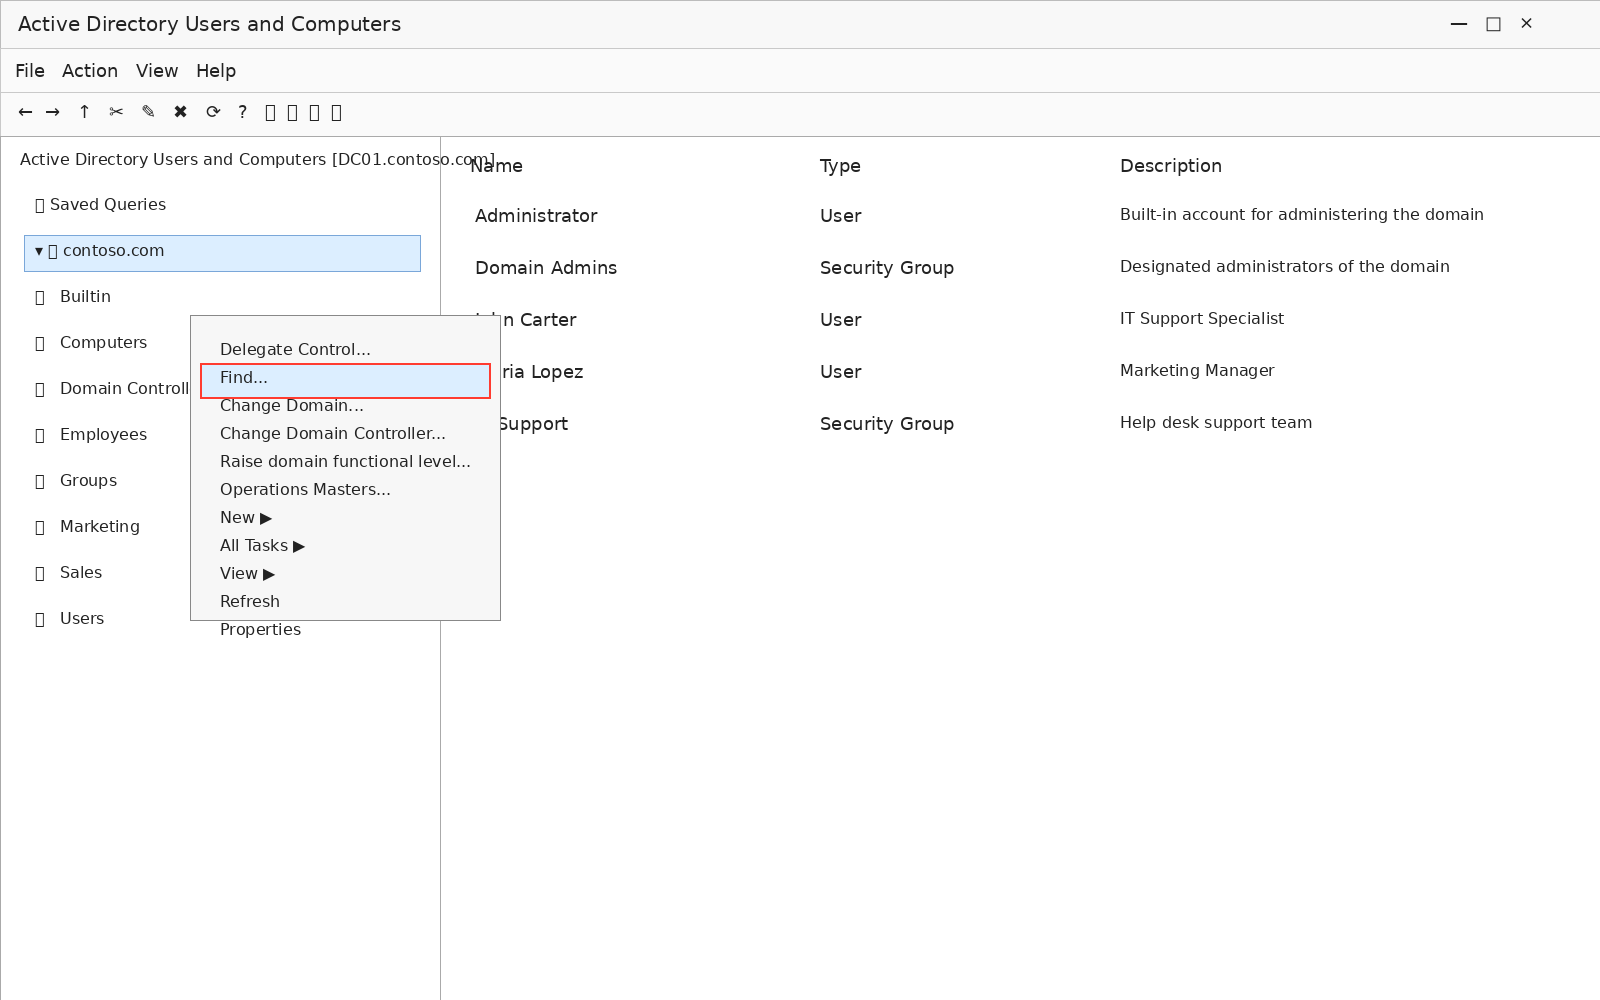
- Right-click a domain or OU and click Find.
2. Set the Find dropdown to the object type, use the In dropdown to choose either a domain or the entire directory, and use Browse to narrow the search to a particular OU. Type the first or full name of the user, or the name of the group, in the Name field, then click Find Now.
3. Review the results. Double-click an object to open its properties.
Delegate control to users
The Delegation of Control wizard lets a user or group perform specific tasks, such as creating user objects or managing particular domain controllers, without membership in a broader admin group.
- Right-click the domain or the OU where the permissions apply, then click Delegate Control to launch the wizard.
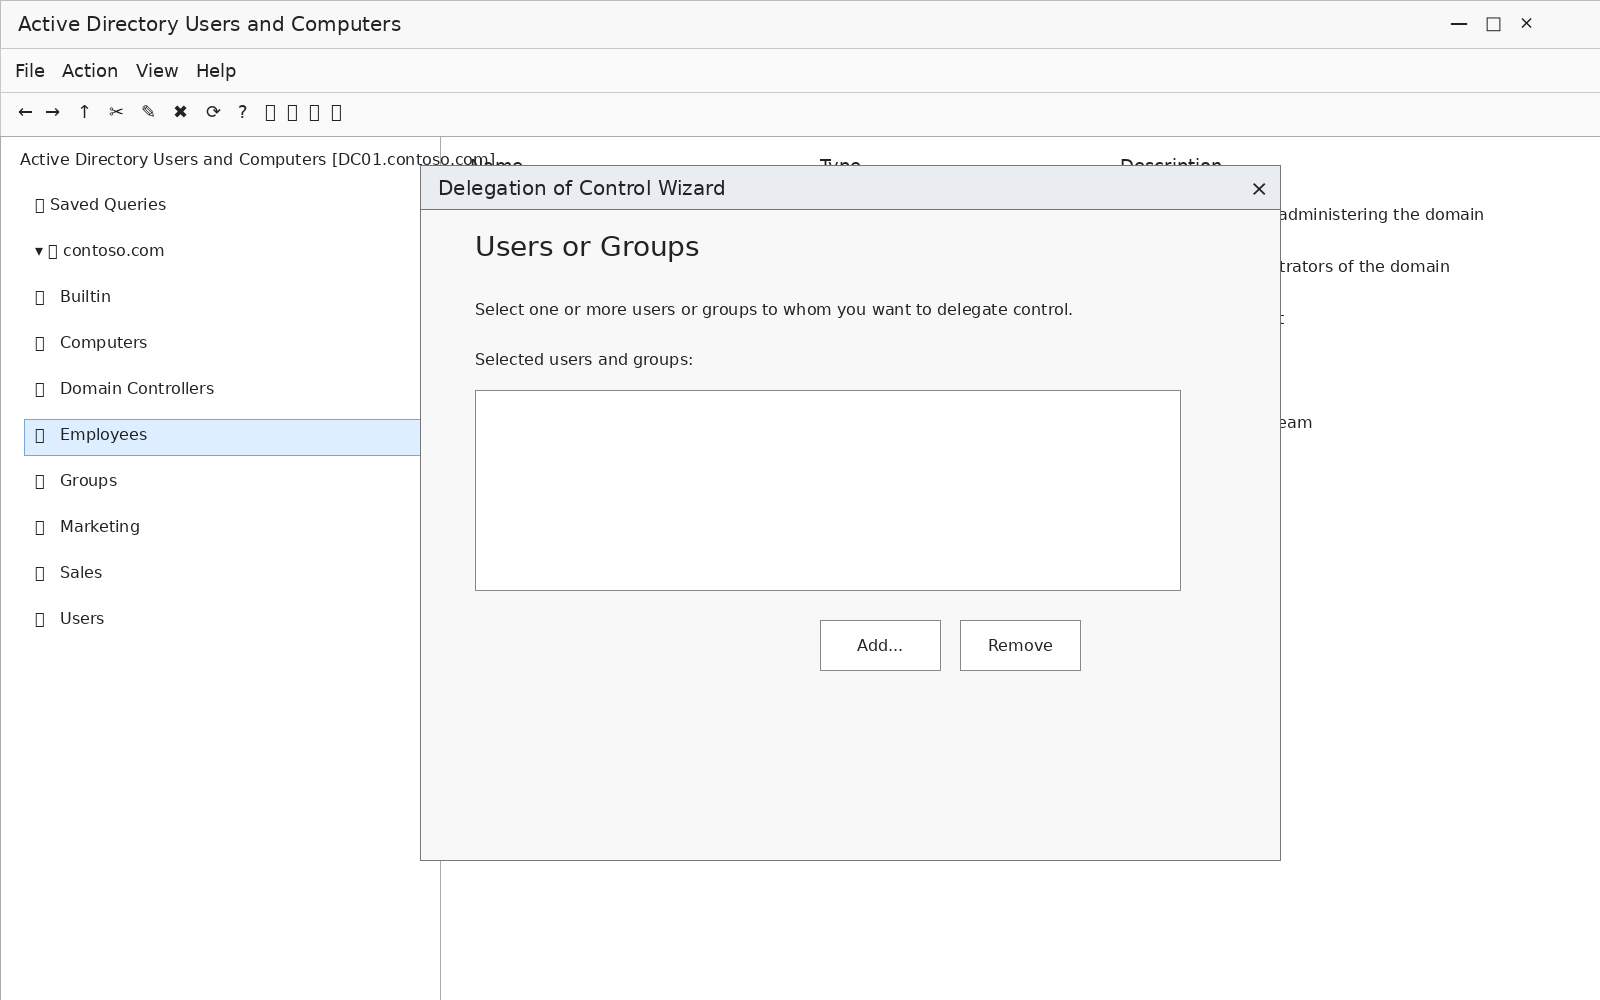
- Click Next past the welcome page, then click Add to search for the user or group receiving the permissions.
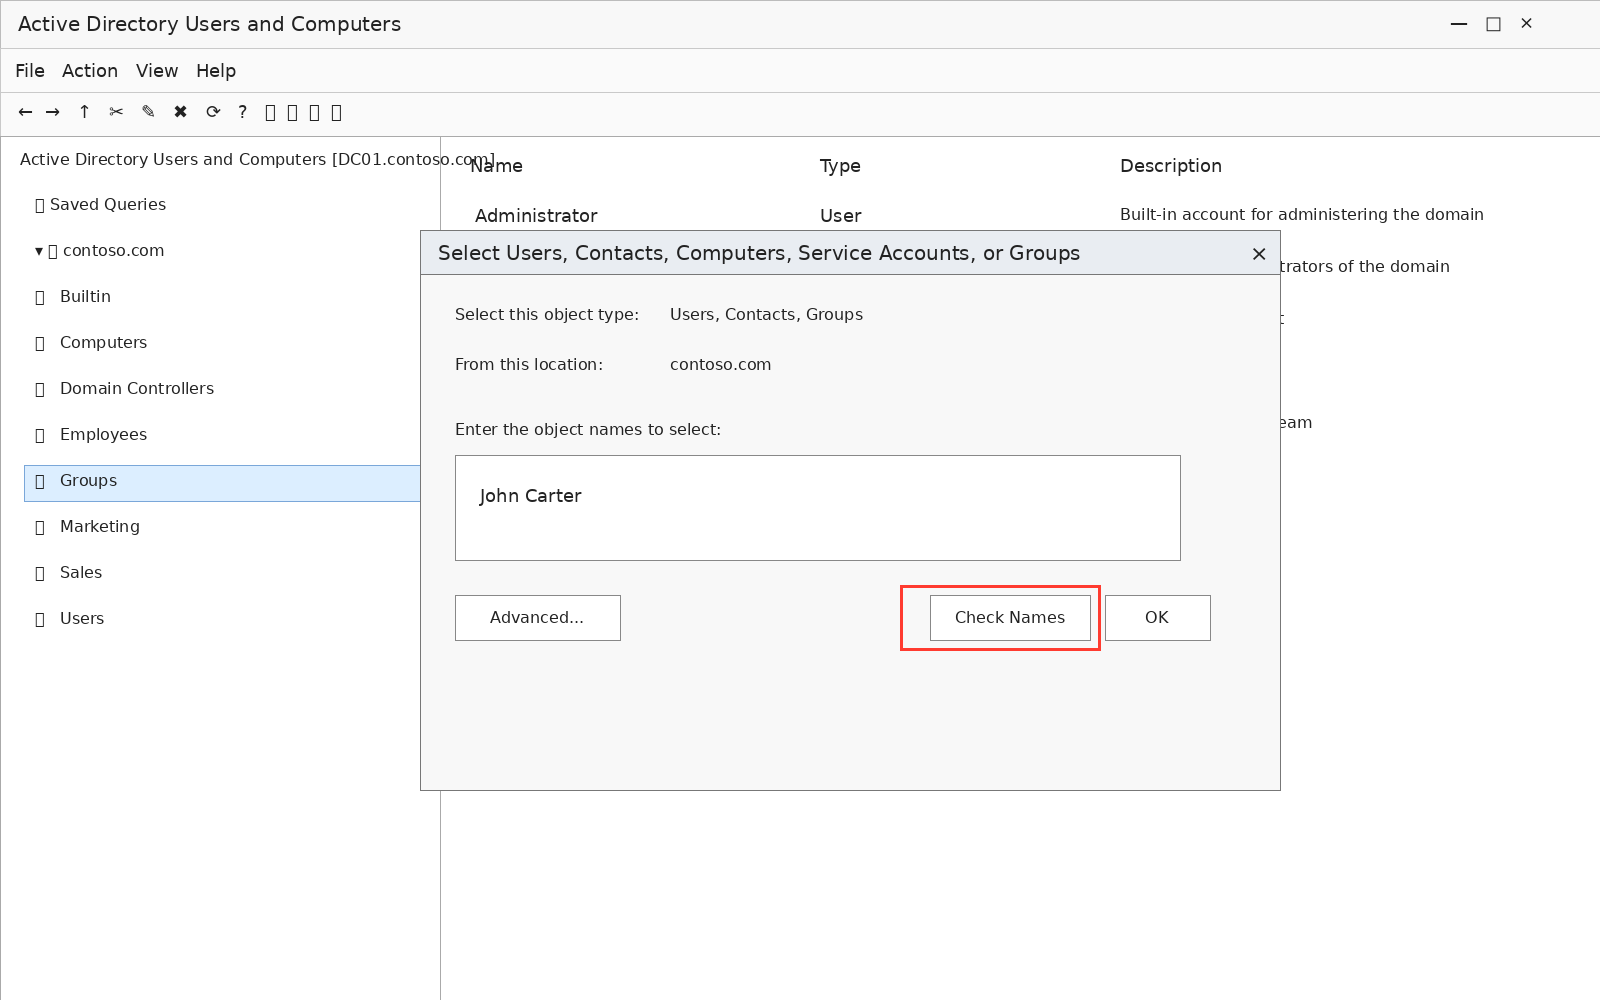
3. Type the user or group name, then click Check Names. Select the object from the list of matches, click OK, confirm it appears in the Selected users and groups field, and click Next.
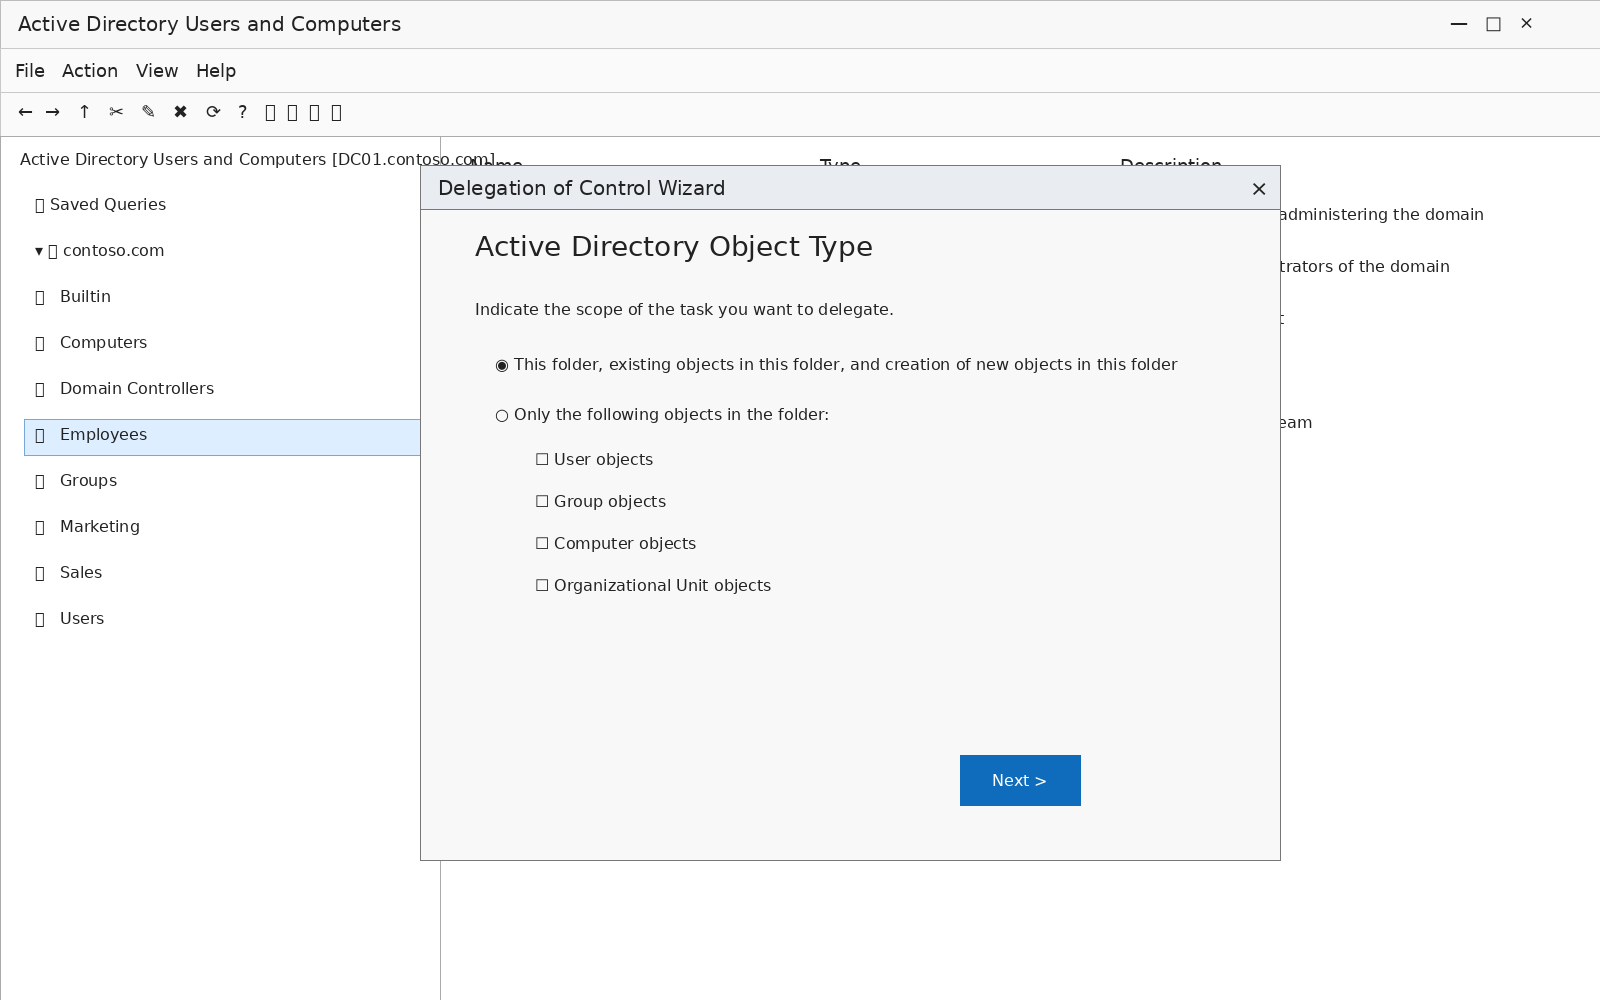
4. Select the scope. This folder, existing objects in this folder, and new objects created in this folder grant permissions across the selected OU. Only the following objects in the folder narrow them to the object types you specify. Click Next.
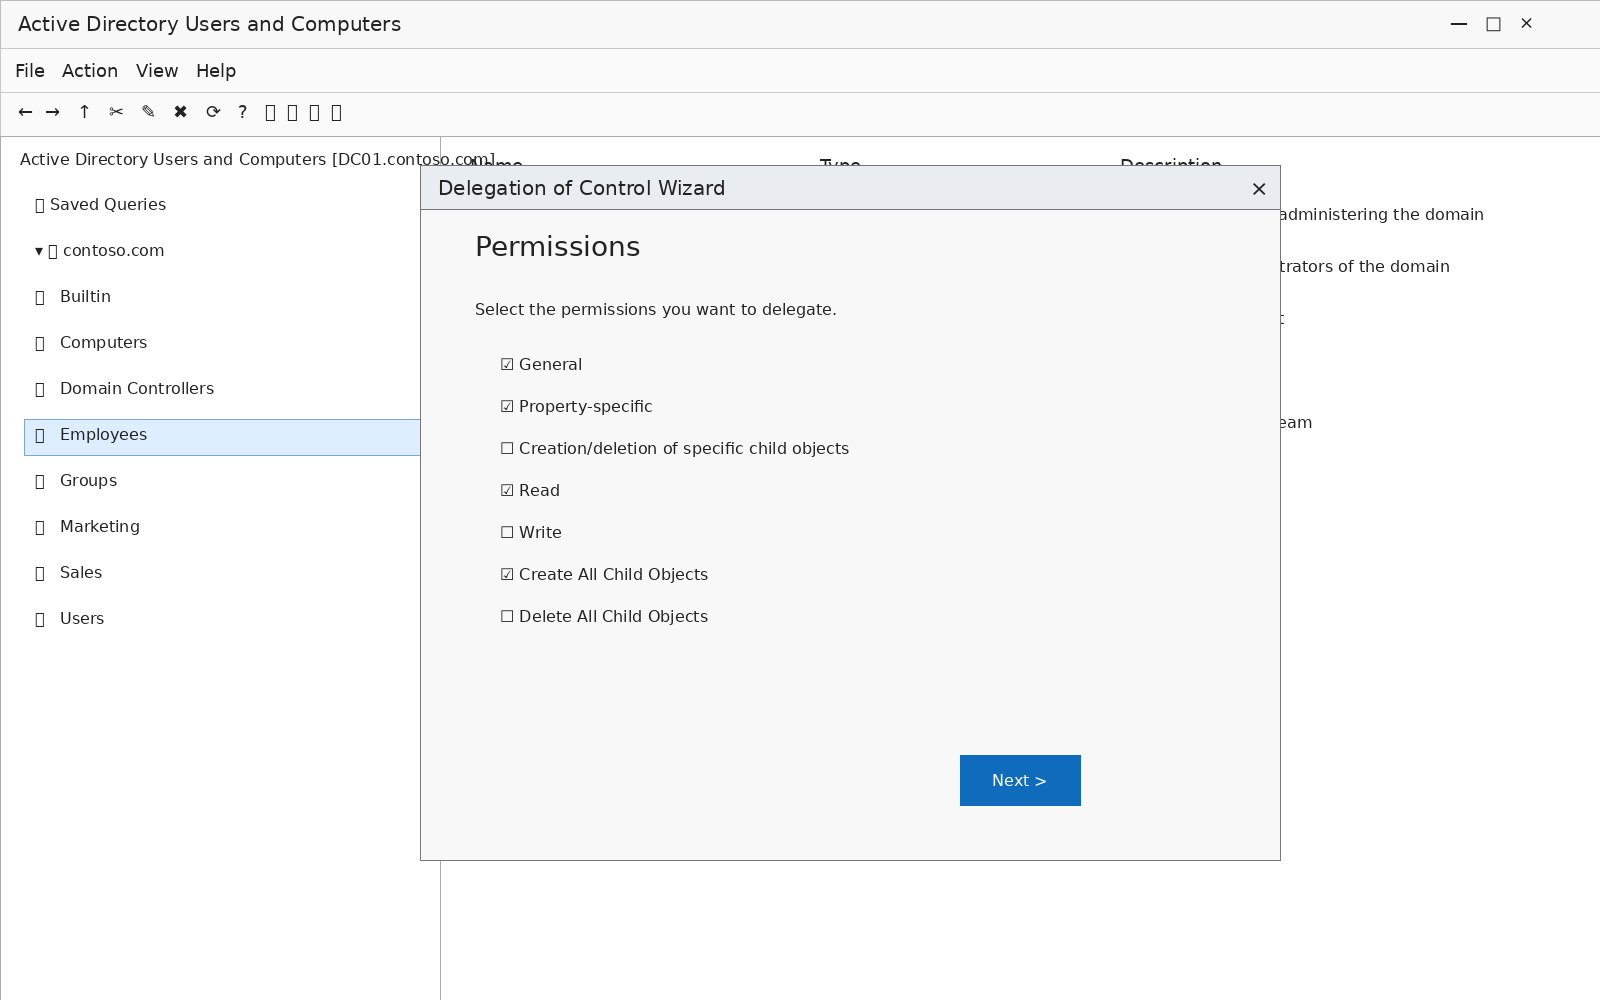
5. Select the permissions to delegate and click Next, then review the summary and click Finish.
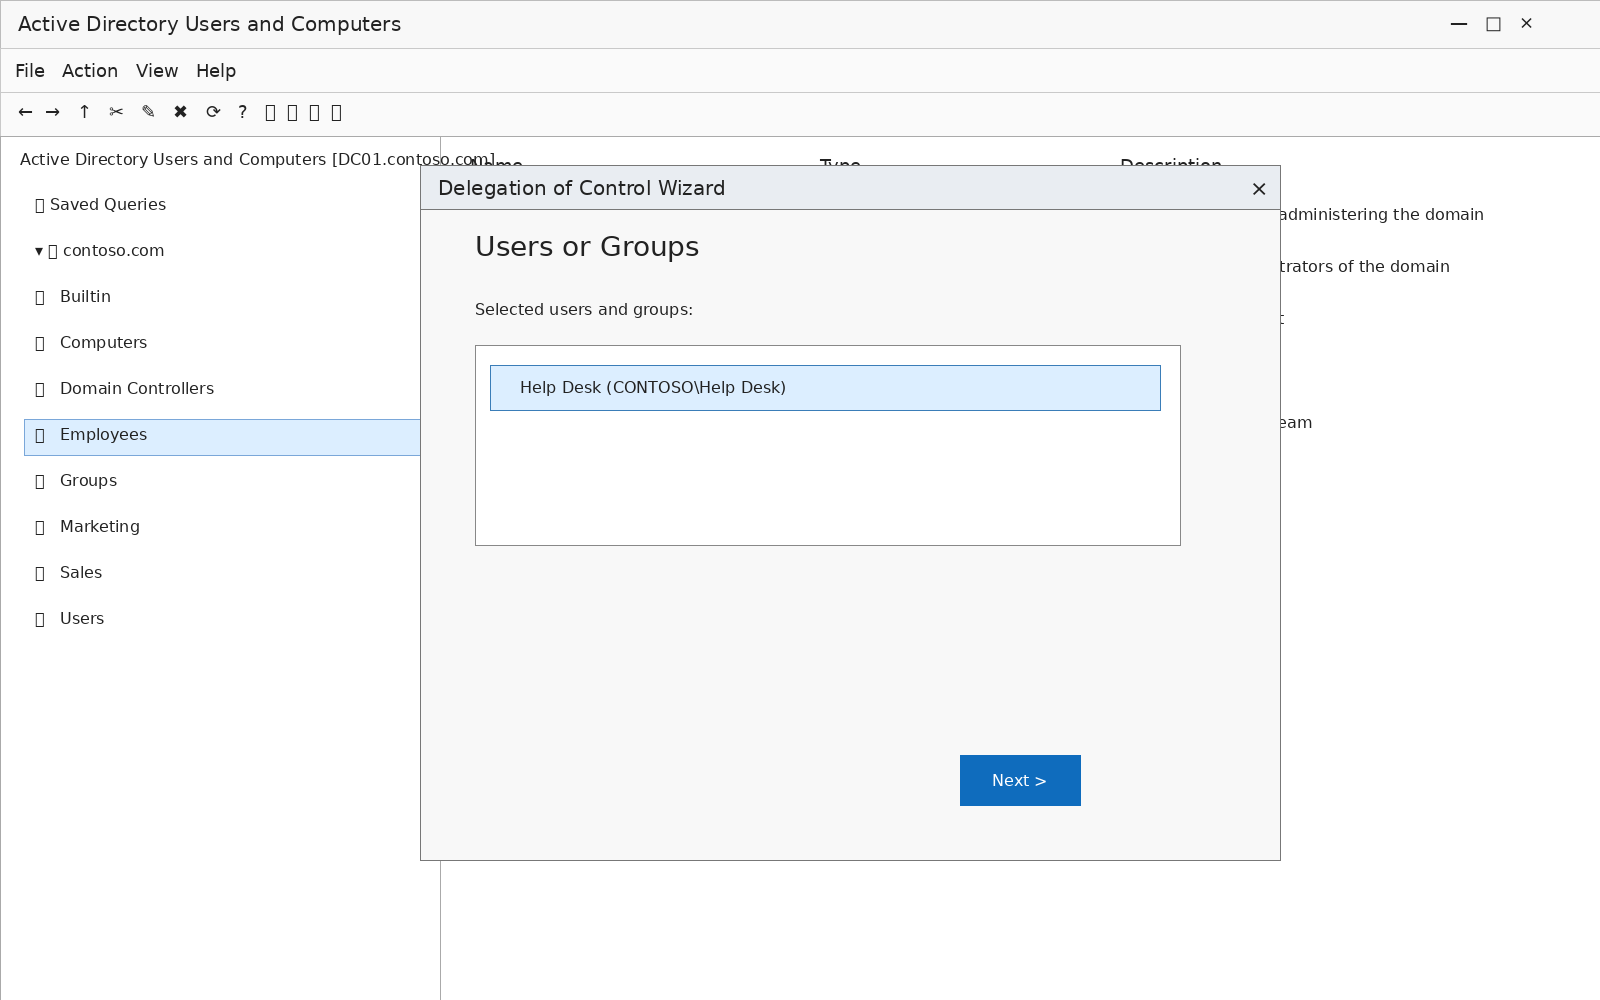
The wizard writes permissions onto the OU without showing what has already been delegated elsewhere in the directory. Audit the existing state before adding more. See this walkthrough of detecting delegated permissions in Active Directory.
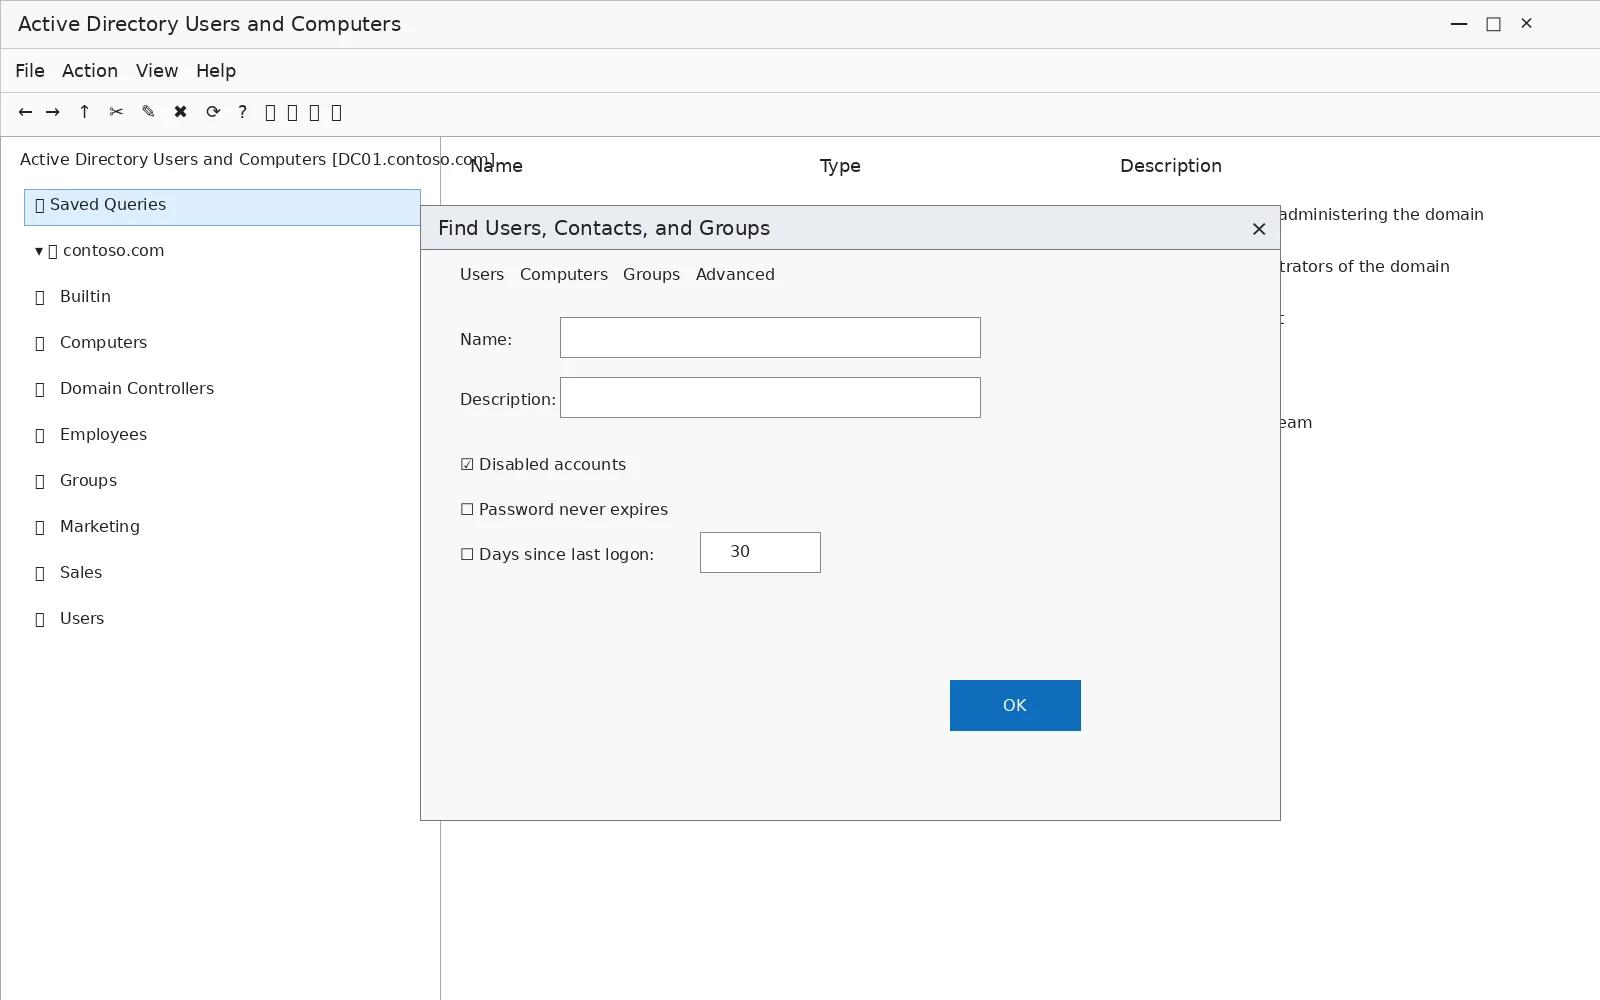
Create and save queries
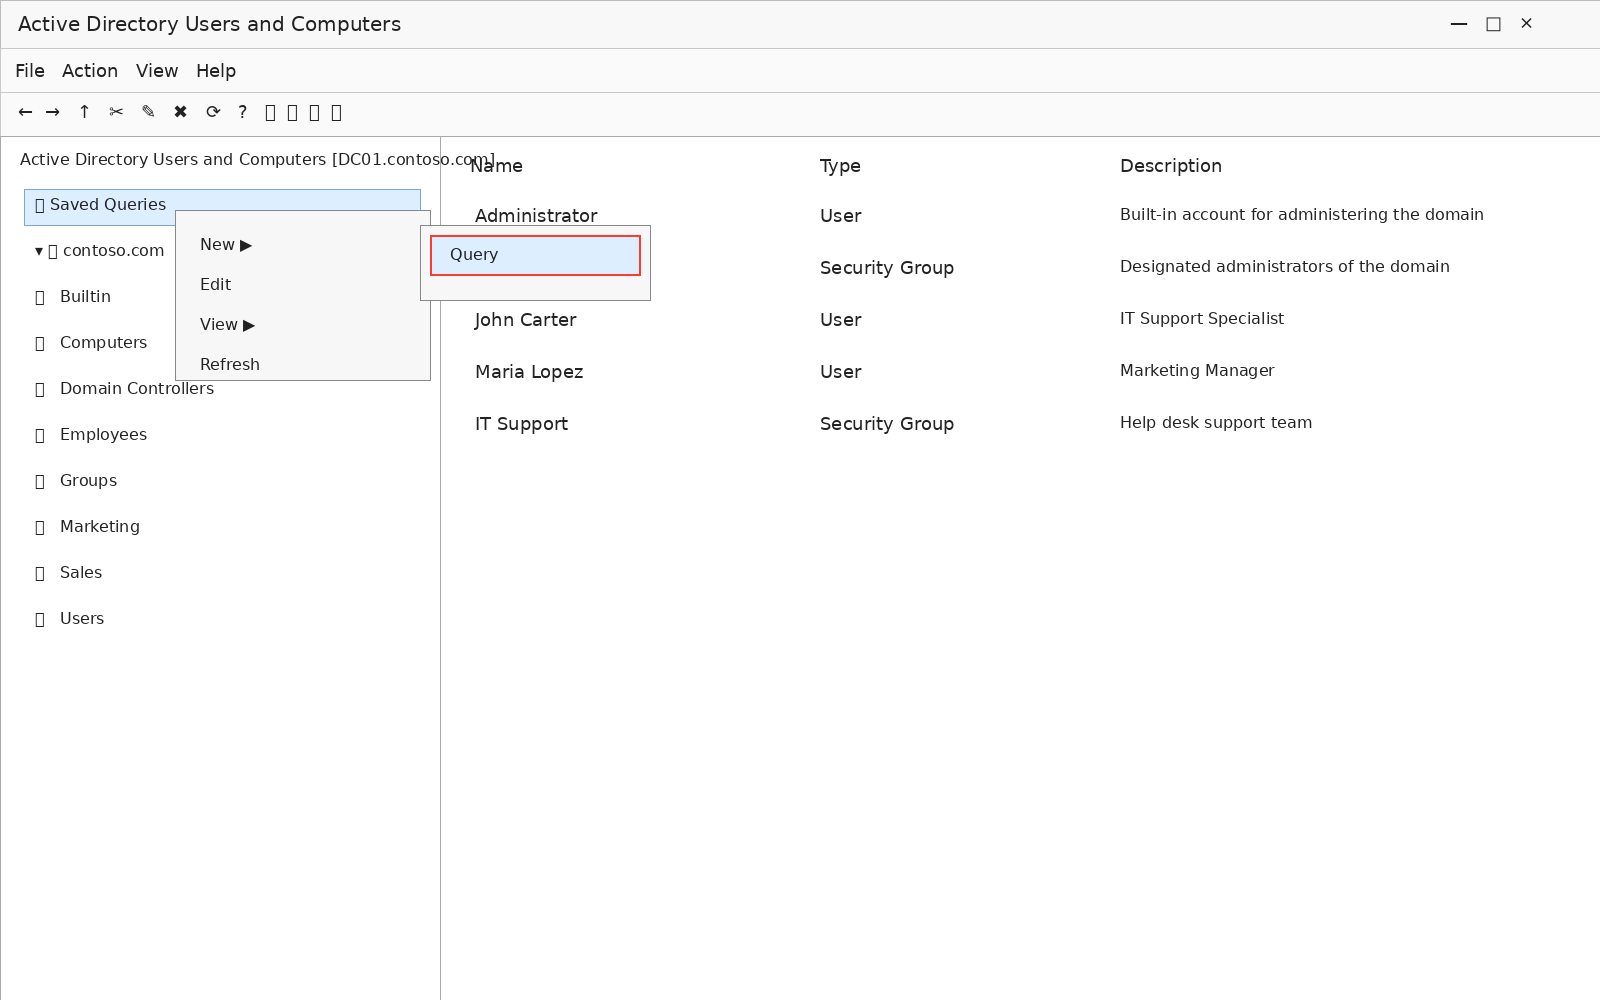
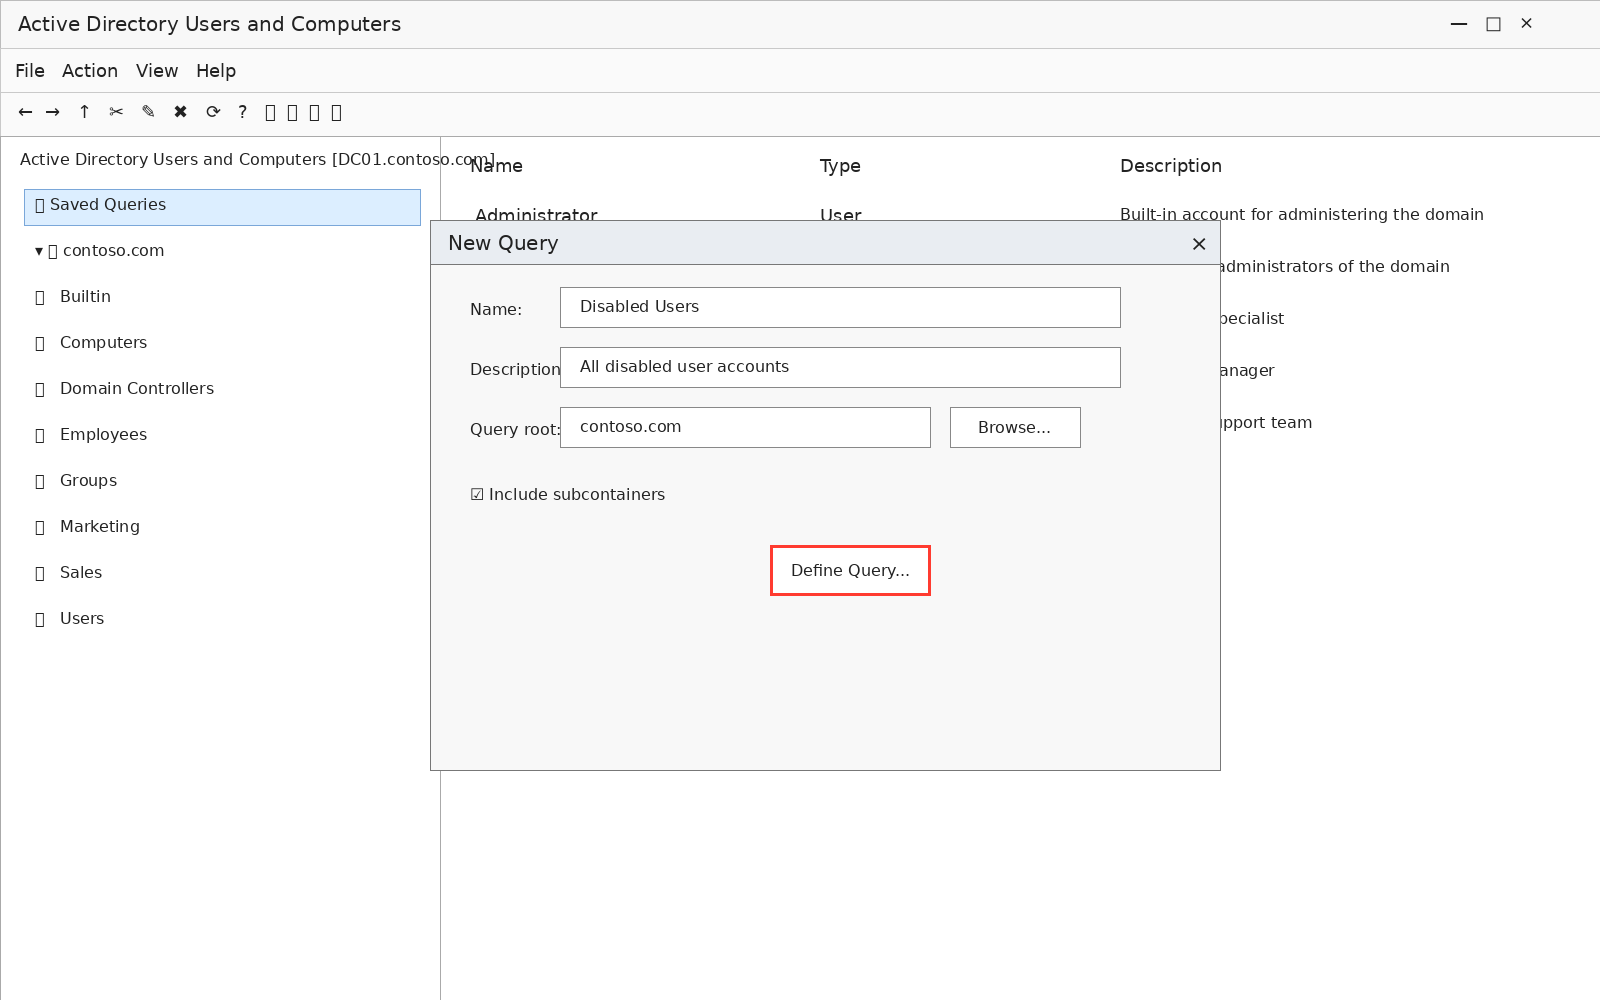
Saved queries hold LDAP filters that persist between sessions and suit work spanning OUs. Administrators use them to pull objects from separate parts of the hierarchy into one flat list for bulk lock, enable, move, and rename operations, or to hold recurring searches such as every disabled account in a domain.
- Right-click the domain or OU you want to search and select New > Query.
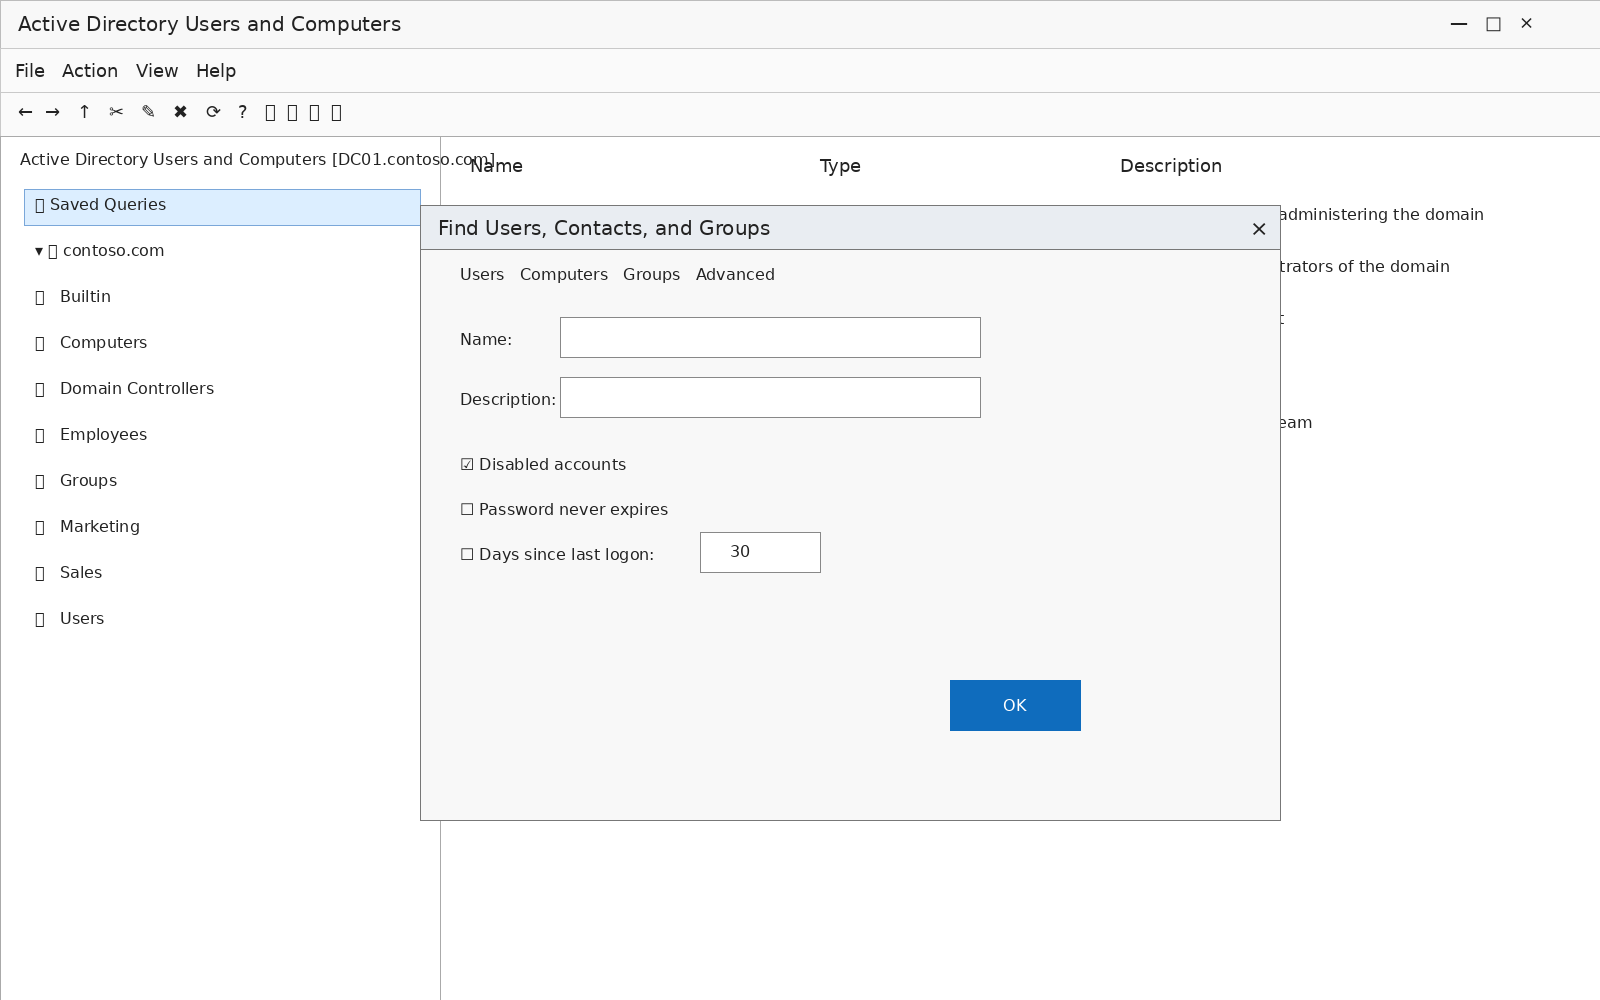
2. Provide a name and description. The Browse button changes the OU the query covers, and Define Query opens the dialog for the filter itself.
3. Use the Find dropdown to select a query type, such as users, contacts, and groups; computers; printers; shared folders; organizational units; a common query; or a custom search.
4. Use the Users, Computers, or Groups tab to set the filter. The Users tab filters on disabled accounts, non-expiring passwords, and days since the last domain logon. Click OK to create the query.
How ADUC compares with the Active Directory Administrative Center and PowerShell
RSAT installs ADUC, the Active Directory Administrative Center, and the PowerShell module against one directory, and the choice between them comes down to how many objects you are touching.
Capability | ADUC (dsa.msc) | ADAC (dsac.exe) | AD PowerShell module |
|---|---|---|---|
|
Best for |
Single-object edits, browsing the OU tree |
Recycle Bin restores, fine-grained password policies |
Bulk changes, repeatable work |
|
AD Recycle Bin |
Not available |
Available |
Available via cmdlets |
|
Fine-grained password policies |
No interface |
Full interface |
Available via cmdlets |
|
Shows the underlying cmdlet |
No |
Yes, in the PowerShell History pane |
Not applicable |
|
Record of your actions |
None |
None |
The script is the record |
ADUC remains the fastest way to handle one user or one group, which is why it stays open on most admin desktops. Anything touching more than a handful of objects belongs in PowerShell, where you can review a script before it runs.
How Netwrix helps with delegated directory management
ADUC assumes the person at the keyboard is a trained administrator holding rights across the directory. That assumption is what makes delegation awkward. Handing the helpdesk password resets for one OU means running the Delegation of Control wizard, which writes permissions into the OU with no record of who asked or why. Declining to delegate is how routine resets queue behind a handful of administrators.
Netwrix Directory Manager takes the two highest-volume tasks off that path. End users reset their own passwords through self-service rather than opening a ticket, and group membership follows attribute-based rules instead of a technician editing the Members tab by hand. Both cover Active Directory and Microsoft Entra ID.
Netwrix Auditor supplies the record the console never writes, capturing directory changes with before-and-after values in a searchable trail, which is how AppRiver keeps employee access privileges in check across 250 users and six domains.
Put a record behind what ADUC delegates
Getting the console onto a workstation is now a solved problem, which moves the real work downstream. Read back what the Delegation of Control wizard has already granted across your OUs. Then decide which of those grants should have been a request rather than a standing permission. Directory permissions accumulate because nothing in ADUC pushes back when they do, so the review has to come from somewhere else.
Request a demo to see how Netwrix Directory Manager and Netwrix Auditor turn ADUC delegation into a governed, auditable process.
Frequently asked questions about how to install and use Active Directory Users and Computers (ADUC)
Share on
Learn More
About the author

Tyler Reese
VP of Product Management, CISSP
With more than two decades in the software security industry, Tyler Reese is intimately familiar with the rapidly evolving identity and security challenges that businesses face today. Currently, he serves as the Vice President of Product Management for the Netwrix Identity Product Portfolio, where his responsibilities include evaluating market trends, setting the direction for the Identity product line, and, ultimately, meeting end-user needs. His professional experience ranges from IAM consultation for Fortune 500 companies to working as an enterprise architect of a large direct-to-consumer company. He is CISSP certified.
Learn more on this subject
Uncovering indirect attack paths to virtualized domain controllers in Azure
Health IT can't move imaging to the cloud. Here's how to keep on-prem systems compliant.
Intune still can't bare-metal image a device, and other things nobody told IT
The AI agent working for you probably has more access than you do
One config changed. Nobody noticed.